Do you have a sweater you love but no longer wear? Let me show you how to turn that sweater into upcycled seasonal decor you’ll cherish year after year.
I’ll admit, I might be a little infatuated with ghosts this season—I’ve already made two types of DIY budget-friendly ghosts.
**Some of the links in this post are affiliate links. This means if you click on the link and purchase the item, we will receive an affiliate commission at no extra cost to you. We appreciate your support. (disclosure policy)
Still, when the Handcrafted Society Challenge announced that this month’s theme was to upcycle a sweater, I knew exactly what I wanted to create.
My own version of the Pottery Barn–inspired ghost in a cloche.
Here’s my take on it!

Isn’t it fabulous!
I’m loving it, and I think this upcycled sweater craft is the perfect way to add a bit of vintage flair to my Halloween decor!
If you’re new here, the Handcrafted Society is a group of talented bloggers who come together each month to share projects based on the same theme.
It’s always fun to see how different our ideas turn out, and at the end of this post, you’ll be able to hop over to their blogs to see their creative ideas!
With all that in mind, let’s take a closer look at why this upcycled sweater Halloween ghost is such a fun and rewarding project—and why you’ll want to make one (or more!) for your own seasonal decor.
Why You’ll Love This Upcycled Sweater Halloween Craft
There are so many reasons to love this project! Here are just a few:
- Budget-friendly – Instead of splurging on store-bought decor, you can repurpose a sweater you already own.
- Eco-friendly – Give new life to old clothing and keep it out of the landfill.
- Pottery Barn inspired – Get the same high-end look for a fraction of the cost with this fun dupe.
- Easy to make – With just a handful of supplies, you can create a ghost in less than an afternoon.
- Unique – No two sweaters are exactly alike, which means every ghost turns out with its own spooky personality!
Let me show you how to transform an old sweater into a ghostly decoration you’ll be excited to display this season.
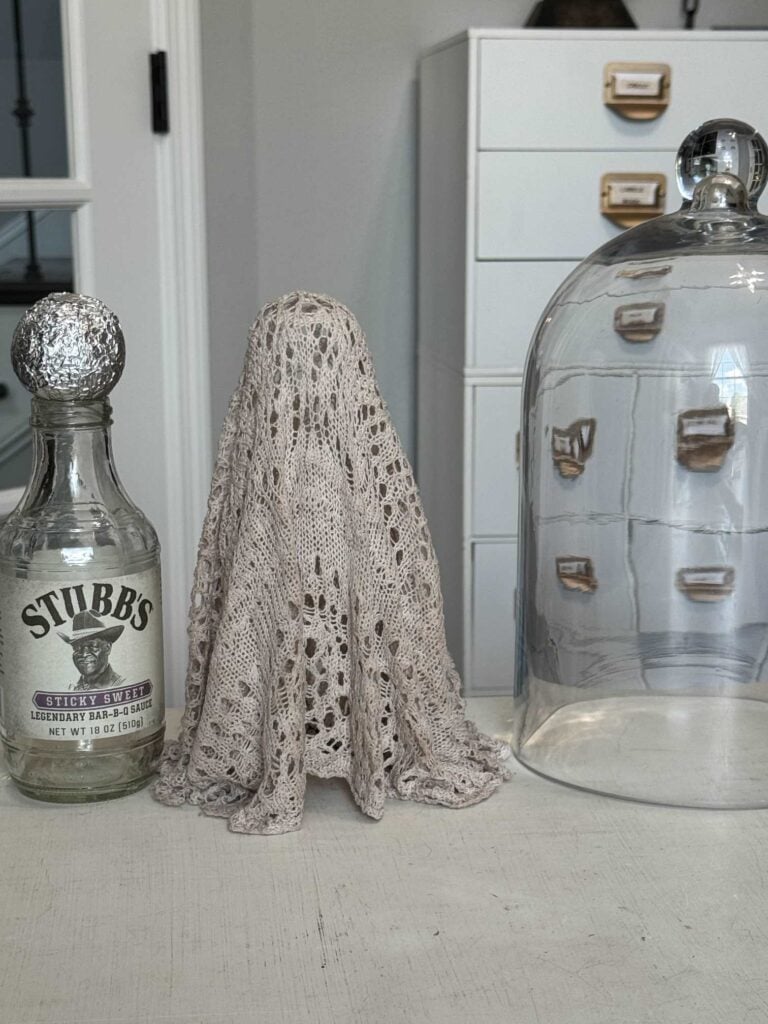
Gather materials

Gather the following materials to complete this project:
- Sweater
- Glass cloche
- Empty glass bottle OR candlestick holder
- Styrofoam ball– 1.9 inch OR make a ball out of aluminum foil
- Ruler
- Scissors
- Fabric stiffening spray OR starch OR 2 parts Mod Podge to 1 part water
- Glass bowl
- Wax paper
- Black felt
- Glue
- Dried flowers-optional
- Black twine-optional
Steps to Turn an Upcycled Sweater into a Ghost
Now that you’ve gathered your supplies, it’s time to turn that old sweater into an adorable ghost.
Follow these simple steps to create your own upcycled sweater Halloween decoration.
1) Create the Ghost Form

Set the Styrofoam ball on top of a glass jar, ensuring the form will fit under your cloche.
2) Cut the Sweater
This is always the most challenging part for me—cutting up a perfectly good sweater!
Even though I haven’t worn this one in years, I still felt a little guilty snipping it up.
But it’s worth it—because this sweater will go from hiding in the closet to being displayed for everyone to see!
So, overcome your fears and grab those scissors!
Measure the height of your jar with the ball on top.
Mine was 9 inches. Multiply that by two (9 × 2 = 18) and cut an 18 × 18-inch square from your sweater.

Trim about 2 inches off the corners, and don’t worry how it looks at this point.
Place the sweater piece over the form and set the cloche on top of it.

If any fabric protrudes, trim it so that it fits neatly inside.
3) Prepare Your Work Surface

Set the ghost form on wax paper to protect your table.
My sweater kept sticking to the Styrofoam ball, so I wrapped it in foil to allow the fabric to move more easily.
4) Coat the Sweater with the Stiffener
I purchased stiffening spray when I made these pretty yarn flowers, and I haven’t needed it since.
So I’m very excited to try it on this project!
Most tutorials for making a ghost in a cloche use a mixture of Mod Podge and water or starch.
If you don’t want to purchase this product, you can try one of those alternatives.

Place the sweater piece in a glass bowl and pour stiffening spray over it.
Work the liquid into the fabric until it’s fully saturated.
5) Drape the Sweater

Arrange the fabric over your ghost form, making sure the bottom doesn’t extend beyond the cloche.
Remove the cloche and let your ghost dry completely.
It took my ghost over 24 hours to dry, but the stiffening spray worked great!
Once dry, remove the sweater ghost from the form and take out the Styrofoam ball.
6) Add a Face

Cut two small eyes from black felt and glue them onto your ghost.
You can also use cardstock or even fabric scraps for the eyes.
Consider experimenting with faces and try different sizes and shapes to give your ghost a unique personality.
7) Add a Dried Flower Bouquet
If you’ve been around here for a while, you know I can’t help but add a little “extra” to my projects!
Since I plan to display my ghost on the mantel next to my DIY neutral fall wreath and vases with dried flowers, I thought she would look fabulous holding a small bouquet.
So, I created a tiny bunch of dried flowers and tied it with black twine.
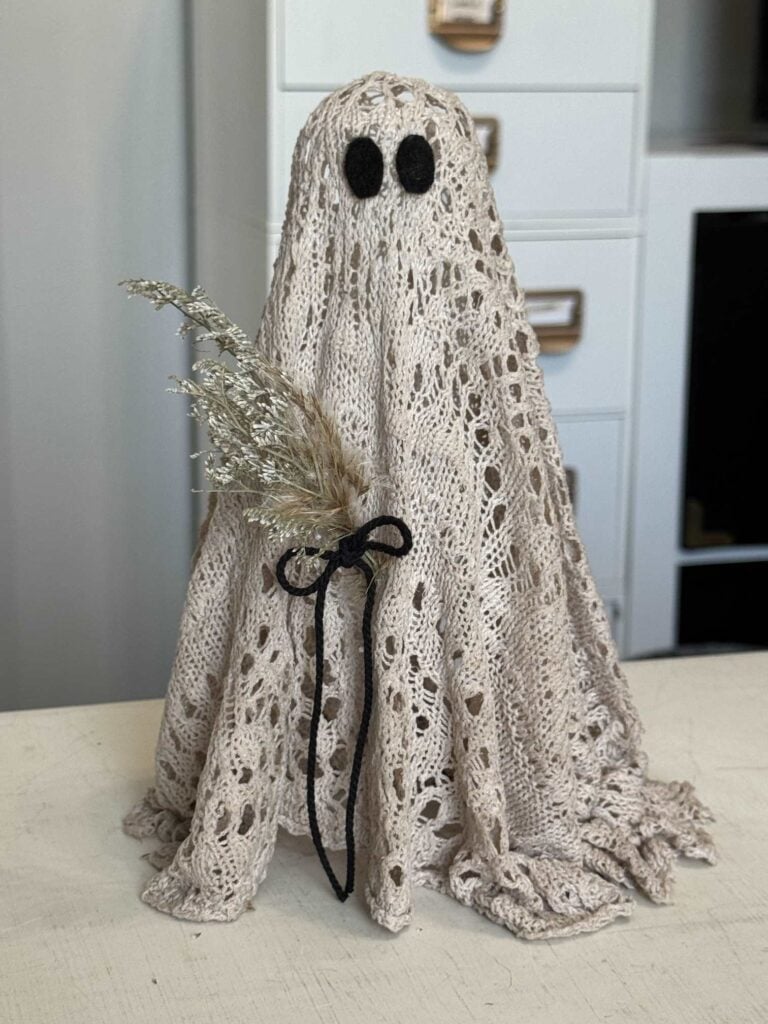
I tucked the stems into a little hole in the sweater so the ghost appears to be holding it naturally.
If that won’t work for you, no worries—just glue it in place.
Either way, this sweet touch adds extra personality and a hint of seasonal charm to your upcycled sweater ghost.
Style your upcycled sweater ghost
Once your ghost is dry and fully assembled, it’s time to show her off!

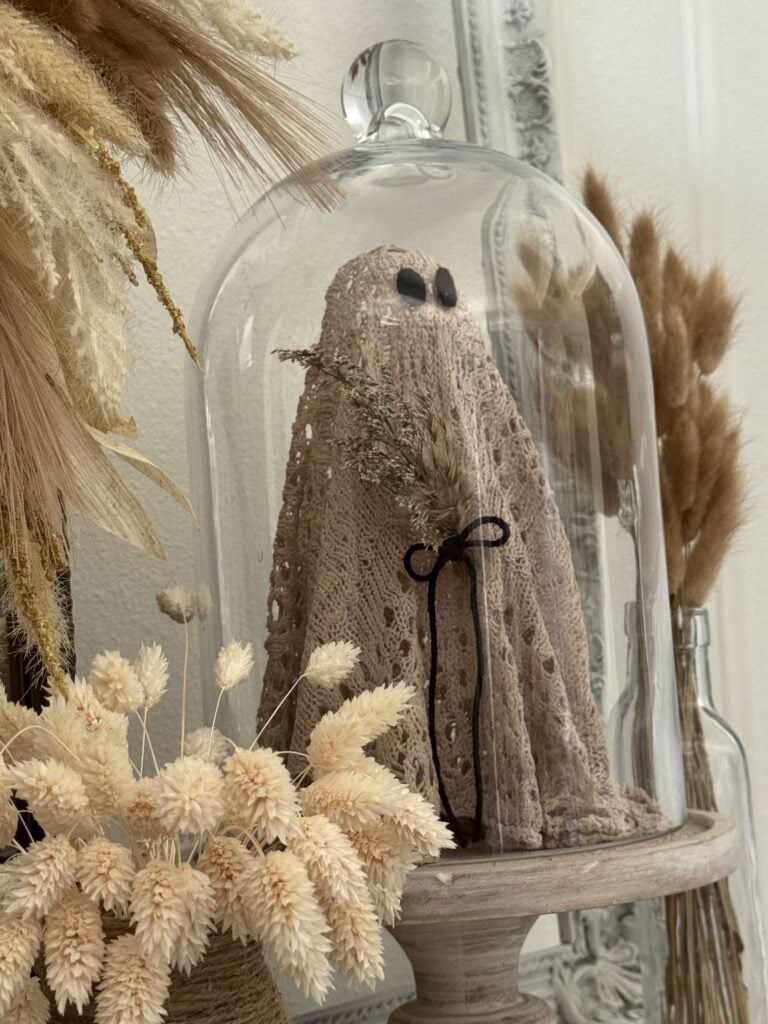
I placed mine inside a glass cloche on our dining room mantel.
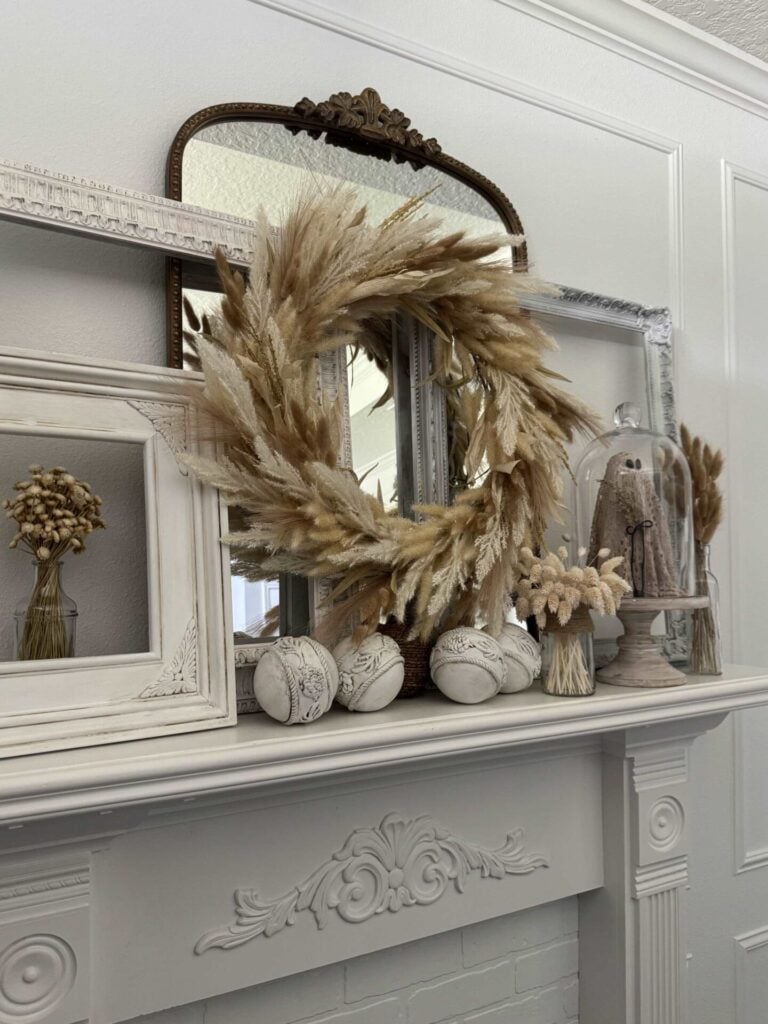
Behind it, a gold mirror with vintage white frames leans against the wall, creating a beautiful backdrop.
A DIY neutral fall wreath hangs from the mirror, adding texture and a touch of seasonal charm.
On either side of the ghost are two vases filled with dried wheat and bunny tails, which inspired the tiny bouquet the ghost is holding.
I have to admit, photographing a ghost inside a glass cloche is trickier than it looks—hello, glare!

Honestly, I like how she looks without the cloche, too, so I wanted to share both views.

This way, you can see all the cute details, from her tiny bouquet to the soft drape of the sweater fabric.
Don’t have a mantel?
Feel free to experiment with different placements—on a console table, a shelf, or even as part of a Halloween centerpiece—to make your ghost truly stand out.
Tips for Making a Sweater Ghost That Lasts
If you want to enjoy your upcycled sweater year after year, keep these simple tips in mind:
- Use plenty of stiffener – Make sure your sweater piece is fully saturated so it holds its shape.
- Let it dry completely – Rushing this step can cause your ghost to collapse. It took over 24 hours for mine to dry completely.
- Store carefully – After Halloween, place your ghost in a box where it won’t get crushed. Wrapping it in tissue paper will help protect its shape.
Final Thoughts

Creating this upcycled sweater ghost was such a fun way to give new life to an old sweater while adding a cozy touch to our seasonal decor.
I still have some sweater material left over, and I’m already dreaming up another project—maybe a few cozy sweater pumpkins!
If you’d like to see what I end up creating, be sure to subscribe to our email list here.
That way, you’ll be the first to know when new DIYs are shared, plus you’ll get access to our free resource library full of organizing printables.
Blessings, Donna And Rich
More DIY Inspiration
If you love making seasonal crafts, don’t stop here! Check out some of our other favorite projects involving old sweaters or ghosts:
- Tips to Make Cozy Home Decor With Old Sweaters
- How to Make a Winter Wreath From Sweaters
- Simple DIY Ghost Apothecary Jars
- Pottery Barn-Inspired DIY Light-Up Ghost
- Join the Ghost Painting Trend to Make Halloween Art
Pin It for Later
Would you like to save this project for your next DIY session?
Just pin the image below to one of your Pinterest boards (hover over the picture and click the red Pin button in the top left corner).
Now, you’ll be able to come back to it whenever the Halloween spirit strikes!

The Handcrafted Society
Don’t forget to check out the fabulous projects from my friends at the Handcrafted Society!
It’s always inspiring to see the different ways we interpret a challenge!
You’ve got to see how they upcycle sweaters – there’s something for everyone to enjoy!


Related Posts:


**Some of the links in this post are affiliate links. This means if you click on the link and purchase the item, we will receive an affiliate commission at no extra cost to you. We appreciate your support. (disclosure policy)
Oh my goodness Donna. I’m not a Halloween person at all. This is the cutest and most upscale ghost ever!! I love it!!! This is going to go viral. Outstanding project!!
Hi Cindy! Thanks so much, you just made my day with your nice comment! I hope you’re right about it going viral, wouldn’t that be great! Thanks again!
Donna, this ghost project is just too much fun! I love the easy process, so I’m thinking I will have to make a sweater ghost too. The addition of the dried flowers and bow is brilliant! Pinning!
Hi Michelle! Thank you very much! I’m so happy you like my cute little ghost and hope you will make one! Let me know if you do!
Oh my word, Donna, I love this so much! I look forward to your Halloween decorations every year but this one might just be my favorite of all. I can’t wait to make this for the littles. They are going to lose their minds in the best possible way. Thanks for the inspo and the easy to follow step by step. You’re right, it’s fabulous! Hugs, CoCo
Thank you, CoCo! I’m thrilled with how it turned out and I think it’s my new favorite too! I know how much you and your family enjoy Halloween and have a fun party every year! I can imagine a ghost in a cloche as the centerpiece on your holiday table! Happy fall my friend!
OMG Donna…ADORABLE!! That’s the cutest, non-scary ghost I’ve ever seen!! What a way to use an old sweater…so cute!!
Thank you Rachel, I think she’s adorable too and I’m so glad I cut up my sweater now! Have a great day!
Donna, I think your ghost is just boo-tiful! So creative and he looks charming under the glass. Because isn’t that where all ghosts belong? Thanks for joining us today with this clever project.
You are so right Wendy, she is boo-tiful! I don’t think I would have ever thought to do this if you hadn’t challenged us to create something with a sweater! Thanks for letting me participate in this amazing group!!
Donna, I must say that I absolutely love your holy ghost (no punt intended). It’s is adorable! Girl, you are so creative.
Hi Tammy! Thanks so much! I didn’t think about her being a “holy” ghost, but she sure is, lol!! Happy fall to you!
I am not much of a Halloween person but this is one project I can see doing to make my home a bit “festive” for the season. Such a creative idea Donna!
I’m so happy you like her Lynn, I hope you’ll try it! Super fun to make! Thanks and have a great day!
Oh my! That little ghost has just captured my heart. So clever and cute!!! Donna you really excelled on this one. I can’t wait to make one of my own. I’m not really that much of a Halloween gal, but this is the kind of decor I can really get behind.
Thank you Diane! She really is a cutie! I hope you’ll try and make one, let me know if you do!!
Hi, Donna! The hosts and I couldn’t stop thinking about your DIY Ghost in a Cloche project! I’m excited to tell you this post is being featured in Whimsy Home Wednesday Link party this week! Thanks for joining us, and I hope to see you at the party this week! Pinning! https://www.artsandclassy.com/whimsy-home-wednesday-no-152-edition/
Hi Meredith! So glad you all liked my cute ghost! It’s always an honor to be featured at your party! I’ll see you there! Have a wonderful week!