Have you ever found a decor item you loved, but it was the wrong color? Did you know you can transform it with paint? We’ve done it several times, and it has led to some incredible thrift store makeovers!
We had a great deal of fun treasure hunting this summer at thrift stores and yard sales as well.
**Some of the links in this post are affiliate links. This means if you click on the link and purchase the item, we will receive an affiliate commission at no extra cost to you. We appreciate your support. (disclosure policy)
While most of our finds just needed a thorough cleaning before we could display them, others required a bit of creativity to fit our style.
I always say—if you love the shape of an item but not the color, grab it anyway, because paint can work wonders.
Today, we’re sharing four easy ways to transform thrift store and yard sale finds with paint, turning them into pieces that look stylish, expensive, and perfect for our home.
Be sure to stick around until the end of the post, as we’ll show the transformations side by side, and you won’t believe how different they look now!
Here are the tutorials.
Makeover 1: Decorative Box with Coasters
Our first treasure is this lidded box filled with coasters.
I’m adamant about using coasters in the living room because nothing ruins furniture faster than water rings.
And since I love home organization, I’m always on the lookout for pieces that are both functional and pretty.
This fabulous find checked both boxes!
The only problem?
The wood was dark and dated, and the small elephant topper on the lid was broken.
Still, I loved that it kept the coasters neat and tidy, so I decided it just needed a quick refresh.
The most exciting part: it only cost $1, so how could I pass it up!
Before – The Original Find
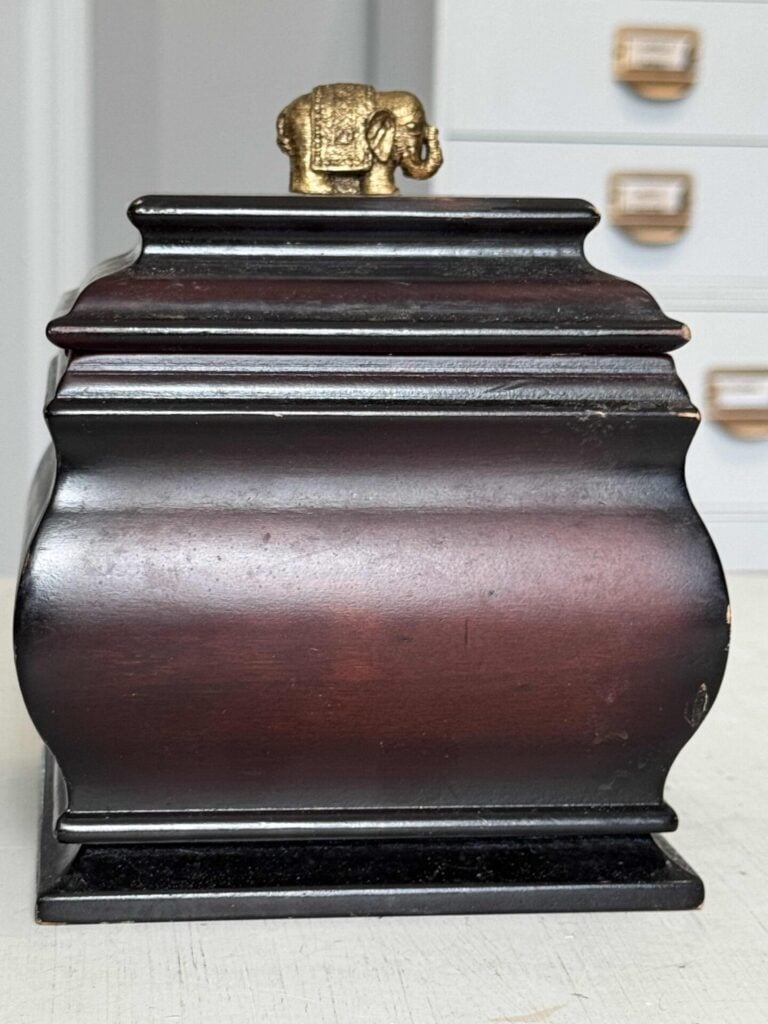
I should have turned the box around so you could see that the elephant’s trunk was chipped off on the back side.
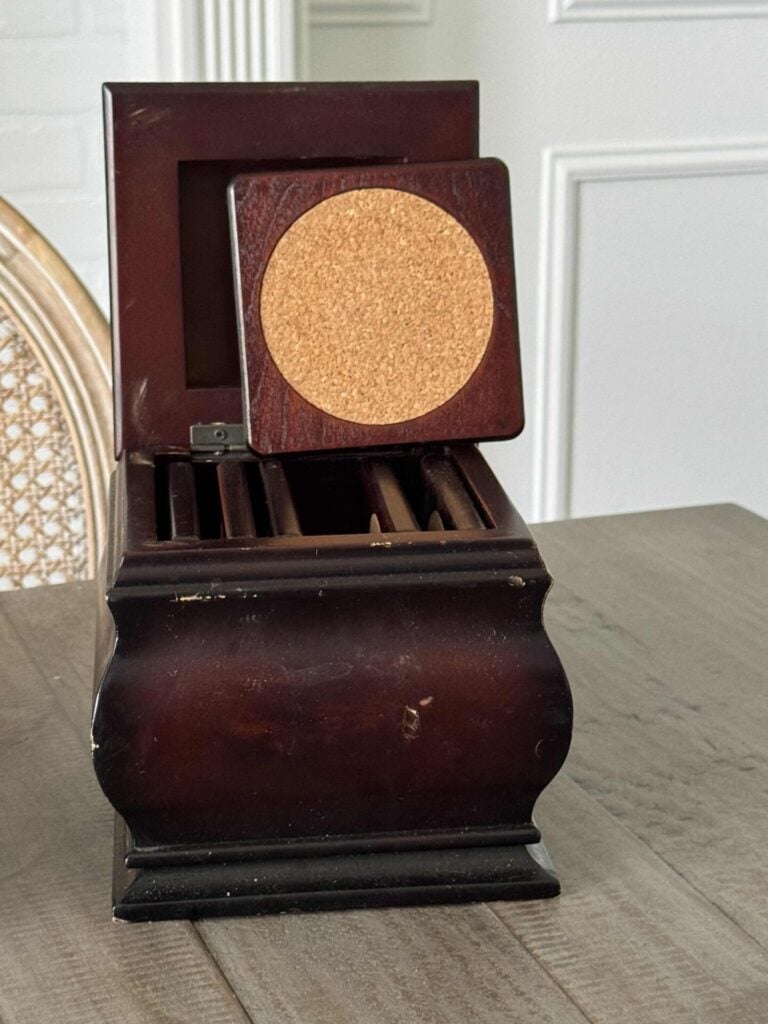
The coasters are in great shape and appear to have never been used.
Step-by-Step Painting Technique
Gather materials
- Lidded box with coasters
- Heat gun
- Pliers
- Screwdriver
- Cleaner (I used Dixie Belle White Lightning)
- Annie Sloan Chalk Paint in Louis Blue
- Paintbrush
- Annie Sloan Clear Wax + wax brush
- Lint-free paper towels
- Annie Sloan sanding sponge (medium grit)
- Tack cloth
- Decorative knob- Hobby Lobby
- Hacksaw with a metal cutting blade
- Drill with a metal bit
- E6000 glue
Remove the old topper and hardware

The broken elephant topper had to go, so Rich heated it with a heat gun, then carefully pulled it off with pliers. After that, I used a screwdriver to remove the lid from the box, allowing me to work more easily.
Clean the box
This piece was filthy, so I gave it a good cleaning with Dixie Belle White Lightning, then wiped it down with water. Prepping your surface makes a huge difference in how well the paint adheres.
Paint and wax

I painted the entire box with Annie Sloan Chalk Paint in Louis Blue. It took three coats to achieve the desired coverage.
Once the paint dried, I applied Annie Sloan Clear Wax with a wax brush, then removed the excess using a lint-free paper towel. This step not only protects the finish but also gives it a nice, soft sheen.
Distress

To give the box some character, I lightly distressed the edges with an Annie Sloan sanding sheet (medium grit), then wiped it clean with a tack cloth.
Add a new topper and hardware

I found a pretty metal knob at Hobby Lobby to replace the broken elephant. Since it wasn’t a standard fit, Rich helped modify it—he sawed off the screw with a hacksaw, drilled a hole so it would sit securely on the peg attached to the lid, and I glued it in place with E6000. Finally, I reattached the lid to the box with the original screws.
Styling the Finished Box + Coasters

Now the box looks fresh and stylish while still being practical.

I placed it on the table between our couch and chaise lounge in the living room, and the Louis Blue paint ties in perfectly with the DIY framed artwork I made for our bookshelves.
Are you excited to see more thrift store and yard sale makeovers?
Here goes number two!
Makeover 2: Decorative Orbs
We found four decorative orbs for just a couple of dollars.
The raised leaf and pinecone details made them perfect for fall, but the dark finish felt outdated.
I knew a lighter look would bring out the design and make them a great seasonal accent.
Before – The Original Find

I thought these were pretty, but I wanted to brighten them up with a completely different look!
Step-by-Step Painting Technique
Gather materials

- Decorative orbs
- Waverly Chalk Paint in White
- Paintbrush
- Mason jar lid (to hold the orb steady while painting)
- Annie Sloan Clear Wax + wax brush
- Valspar Antiquing Wax + paintbrush
- Lint-free paper towels
Clean
I cleaned the orbs with soapy water, rinsed, and dried them.
Paint

To make painting easier, I set each orb inside a mason jar lid to keep it from rolling around. I painted the top half first, let it dry, then flipped it over and painted the other side. I repeated this process three times to get full coverage.
Wax

Since I wanted to highlight the leaf and pinecone details, I decided to antique the orbs. First, I brushed on a coat of clear wax. Then, working in sections, I applied antiquing wax and wiped away the excess with a lint-free paper towel. This technique left just enough dark wax in the crevices to make the design stand out beautifully.
Styling the Finished Orbs

Once finished, I styled the orbs on my mantel, which I had decorated for early fall.

They look gorgeous grouped together under the DIY fall wreath I made, adding the perfect touch of seasonal texture and warmth.
Our thrift store and yard sale makeovers are not finished yet. Here is number three!
Makeover 3: Decorative Box & Candlesticks
Several months ago, I found an interesting decorative box at a thrift store for $3.
I adored the fleur-de-lis on the sides and thought the lion heads were a pretty detail, but I wasn’t sure where I would use it.
So, it sat on the corner of my desk for weeks until inspiration finally hit!
You see, a few months later, we came across two candlesticks with matching lion heads at a yard sale for just 25 cents each.
As soon as I saw them, I knew they would pair perfectly with the box—and I also knew exactly where they belonged: in our son’s Haunted Mansion–themed bedroom!
Before – The Original Finds

Can you believe how great these items look paired together?
Did you notice that one of the candlesticks has significantly more gold on it than the other?
I’m not sure what’s going on with that, but we’re going to make all three pieces match.
Step-by-Step Painting Technique
Gather materials
- Decorative box and two candlesticks
- Screwdriver
- Annie Sloan Chalk Paint in Athenian Black
- Paintbrush
- Rub ’n’ Buff in Gold Leaf
- Small paintbrush
- Annie Sloan Clear Wax + wax brush
- Lint-free paper towels
Remove hardware from the box and clean
First, I pulled out the old velvet lining from inside the box (it was gross, and it also covered the screws that were holding the lion’s heads on). Then I unscrewed the lion heads, the topper, and the four feet from the bottom (I couldn’t remove the fleur-de-lis emblems). Once everything was disassembled, I washed the box and candlesticks with soapy water and gave them a good rinse.
Paint

Using Annie Sloan Chalk Paint in Athenian Black, I painted the inside and outside of the box, as well as both candlesticks. The rich black was perfect for creating a dramatic base, and it only took two coats.
Apply Rub ’n’ Buff
To highlight the details, I used Rub ’n’ Buff in Gold Leaf. With a small paintbrush (and gloves to protect my hands), I carefully applied it to the box hardware and the raised details on the candlesticks.

Look how much brighter the lion on the left looks after applying the Rub’ n’ Buff!

Can you believe how the gold accents make the designs pop beautifully against the black paint?
This step is a little time-consuming, but it’s worth it!
Wax

Once the paint and gold accents were finished, I sealed everything with Annie Sloan Clear Wax. I brushed it on, then wiped away the excess with a lint-free paper towel for a smooth finish.
Reattach hardware

After the wax cured, I screwed the lion head, topper, and feet back onto the box.
Styling the Finished Set

I displayed the finished set in our son’s Haunted Mansion–themed bedroom, on a small half table next to an antique rocking chair.

The black and gold combination adds just the right touch of spooky elegance to the room’s atmosphere.
And last, but not least, here is our final makeover for the day!
Picture Frame Makeovers
As I mentioned earlier in the post, I created some DIY framed artwork for our living room makeover a while back, and I thought it would be fun to make a smaller version to sit on our mantel.
I already had one small frame at home, but I needed two more to complete the set.
During our trips to the thrift store and yard sales, I found a cute little frame for $1.50 and an oval frame for just $1.
Such a bargain!
With three frames of varying sizes, I was ready to give them a fresh look that would coordinate with my other artwork.
Before – The Original Find

All three of these frames are pretty, but I’m going to paint them to match our living room decor!
Step-by-Step Painting Technique
Gather materials

- 3 frames in varying sizes
- Thin cardboard
- Pencil + scissors
- Waverly Chalk Paint in White
- FolkArt Metallic Paint in Pure Gold
- Annie Sloan Chalk Paint in Louis Blue
- FolkArt Paint in Medium Gray
- Paintbrushes (various sizes)
- Wood appliqués in three sizes- Hobby Lobby (small, large, could not find medium to link)
- Wood glue
- Lint-free paper towels
Prep frames
I took the frames apart and cleaned each one. Then, I traced the shape of each piece of glass onto thin cardboard and cut out the inserts. These will serve as the backgrounds for the artwork.
Paint

I painted all of the frames and wood appliqués with Waverly Chalk Paint in White, applying three coats for full coverage. Then, I painted the cardboard pieces with Annie Sloan’s Chalk Paint in Louis Blue.

Once the frames were dry, I used a small brush and FolkArt Pure Gold metallic paint to highlight the raised details, applying two coats for richness.
Distress

When the appliqués were dry, I distressed them with FolkArt Medium Gray paint. Using a tiny brush, I applied gray into the indented areas and wiped away the excess with a lint-free paper towel.
Attach embellishments

I reassembled the frames with the blue cardboard inserts, then glued a wood appliqué to the center of each frame.
Styling the Finished Frames

I think these sweet frames look fabulous in our living room!

They look perfect on our mantel, and since it’s fall, I styled them with neutral leaves and pumpkins for a cozy seasonal touch.
I’m so happy with how our yard sale/ thrift store picture frame makeovers turned out!
Before & After Thrift Store Makeovers
One of my favorite parts of a thrift store makeover is seeing the transformation side by side.
It’s amazing what a little paint can do!
Here’s a look at how each project went from dated to stylish:


Do you have a favorite before-and-after?
Tell me in the comments, or share your own thrifted makeover story!
Closing Thoughts
These four thrift store makeovers prove that a little paint can completely transform outdated pieces into stylish decor that fits seamlessly into your home.
From coasters in a refreshed box to gilded candlesticks, lightened-up orbs, and elegant picture frames, each project started as a budget-friendly find and ended up looking like something you’d see in a boutique.
The best part is that thrift store makeovers like these don’t require a lot of money—just some creativity, paint, and a willingness to look at thrifted items with fresh eyes.
So the next time you’re out thrifting or browsing a yard sale, don’t pass up an item just because it’s the “wrong” color or feels dated.
With a bit of paint, you can give it a brand-new life and make it something you’re proud to display in your home.
If you enjoy the blog, please sign up for our email list so you won’t miss any future posts!
Until next time, follow us on Pinterest, Facebook, and Instagram!
Blessings, Donna and Rich
More DIY Makeover Inspiration
If you enjoyed seeing how we turned these thrifted treasures into stylish home décor, you’ll love these other DIY makeovers too!
Each one started as something ordinary (or even a little outdated) and with a bit of creativity, became a piece we’re proud to display in our home.
- Beautiful Bed Tray Makeover With a Surprise
- How to Easily Makeover an Old Lamp
- Table Set Makeover With Paint and a Stencil
- Simple Basket Makeover With Paint
- Makeover a Porch Swing With Four Steps
Pin It For Later
If you enjoyed these makeovers, be sure to pin this post so you can find it later and share it with a friend who loves a good DIY project!
Just click the red Pin button in the top left corner to pin the image to one of your Pinterest boards!

Related Posts:


**Some of the links in this post are affiliate links. This means if you click on the link and purchase the item, we will receive an affiliate commission at no extra cost to you. We appreciate your support. (disclosure policy)
I adore a good before and after, Donna! I love that you have a completely fresh feel to these thrifted items and made them your own. I swear, the power of paint never gets old! Great job on these projects. They’re fabulous! Hugs, CoCo
Thank you! You are right, the power of paint is amazing and it’s so fun to give new life to old objects1
These are all SO GOOD, Donna!! They all turned out so well! I seriously need to start finding things that I can makeover from the thrift.
Thank you! You’re so talented Rachel, I know you would be great at flipping thrift store finds! You should definitely give it a try!