Easily create a DIY memory box with a map from your vacation and turn your travel souvenirs into a keepsake you’ll treasure for years to come. Whether it’s ticket stubs, postcards, photos, or small mementos, a memory box is the perfect way to preserve those special moments.
This project is part of the Handcrafted Society, where a group of our talented blogger friends share creative DIY ideas each month based on a common theme.
**Some of the links in this post are affiliate links. This means if you click on the link and purchase the item, we will receive an affiliate commission at no extra cost to you. We appreciate your support. (disclosure policy)
This time, we were tasked with creating something using either new or old paper maps.
Crafting With a Map

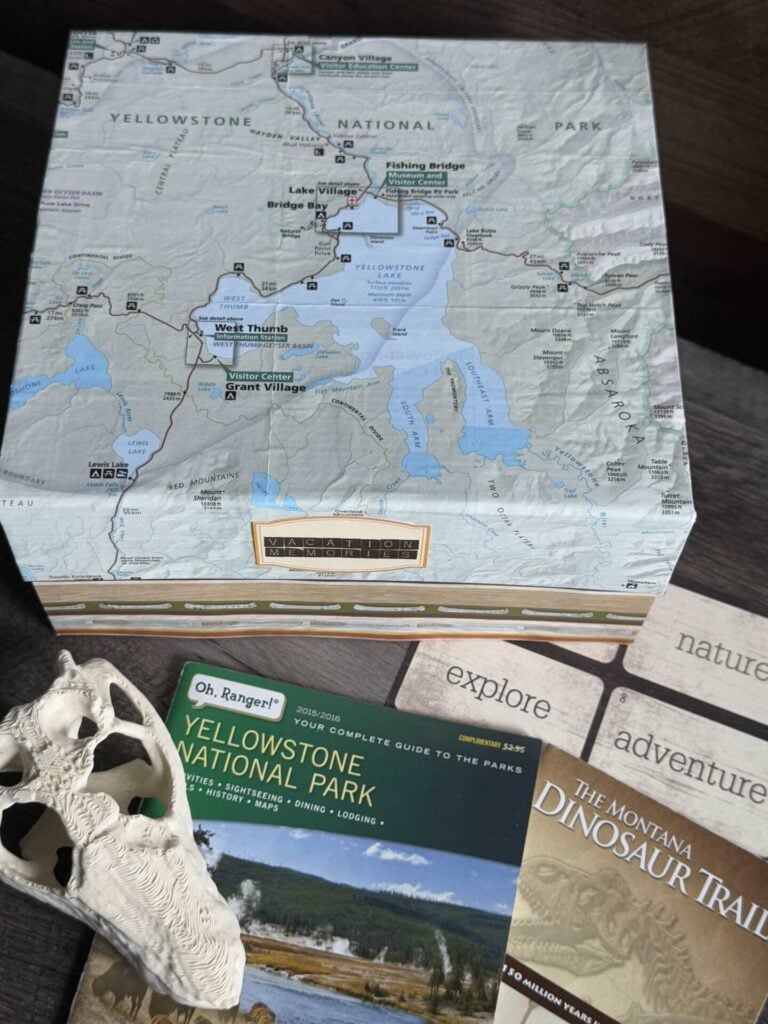
For this project, I used a map from our trip to Yellowstone National Park to add a personal, handcrafted touch to a box.
I love this idea because creating a memory box is a meaningful way to relive your favorite travel moments.
Instead of letting your souvenirs sit in a drawer, this simple project helps you display and preserve them with intention.
It’s a fun and meaningful way to relive your adventures every time you open the lid.
We’re excited to show you how we created this fabulous DIY memory box, and then you can hop over and check out what our friends have made using maps!
Their creativity never ceases to amaze me!
Gather Materials

If you’d like to make a DIY memory box, here’s everything you’ll need to get started:
- Map
- Box- Hobby Lobby
- Fabric
- Scrapbook paper- 2 pieces of printed paper that coordinate
- Scissors/paper cutter/rotary cutter
- Cutting mat
- Measuring tape/long ruler
- Hot Glue gun and glue sticks
- Finger protectors
- Mod Podge
- Paintbrush
- Craft knife
Steps to make a DIY memory box with a map
Follow these simple steps to create your personalized memory box using a map from your vacation:
1) Choose a Box
Start with a sturdy box—something that’s large enough to hold your keepsakes but easy to store on a shelf or display.

I originally planned to use a basic white photo box, but while browsing at Hobby Lobby, I stumbled upon this white magnetic flap box that ended up being the perfect fit.
The magnetic closure gives it a more finished look and the smooth surface makes it easy to work with.
You can use whatever style of box you like—make sure it’s sturdy enough to hold your keepsakes and has a shape that works well with your map layout.
Tip: A white or light-colored box works best, especially if you’re using Mod Podge with thinner materials. Dark colors may show through once the glue is applied.
2) Select coordinating Materials
Start by choosing a color palette that complements your map.
Look closely at the tones in the map itself—these will guide the rest of your design.

I pulled colors like browns, tans, light blue, evergreen, gold, and burnt orange to create a warm, natural look that not only matches the map but also reflects the earthy tones of Yellowstone.
Once you have your palette, gather scrapbook paper, fabric, sticker letters, and any embellishments you plan to use.
3) Cover the Sides

I chose a rich brown fabric with a subtle design and a soft, suede-like texture.
Honestly, I’ve had it in my stash for so long that I can’t even remember what I originally bought it for—so I was thrilled to put it to good use finally!
Using a hot glue gun, I attached the fabric to the right and left sides of the box.
Be sure to smooth it out as you go so there are no bubbles or wrinkles.
Then, I attached it to the front and back sections of the inside of the box.

Leave the front and back of the outside of the box uncovered for now—we’ll add something to those areas later.
Tip: If you’re using fabric, make sure it’s thin. The suede-like fabric I used looks great, but it added a little too much bulk, and now the box barely closes! A thinner cotton or lightweight material might be a better option if your box has a tight-fitting lid.
Bonus Tip: Be cautious when working with hot glue, especially around the edges of fabric. We highly recommend using silicone finger protectors to avoid burns—they’re inexpensive and a total game-changer for crafting!
Remember, you don’t have to use fabric. You could also cover the sides with scrapbook paper or coordinating wrapping paper using Mod Podge instead of hot glue.
4) Line the inside of the box
Next, we’ll dress up the inside of the box.

I used two different patterns of scrapbook paper—one for the top and another for the bottom—to give it a more finished, custom look.
It’s a simple step, but it makes a big difference when you open the box and see those special touches inside.
My scrapbook paper is thick, so I used my hot glue gun to attach it to the box in sections, but you can use a thin layer of Mod Podge if you prefer.
Be sure to smooth the paper out as you go to keep it looking neat and wrinkle-free.
5) Trim and Position the Map

Now for the fun part—cutting the map to fit your box!
I used a rotary cutter and a long ruler to trim the map so that it would cover the top of the box, wrap around the back, and extend over the small flap on the front.
It took a little measuring and adjusting to get it just right, but it was totally worth the effort.
You should definitely take your time with this step.
Laying the map out first to test the fit before gluing helps avoid mistakes—and makes the whole process go a lot smoother.
Once you’re satisfied with how it lines up, it’s time to attach it.
6) Attach the Map

Now, it’s time to add the map to the outside of the box.
I started with the small flap on the front and worked my way up and over the top, then down the back.
To make it manageable, I applied thin layers of Mod Podge in small sections rather than trying to do it all at once.
After applying a thin layer of Mod Podge, I carefully smoothed the map over the glue with my hands, working out any bubbles as I went.
This slow, section-by-section approach gave me more control and helped me avoid wrinkles.
Tip: Be gentle when smoothing the paper, especially if you’re using an older or delicate map, as it can tear easily when wet with glue.
7) Clean Up the Edges
Once the map is in place, use a craft knife to trim off any excess paper around the edges for a clean finish.

Even though I thought I had measured everything perfectly, I still ended up with a slight overhang on one side of the box—it happens!
To tidy things up, I placed the box on my cutting mat and used a craft knife to trim away the excess paper carefully.
Go slow and use light pressure so you don’t accidentally tear the map or cut into the box itself.
8) Seal the Map
Apply a thin, even coat of Mod Podge over the entire surface of the map using a soft paintbrush.
This will not only protect the map but also give it a subtle, finished sheen.

Don’t panic if the paper starts to bubble up a bit—this is normal!
As the Mod Podge dries, most of the bubbles will flatten out on their own.
Just resist the urge to keep smoothing it once the glue is tacky, as that can tear the paper.
Allow the top coat to dry completely before handling the box, which usually takes about 20–30 minutes.
9) Cover the Front Section Under the Flap

Don’t forget about the front panel of the box that sits under the flap—it’s small but still visible when the box is closed.
I used a piece of coordinating scrapbook paper to cover this area and tie it in with the rest of the design.
I avoided covering the spot where the magnets are located since I didn’t want the added thickness to interfere with the box closing properly.
The scrapbook paper I used was quite thick, but if you’re working with thinner paper, you may be able to cover the entire section without any issues.
Just keep an eye on how it affects the closure before gluing it down.
10) Add an Embellishment

To finish the DIY memory box, I added a small emblem to personalize it and hint at what’s inside.
I used sticker letters to spell out the words “Vacation Memories.”
You could use a printed tag, vinyl lettering, or even a wooden cutout, depending on your style.
Feel free to get creative here!
You could include the year, the location of your trip, or even a favorite quote or phrase.
The Finished DIY Memory Box
Here’s a look at the outside of the completed box!
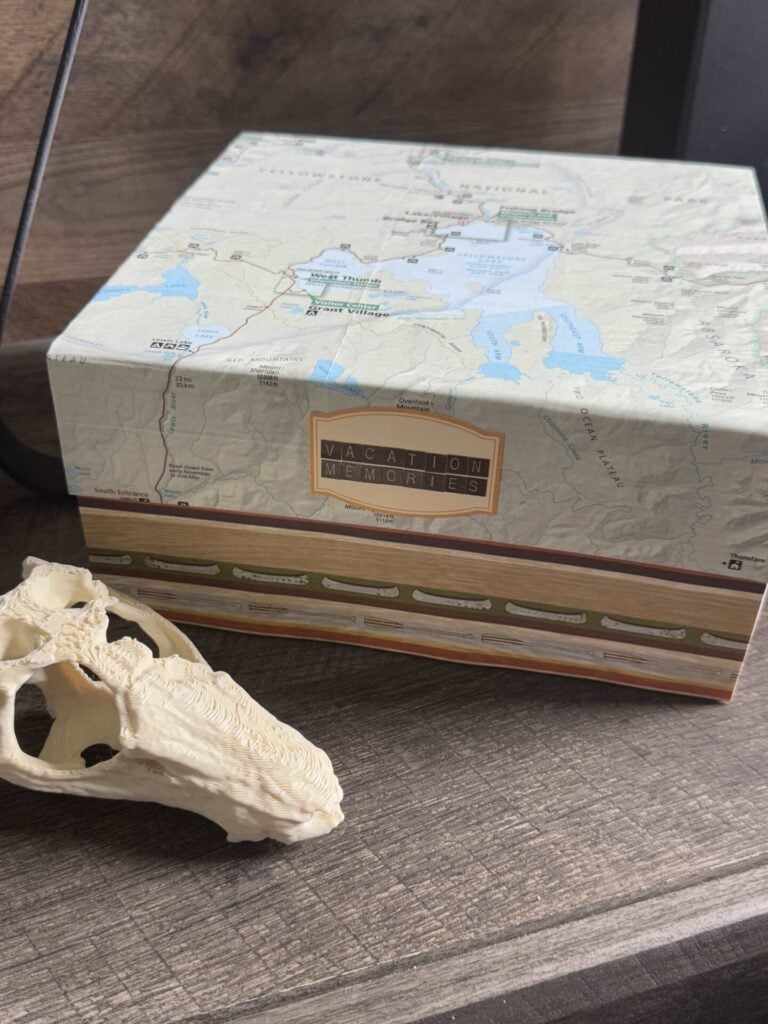
I adore how the map covers the top and back and tells you where we traveled on our trip.
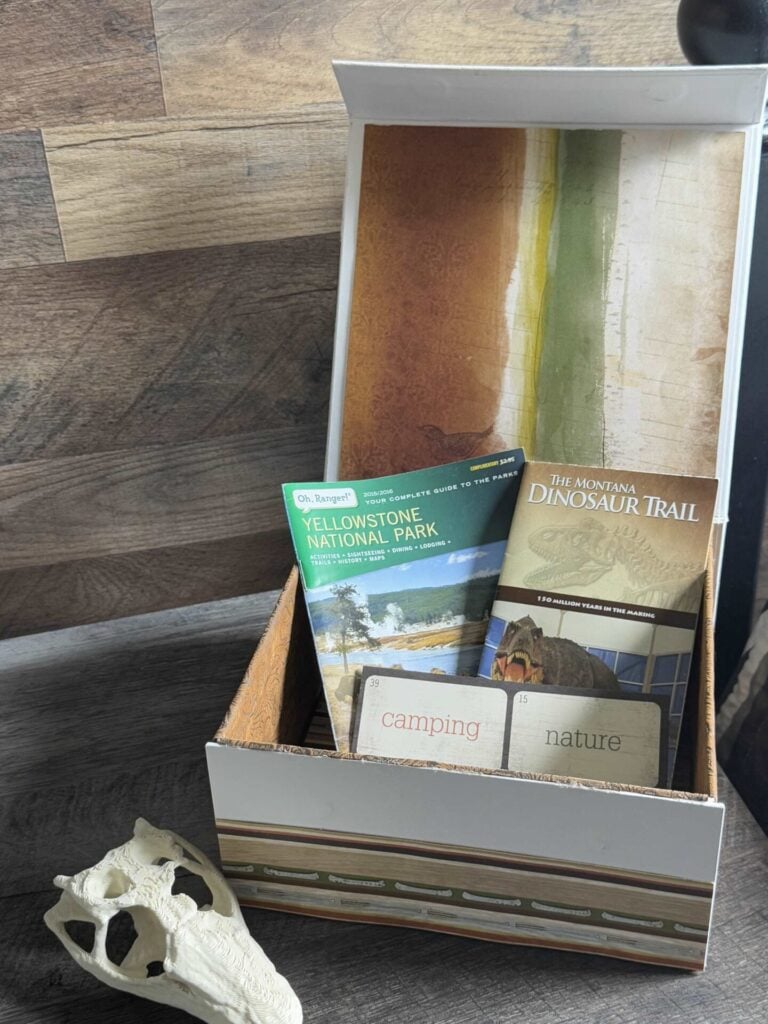
And let’s not forget the inside!

I love how the colors came together, and don’t you think the suede-like fabric adds just the right amount of texture?
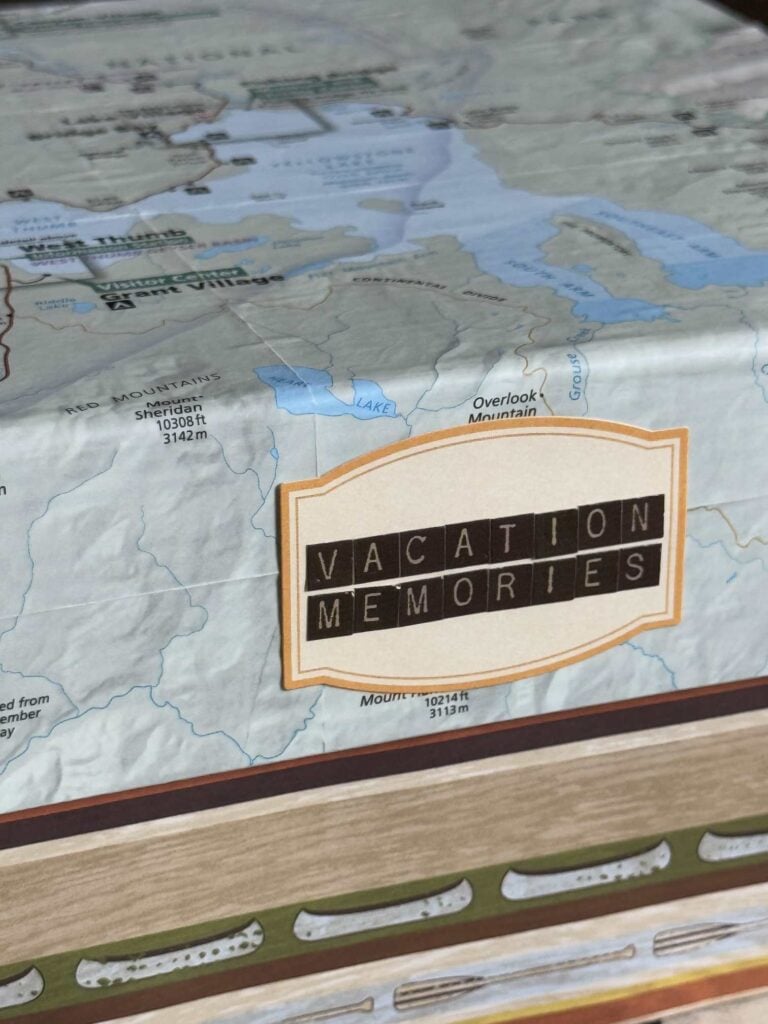
And how about the label on the front?
I think it’s the perfect finishing touch!
I’m so excited to start filling it with photos, souvenirs, and all the little things we collected along the way.
It’s not just a box—it’s a keepsake full of stories!
Ideas for What to Put in Your Vacation Memory Box
Once your DIY memory box is complete, it’s time for the fun part—filling it with all the special keepsakes from your trip!
Think of it as a time capsule that holds the little moments that made your vacation meaningful.
Here are some ideas to get you started:
- Photos – Print out a few of your favorite snapshots or even an entire photo strip from a visitor center or photo booth.
- Maps & Brochures – Include folded maps, trail guides, park brochures, or visitor handouts to remind you of the places you explored.
- Ticket Stubs – Whether it’s for a national park entrance, a guided tour, or a scenic drive, these small slips hold big memories.
- Postcards – Don’t like taking or printing pictures? Include postcards you bought during the trip.
- Souvenirs – Consider keychains, patches, pins, or other small trinkets that don’t require much space.
- Restaurant Napkins or Coasters – A small souvenir from a memorable meal..
- Handwritten Notes or Journaling – Write down favorite moments, funny things that happened, or reflections on the trip.
Final Thoughts

I hope this DIY memory box inspires you to find a creative way to preserve your travel memories.
Whether you’re holding on to ticket stubs, postcards, or a collection of pictures, a handmade keepsake like this transforms those moments into something tangible that you can treasure for years to come.
If you enjoyed this project, be sure to join our email list!
You’ll get access to our free printable library, helpful DIY tips, and seasonal inspiration delivered straight to your inbox.
It’s the best way to stay connected and never miss a creative idea!
And don’t forget to check out the rest of the Handcrafted Society’s creative ideas at the end of this post.
You’ll find even more beautiful and creative ways to use maps—you’re sure to leave inspired!
Blessings, Donna and Rich
Pin it for later
Don’t forget to pin the image below to one of your Pinterest boards (hover over the picture and click the red Pin button in the top left corner).

More DIY inspiration: Using Mod Podge
If you love crafting with Mod Podge as much as I do, here are a few more fun and creative projects to try.
Some are seasonal, but you can always pin them now and come back when the time is right!
- Mod Podge Easter Eggs – Add a custom twist to plastic eggs with pretty napkins or scrapbook paper.
- Decoupaged Pumpkins – A fun fall project using napkins and faux pumpkins.
- DIY Christmas Ornaments – Create beautiful keepsakes with napkins and Mod Podge.
- St. Patrick’s Day Garland – A festive and easy paper craft project.
- Sea Shell Trinket Dishes – Learn to turn seashells into pretty dishes.
The Handcrafted Society
Before you go, be sure to check out all the creative projects from my friends in the Handcrafted Society!
Everyone came up with a unique way to use maps, and I know you’ll be just as inspired as I was.
Click on the blog name or image to hop over to each post.


Related Posts:


**Some of the links in this post are affiliate links. This means if you click on the link and purchase the item, we will receive an affiliate commission at no extra cost to you. We appreciate your support. (disclosure policy)
Donna, I love this idea of a memory box to keep favorite travel memorabilia in it. Your box turned out really pretty. Yellowstone is on my bucket list to visit someday.
Hi Tammy! You have to go to Yellowstone, it’s my favorite National Park, so many amazing sights to see in one place! Thanks so much!
Covering a box like this can seem daunting, but you give such a great “map” to creating it with ease! I love that you lined the inside (such a nice detail), and it looks beautiful with your Yellowstone memorabilia!
Thanks a bunch Missy! It was fun to put together an a great way to use up some of my scrapbooking supplies!
So much fun Donna! I’m glad you pointed out the magnet closure box. Off to Hobby Lobby!!!
Hi Diane! I was so excited when I found that cute box, it is perfect for this project! It would make a wonderful gift box as well! Thanks!
SO special and unique, Donna!! LOVE the map theme this month…how fun!! Love how you used a mixture of paper and fabric, too. It turned out great!
Thanks Rachel, It was such a fun challenge and I was excited to use materials that I already had on hand! Glad you like how it turned out!
This is a great idea Donna and it came out great. I have a ton of scrapbooking supplies left over just like you and I love that you used them here. Great project and fabulous instructions as always. XO- MaryJo
Hi MaryJo! I always get excited when I can use my scrapbooking supplies on a project! They worked so well on this one! Thanks for stopping by!
Donna, what a beautiful box to hold your treasured memories from your trip! I love the thoughtful mix of papers you incorporated—it adds so much charm and character. Thank you for joining in the fun with us this month. It’s always a joy to see your creativity!
Thanks so much Wendy! These challenges are always so much fun and I love that they make me think out of the box! Thanks for heading up this fun group!
What a great project Donna! I love the mix of papers and fabric you’re using plus the magnetic box is just so smart! Over time you’ll have so much fun adding more memorabilia from your vacation adventures! Pinning!!
Thank you Michelle! It really is a fun way to remember such a fabulous trip!
Donna – I think its a sign we are HCS sisters since our projects are usually along the same lines. Did I tell you – one month when I couldn’t participate in HCS, I was going to make yarn flowers. I was chuckling when I saw the HCS projects – because of course – you made yarn flowers. Love your DIY vacation memory box! (Obviously because I made something similar). Thanks for being a HCS sister!
Hi Anna! I’m so happy to be your HCS sister, and yes we definitely think alike! You never told me about the yarn flowers, but I’m not surprised! Can’t wait to see what you create next!
Your memory box looks great Donna. I like the idea of placing items in the box from your trip, what a great way to keep the memories alive. I cannot wait to see what memories you add to this box over time.
Thank you Cara! I’m very excited about this cute little box! It really is a fun way to preserve your memories!