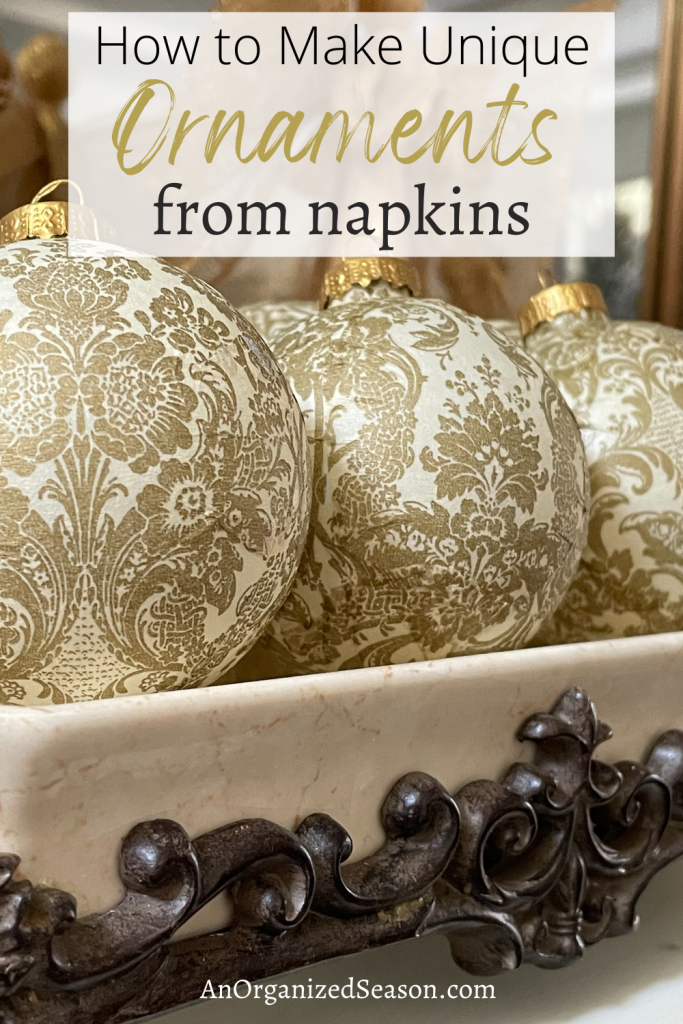
Did you know there’s a super easy and affordable way to make ornaments that will match your home decor perfectly? It doesn’t matter if you’re decorating with red and green, or blue and white, this DIY will work for you! The secret is using napkins. So, find some napkins that match your home decor, get a bottle of decoupage, and let’s make Christmas ornaments that are completely unique to you!

Before I tell you the story of why I made Christmas ornaments with napkins, I have a little surprise for you!
**Some of the links in this post are affiliate links. This means if you click on the link and purchase the item, we will receive an affiliate commission at no extra cost to you. We appreciate your support. (disclosure policy)
I joined up with some of my blogging friends for an Ornament Exchange Blog Hop!
At the end of this post, you’ll be able to click on their links and hop over to see their ornaments!
If you’re visiting us for the first time from the Ornament Exchange, welcome!
We’re so glad you’re here!
Now, back to my story!
why I made Christmas ornaments with napkins
How’s your Christmas decorating going?
I finished mine last week.
Or so I thought I did!

You see, I put these two pretty little trees in my foyer and added fairy lights to them.
I was going for the minimalist look!
The only problem is, I’m not a minimalist, lol!
I tried to like them, but every time I walked through the foyer, I felt like something was missing.
So, I did this.

I added a little sparkle.
After all, the foyer opens to our dining room, and the theme for our Christmas decor is “Tis the season to sparkle!”

While I liked this look better, they still needed something more!
I looked through my Christmas box of gold ornaments, but nothing stood out!
And then, it hit me!
I remembered the elegant decoupage pumpkins I made in the fall and headed toward my napkin stash.
I was sure I had a few napkins left over from that project.
Sure enough, I did!

Just my luck, they match perfectly!
Don’t they look beautiful next to the gold metallic magnolia branches?
Time for another DIY!
Grab the Mod Podge, and let’s get started!
Steps to Make Christmas ornaments
Gather

Gather or purchase the following items to complete this project:
- Glass ornaments -or you can use old ornaments you already have at home
- Napkins -my favorite place to buy unique napkins is Home Goods
- Mod Podge
- Paintbrush
- Scissors
- Metallic paint -I used Folk Art Pure Gold
- Egg carton-optional
Prep

Remove the hangers from the glass ball and set them aside.
I put my ornaments in an egg carton so they couldn’t roll away!

My napkins have three layers. I removed the two white layers from the layer with the design on it.
Cut or tear the napkin into smaller pieces.
How to decoupage Christmas ornaments
Protect your work surface with wax paper.

Paint Mod Podge onto the ornament.

Adhere the piece of napkin to the Mod Podge.
Lightly press the napkin into the glue, do not rub, or it will tear the napkin!

Repeat that process until the entire ornament is covered.

Apply a layer of Mod Podge to one side of the ornament, and let it dry.
Then, apply Mod Podge to the other side and let dry.
paint hangers
While the ornaments are drying, paint the hangers.

First, I tried Rub’n Buff, but the color was too brown.
Instead, I painted the hangers with Folk Art Metallic gold paint.
It took three applications of paint to get good coverage of the hangers.

Put the hangers back onto your ornaments!
And you’re done!
Here’s a reminder of what they looked like before.

Now compare that to the after!
Wow! What a terrific transformation!
See how easy it is to make decoupage Christmas ornaments in any color you want!!!
The finished Project
I think these ornaments are gorgeous!

Let’s hang them on the tree!

The extra ornaments fill out the tree perfectly!

And right when I thought I was finished decorating…

I just noticed I forgot to put candles in the candlestick holders!
I’m going to check out my candle stash, and you need to check out my friend’s ornaments!
Ornament Exchange Blog Hop
I want to say thank you to Juliet from A Loverly Life for putting this Christmas ornament exchange together. Be sure to visit her blog and tell her I sent you!!
Click on the links below to enjoy more DIY Christmas ornament inspiration!
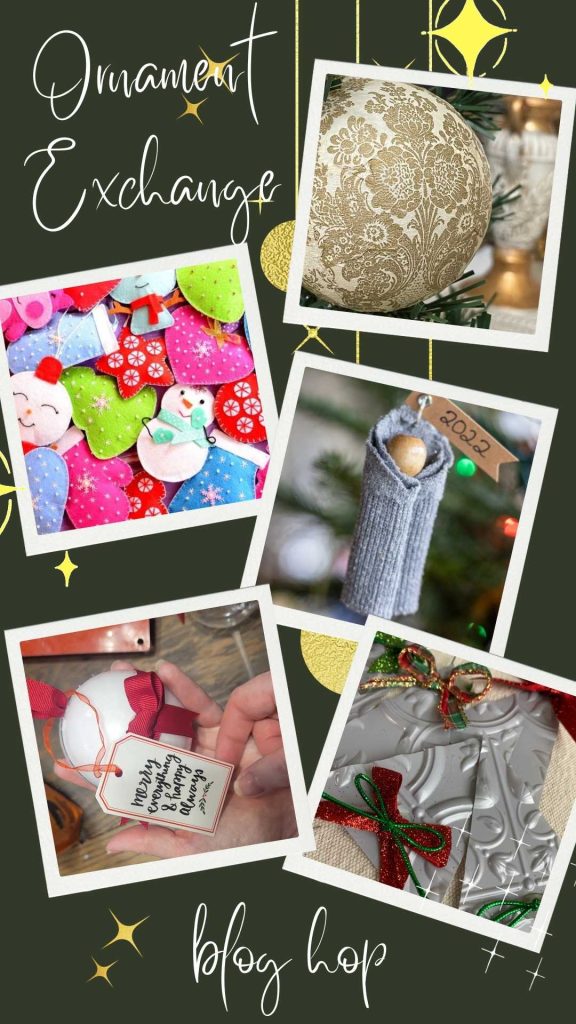
- Juliet~A Loverly Life~ Shower Steamer DIY Ornament
- Sue~Shop at Blu~ Faux Vintage Ceiling Tile Ornament
- Kimberly~From Farmhouse to Florida~Easy Felt DIY Ornaments
- Marie~This Dear Casa~Baby’s First Christmas Ornament
If you enjoy the content here at An Organized Season, please sign up for our email list so you won’t miss a post!
Until next time, follow us on Pinterest, Facebook, and Instagram!
Blessings, Donna and Rich
Pin It For Later
No time to make these now, save this pin for later when you do have the time!
More DIY Christmas Inspiration
Want to see more DIY creations I made to decorate during the holiday season?
- Make Your Own Vintage Ornaments for Christmas
- Beautiful Vintage Cone Christmas Tree DIY
- Rustic Pottery Barn Bell Hack
- How to Create an Ornament Advent Calendar
- Easy Cone Christmas Tree DIY
Get The Look
Items to help you complete this DIY project!

- Mod Podge 10615 3 Piece Short Handle Brush Set
- Clear Plastic Acrylic Fillable Ball Ornament Set
- 15-ct 13×13 Cream Gold Christmas Napkins
- 80-Pack Disposable Paper Towel Cocktail Napkins
- Mod Podge
- Gold Napkins Christmas Paper Decoupage
- Paint Brushes Set
- FolkArt Acrylic Metallic Paint
Related Posts:


**Some of the links in this post are affiliate links. This means if you click on the link and purchase the item, we will receive an affiliate commission at no extra cost to you. We appreciate your support. (disclosure policy)
Such a fun project, Donna!!!
They turned out beautifully and match your decor perfectly!! I love how you painted the hangers to match as well. Merry Christmas!
Hi, Rachel! They were very easy and fun to make! I enjoy doing decoupage! Thank you and Merry Christmas to you and yours!
Great answer but fr a custom look! What did we do without Mod Podge?? Pinned
I know Sue, isn’t Mod Podge wonderful!! You can make so many amazing things with it!
The ornaments look so pretty and your home looks lovely and very sparkly indeed!!
Thank you, JJ! I love to decorate and make things for Christmas! Merry Christmas to you and yours!
Your ornaments look so elegant – thank you for sharing them in the Ornament Exchange blog hop this month!
Wishing you and your family a wonderful Holiday season.
Thank you, Juliet! It was fun “hopping” with you and the other ladies! I appreciate all of the work and time you put into putting this together! Happy Holidays to you!!
Spheres are so hard to cover but you did an excellent job, these look great. Merry Christmas!
Yes, Rachel, decoupaging a sphere can be challenging! That’s why I like to tear the napkin into smaller pieces, so I don’t get much overlap or creases! Glad you like them! Thanks, and Merry Christmas to you!
Donna these ornaments turned out so pretty! I especially like that you painted the caps gold too. Hope you have a Merry Christmas!
Thanks, Marie! I’m very happy with how they turned out! They didn’t look right with the silver hangers, so I was glad I had metallic gold paint at home! Merry Christmas to you!!
Love the way these came together, Donna! They’re really beautiful, totally creative, and definitely make me want to create my own next year. Loving and pining as always sweet friend, CoCo
Thanks! I thought they were really beautiful too! And so easy to make! I hope you’ll try it!
Does it take a long time to line up the pattern so it doesn’t look like a quilt made with scraps? I want to try this but am worried that any napkin with a pattern is gonna be a nightmare to line it up just right.
I did not line up the pattern, and mine turned out beautiful. Try it, I think you will be surprised how good it looks when you’re done!
These are beautiful! I love the napkin design you used. This post will be a feature this week. #HomeMattersParty
So glad you like them! It’s always an honor to be picked as a feature for your party! Thanks and I’ll see you there!