Have you ever wanted to make a DIY St. Patrick’s Day wreath that feels more natural and less store-bought?
I went shopping for a St. Patrick’s Day wreath but couldn’t find anything that matched my style.
**Some of the links in this post are affiliate links. This means if you click on the link and purchase the item, we will receive an affiliate commission at no extra cost to you. We appreciate your support. (disclosure policy)
I’d just about given up on a wreath, and then while browsing Pinterest, I saw something that changed my mind!
It was actually a shamrock centerpiece for a St. Patrick’s tablescape, and when I clicked on it, I discovered it was made by my friend Michele!
I knew right then, I could take her idea and make it my own!
So I went to Dollar Tree and bought this!

A bright green tinsel shamrock!
I had a very clear plan — cover it with leftover grapevine wreath pieces, then wrap some ivy around it for a softer, more organic look.
Sounds easy, right?
Well, as sometimes happens with DIY projects, things didn’t go quite the way I expected.
After a failed attempt with the grapevine, a last-minute pivot, and one “why didn’t I do that first?” moment, this makeover turned into a beautiful DIY St. Patrick’s Day wreath that looks nothing like the original.
If you love budget-friendly projects with a realistic, imperfect journey (and a happy ending), you’re going to love this one.
Supplies for This DIY St. Patrick’s Day Wreath
Gather the following supplies to complete this project:
- Tinsel shamrock- Dollar Tree
- Wire cutters
- Pruners
- Faux ivy garland- Hobby Lobby (buy when it’s 40% off)
- Hot glue gun and glue sticks
- Finger protectors
- Reindeer moss- chartruese, basil
Optional
- Frame
- Posterboard
Remove the Tinsel from the Shamrock
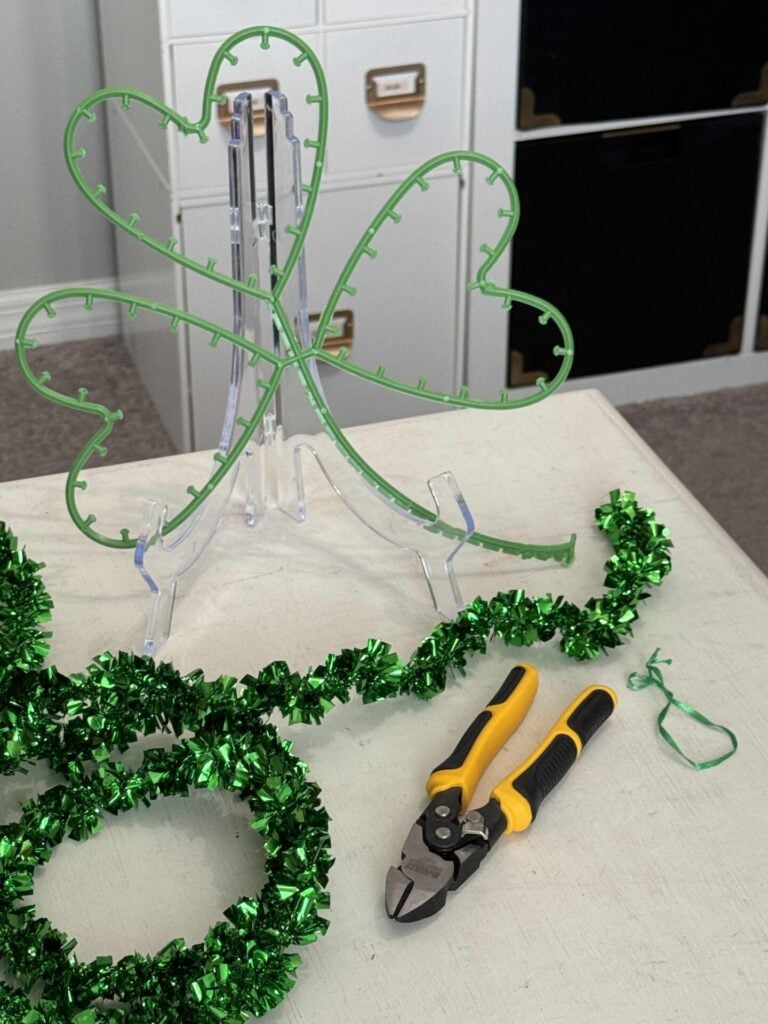
The first step is transforming that bright, sparkly Dollar Tree shamrock into a blank base you can work with.
Using wire cutters, snip the tinsel in several places, then begin to unravel it from the plastic frame.
Once you get it started, the tinsel usually comes off easily.
You’ll be left with a simple shamrock-shaped base ready for its makeover.
My Original Plan (That Didn’t Work)
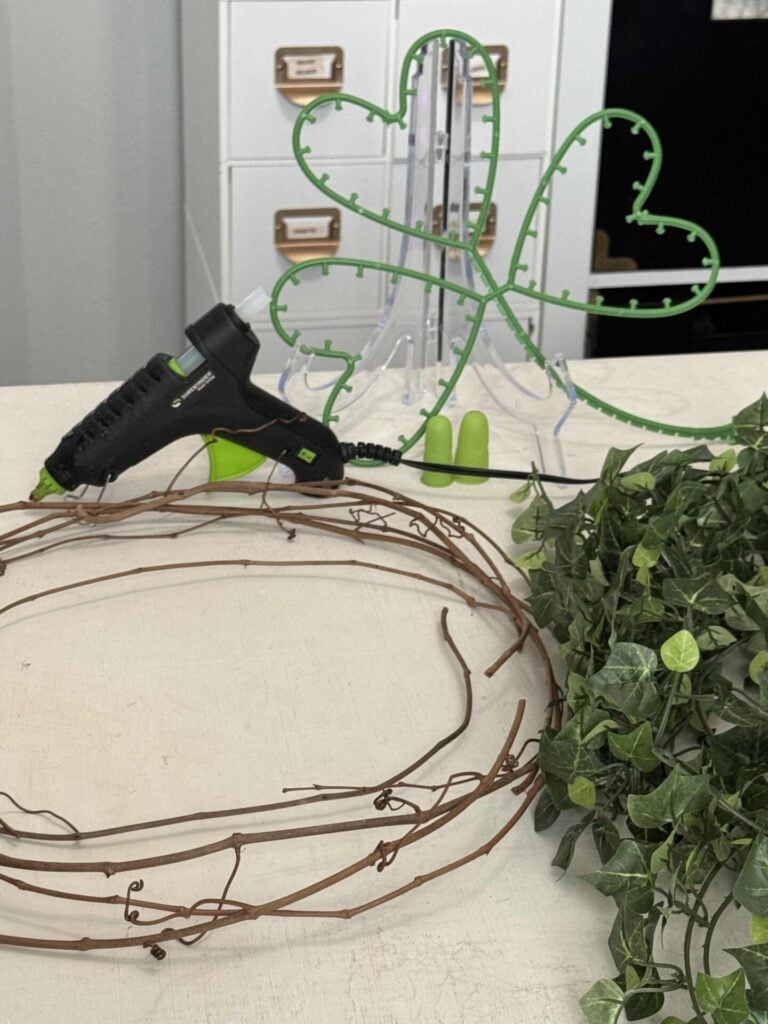
My original vision for this wreath was to give the shamrock a natural, grapevine-style makeover.
I planned to wrap pieces of grapevine around the plastic base to create an organic look — something soft, textured, and much less “Dollar Tree tinsel.”
Unfortunately, the grapevine had other ideas.
Because each shamrock leaf is shaped like a heart, the tight curves made it nearly impossible to bend the grapevine neatly around the form.
It kept springing back, sticking out awkwardly, or refusing to follow the shape at all.
Not ready to give up yet, I tried a second approach and wrapped the ivy garland around the frame instead.
That technically worked, but it created a new problem — the greenery was so bulky that you could barely tell it was a shamrock anymore.
At this point, it was clear my original plan wouldn’t deliver the look I wanted, so it was time for a new strategy.
And honestly, I almost gave up.
But I decided to give it one more try!
Pivoting the Plan – Gluing the Ivy
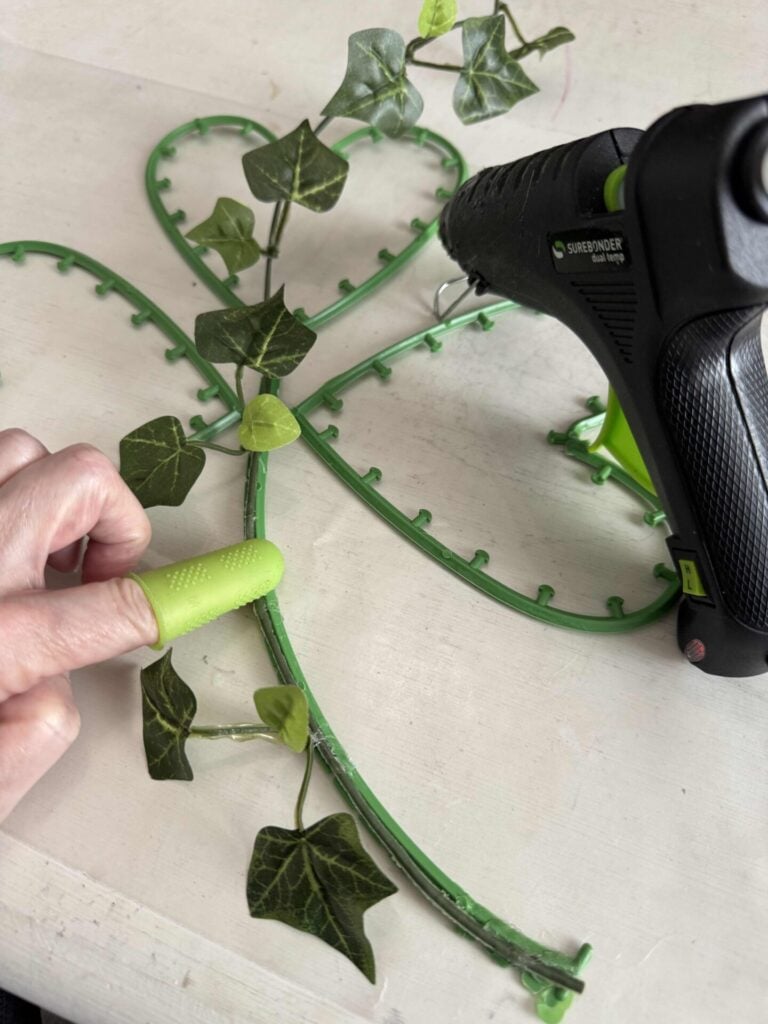
Since wrapping the ivy around the frame made the shamrock lose its shape, I decided to try a different approach — attaching the greenery directly to the top of the base instead.
I cut a piece of ivy garland about six feet long and began hot-gluing it along the wire frame, pressing the stem firmly into place as I worked my way around each leaf of the shamrock.
Using finger protectors was a big help here, since you need to hold the greenery in place for a few seconds while the glue sets (and hot glue burns are no fun).

Once the main length of ivy was attached, I stepped back and noticed several sparse areas where the base was still visible.

To fill those in, I snipped individual ivy sprigs from the garland and glued them into the gaps.
This method took a little more time than simply wrapping the garland, but it kept the shamrock shape defined — and finally started to look like the wreath I had envisioned.
The “Whoops” Moment
Just when I thought things were going smoothly, I noticed something I should have taken care of much earlier — the small plastic pieces sticking out around the edges of the shamrock leaves were still there.
And now they were peeking through the greenery.
Cue the “why didn’t I do that first?” moment.

I grabbed a pair of pruners and carefully snipped off all of those protruding bits as close to the frame as possible.
It definitely would have been much easier to do this before gluing on the ivy, but thankfully, it was still manageable with a little patience.
If you’re making this wreath yourself, learn from my mistake and trim those plastic pieces right after removing the tinsel.
It will save you time — and a bit of frustration — later on.
Sometimes DIY projects have a way of teaching us the order of operations the hard way!
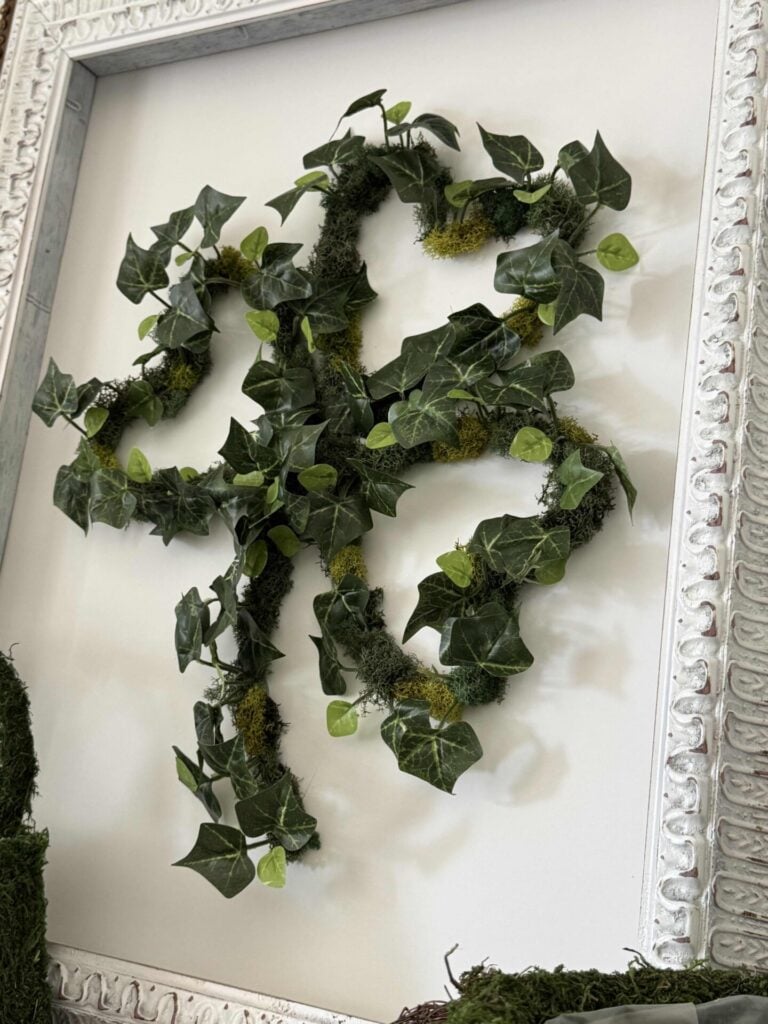
Filling Bare Spots with Moss
At this point, the wreath was definitely taking shape, but you could still see portions of the plastic base peeking through.
I didn’t want to add more ivy because too much greenery would blur the shamrock shape again.
That’s when I remembered my stash of reindeer moss.

I happened to have two different shades of green, which turned out to be perfect for adding both coverage and texture without extra bulk.
Working in small sections, I applied a bit of hot glue to the exposed areas and gently pressed pieces of moss into place.

I alternated between the two colors as I went, which created a more natural, dimensional look and kept the wreath from appearing flat or overly uniform.
This step made a huge difference.
Not only did it hide the remaining bare spots, but it also softened the overall appearance and gave the wreath that organic, finished look I had been hoping for all along.
Sometimes the final detail is what truly brings a project together — and in this case, the moss was exactly what it needed.
Safety note: Hot glue can burn your skin, especially when working with moss, because it can seep right through to your skin. We suggest using silicone finger protectors whenever working with hot glue!
A Small Detail (And a Happy Surprise)

Once I started filling in the bare spots with moss, I realized something — the moss would have completely covered those plastic pieces.
In the end, trimming them wasn’t even necessary.
So if your shamrock form has little plastic connectors around the edges, don’t stress.
You can trim them if you’d like, but if you’re planning to add moss, they’ll disappear anyway.
How to Hang Your DIY St. Patrick’s Day Wreath
Originally, I planned to hang my wreath on an antique frame with a ribbon.
When I leaned the frame up against the mirror on my mantel, you could see that the back of the wreath wasn’t finished.
That wouldn’t do, so I had to come up with another idea.

I decided to mount a piece of poster board to the back of my antique white frame and then attached the wreath to that.
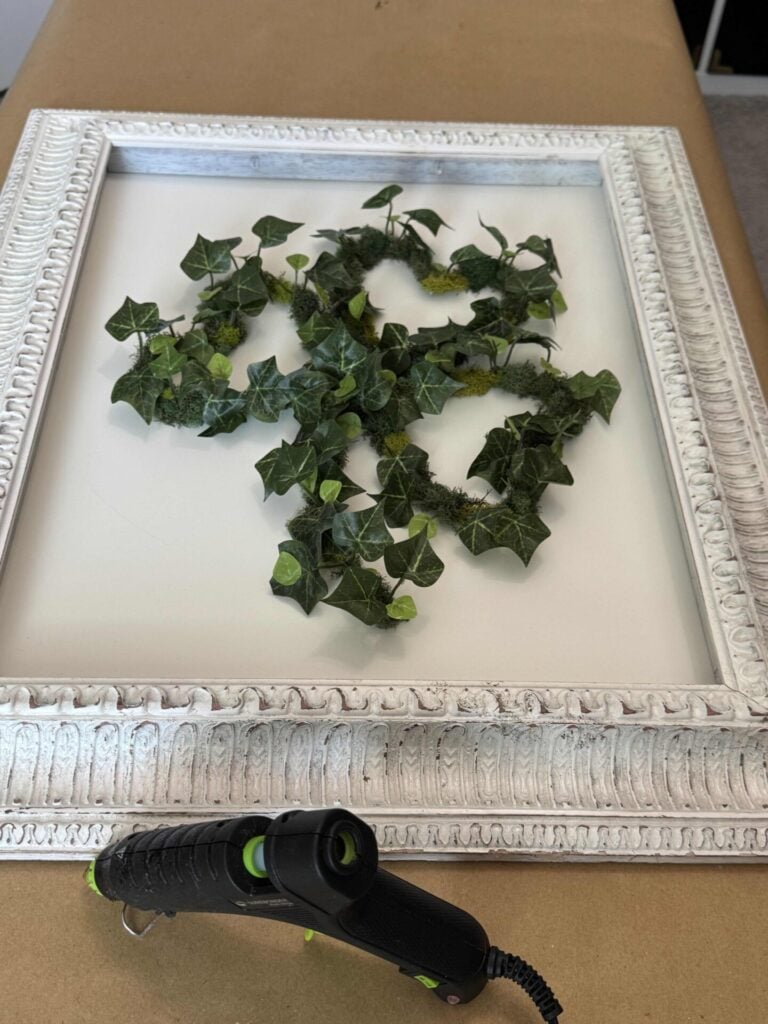
This gave it a polished look and made it easy to display.
If you don’t want to use a frame, there are other options for hanging your DIY St. Patrick’s Day wreath:
- Wreath hanger: Perfect for doors or walls and requires no adhesives.
- Ribbon or twine loop: Tie a loop around the top of the wreath and hang it from a hook, nail, or over-the-door hook.
- Command hooks: Great for walls or doors if you don’t want to make holes.
- Floral wire or zip ties: Secure the wreath to a railing, knob, or frame.
How I styled my wreath
Once my DIY St. Patrick’s Day wreath was finished, I wanted to give it a stylish home on the mantel.

I leaned the white antique frame with the wreath against a gold mirror for a layered, elegant backdrop.

On either side of the frame, I added a moss-covered purse and a faux watering can topped with moss — these little touches helped balance the display and tie in the wreath’s natural, organic feel.

To fill out the mantel, I placed a white wire vase filled with moss balls and a small milk glass bowl holding a single moss ball on one end.
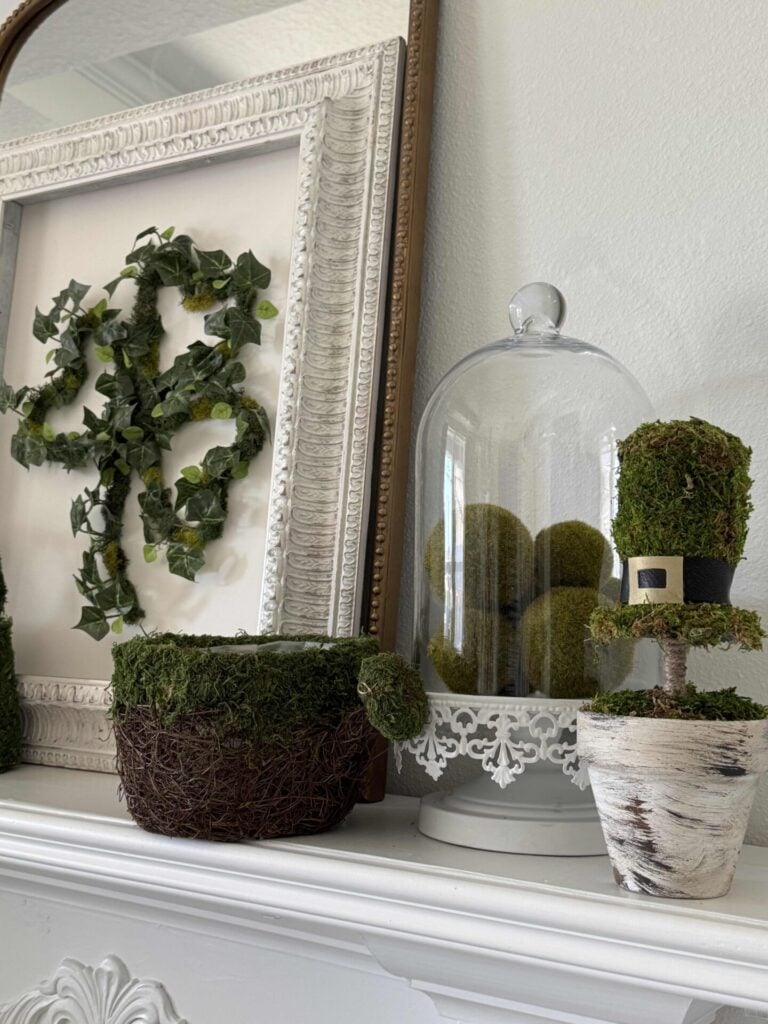
On the other end, I added a white cake stand with a glass cloche containing more moss balls, alongside my DIY leprechaun hat topiary.
Ideas for styling your wreath
If you don’t have a mantel or a gold mirror, your DIY St. Patrick’s Day wreath can still shine. Here are a few ideas:
- Console Table Vignette: Lean the wreath against the wall on a console table and layer in small accents like moss balls, miniature topiaries, or a small lantern. This works beautifully in entryways or living rooms.
- Front Door Display: Hang the wreath on a door with a ribbon, wreath hanger, or a Command hook. Pair it with a simple doormat and a potted plant for a welcoming, festive touch.
- Wall Shelf: Place the wreath on a shelf among framed prints, small plants, or decorative objects. The shamrock shape adds a subtle holiday nod without being over-the-top.
- Gallery Wall: Incorporate your wreath into a gallery wall.
No matter where you place it, the key is to let the shamrock shape and natural textures of your DIY St. Patrick’s Day wreath stand out.
Closing Thoughts
This DIY St. Patrick’s Day wreath started as a simple Dollar Tree shamrock and ended up as a soft, textured, and surprisingly charming piece of seasonal decor.
Along the way, I learned that sometimes the original plan doesn’t work — and that’s okay!
A little pivot, some hot-glued ivy, and a touch of moss turned it into a happy ending, and now I have a wreath that’s both budget-friendly and beautiful.
If you’ve been thinking about adding a handmade, natural touch to your holiday decor, this project is a great way to get started!
If you enjoy the blog, please sign up for our email list so you won’t miss a post!
Until next time, follow us on Pinterest, Facebook, and Instagram!
Blessings, Donna and Rich
More St. Patrick’s Day DIY Inspiration
Here are a few other St. Patrick’s Day DIYs you might enjoy seeing:
- DIY St. Patrick’s Day Topiary (Easy Dollar Tree Makeover)
- Quick and Easy Dollar Tree Shamrock Garland DIY
- Easy DIY St Patrick’s Day Decor Shamrock Upcycle
- Simple St. Patrick’s Day DIY Decor Makeover
Pin It For Later
Don’t forget to pin the image below to one of your Pinterest boards (hover over the picture and click the red Pin button in the top left corner).

Related Posts:


**Some of the links in this post are affiliate links. This means if you click on the link and purchase the item, we will receive an affiliate commission at no extra cost to you. We appreciate your support. (disclosure policy)
Didn’t think i would like it but I do.
Thanks so much! I was worried I wasn’t going to like it either, but I’m happy with how it turned out!! Have a great day!
I’ve had so many of those ‘pivot’ moments! It turned out GREAT!! Love the organic feel that it brings to your mantel!
Thank you Rachel, I was about ready to give up on this one but glad I didn’t! Enjoy the weekend!
Thanks for sharing with us, I’m featuring you when the next To Grandma’s house we go link party starts!
Hi, Tarahlynn! Hope you are doing well! It’s always such an honor to be featured! Thanks and I’ll see ya at the party!