Are you dreaming of a custom feature wall in your living room? Today, we’re sharing how to build a DIY electric fireplace and TV wall to create a stunning focal point in our home!
This is Part 2 of our Living Room Feature Wall series. In Part 1, we demonstrate how to build custom-looking cabinets and bookshelves using our favorite IKEA hack. Read Part 1 here!
**Some of the links in this post are affiliate links. This means if you click on the link and purchase the item, we will receive an affiliate commission at no extra cost to you. We appreciate your support. (disclosure policy)
Not many homes in Florida come with fireplaces, and I’ve missed having one to decorate.
A couple of years ago, we built a faux mantel in our dining room (you can see it here).
And while I’ve loved styling it, I still wanted the warmth and feel of an actual fireplace.
That’s what led us to this project—a DIY electric fireplace and TV wall in our living room.
We knew this addition would give us a cozy focal point and create the perfect spot for our Frame TV.
So, today, we’re tackling the second half of the project, which ties the entire feature wall together.
This part was definitely more involved, but the transformation was worth every bit of effort.

Let us guide you through the process step by step, so you can see how it all comes together!
Plan the Fireplace and TV Wall
The first step in creating our DIY electric fireplace and TV wall was careful planning.
From Part 1 of the project, we knew we had about 60 inches of space between the built-in cabinets to work with.
From there, we had to visualize how the mantel, TV wall, and fireplace would fit into that space.
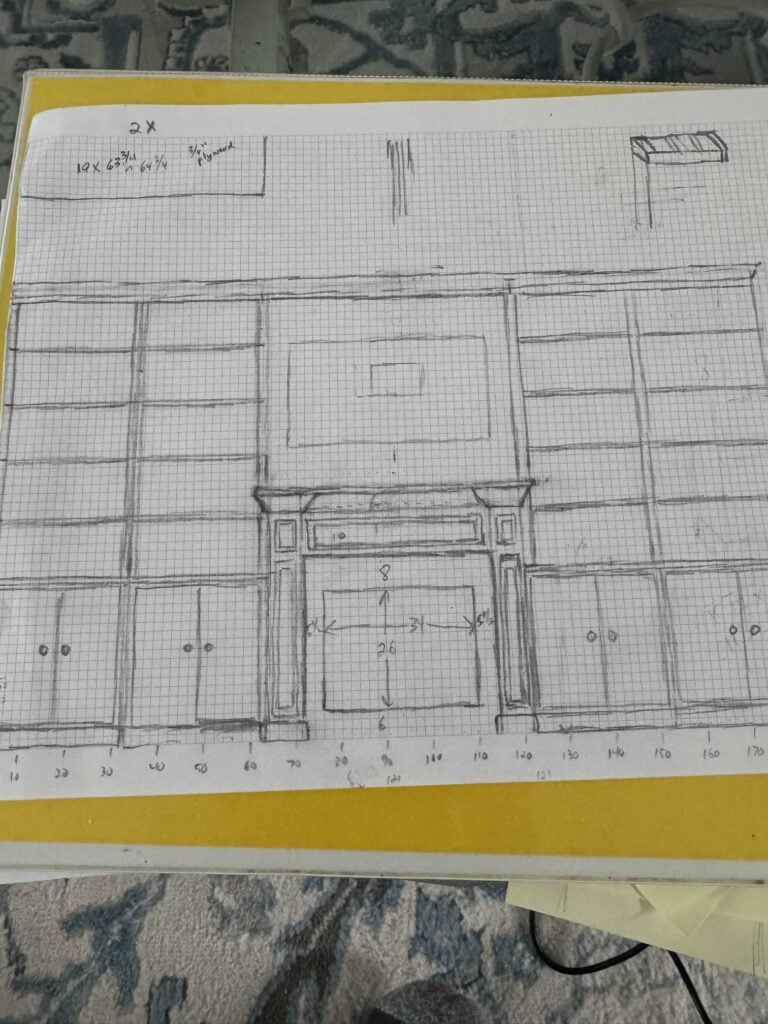
To get a better idea, we sketched out a few different designs, noting the possible height, width, and placement of each element. (And to be honest—we went through quite a few sketches before we landed on the look we wanted!)
We ultimately decided to use 1×8 boards (which are 7 ½ inches in actual width) for the front of the mantle columns.
That left us with about 45 inches for the fireplace and its surround.
After some measuring and adjusting, we settled on a mantle height of around 52 inches.
This gave us the proportions we wanted and ensured enough clearance for our Frame TV and any additional components.
Choose an Electric Fireplace Insert

When it came time to choose our electric fireplace insert, we had a few must-haves in mind.
First, we aimed to make the flames and logs as realistic as possible.
Second, the unit had to be functional, with enough power to heat our family room.
Size was also a significant factor.
We wanted the insert to fit proportionally within the mantel, leaving about 5–6 inches of space on each side.
For height, we planned to raise the fireplace about 5 inches off the floor. Then go another 8–10 inches of trim above it, leading into the mantel.
After conducting extensive research, we settled on the PuraFlame Klaus Electric Fireplace Insert for the DIY TV wall.
Measuring 33 inches wide by 25.5 inches high, it was the perfect fit for our design and budget.
Even better, it comes with a remote and can be used with or without heat.
It’s excellent for creating ambience on a warm Florida evening and adding extra warmth in the cooler months.
STEPS to CREATE FRAME For ELECTRIC FIREPLACE INSERT
Build the Fireplace Frame
- Once the base cabinets were secured, we framed out a mini wall to house the fireplace insert.
- Instead of standard 2x4s, we used 2x3s, which are slightly smaller but more budget-friendly.
- The opening in the center was sized according to the manufacturer’s recommendations for the fireplace insert.
- Next, we test-fitted the insert along with the 1×8 boards that would eventually form the mantle columns on each side.
Add a Plywood Backing

- To prepare for the decorative finish, we cut thin pine plywood to cover the frame.
- This created a smooth, solid surface for attaching the faux brick paneling.
Attach the Faux Brick

- Next, we cut faux brick plywood to fit the fireplace wall and opening.
- Using Liquid Nails adhesive, we secured the panels to the plywood backing and clamped them in place until dry.
- For extra hold, we also added a few brad nails around the edges and opening.
- The trim on the fireplace will conceal these nail marks so that they won’t be visible in the finished project.
- With this step done, we set the framed wall aside.
- We’ll retrieve it when it’s time to integrate it into the larger TV wall and mantel construction.
Steps to Build a DIY Electric Fireplace and TV Wall
Prep with painters’ tape
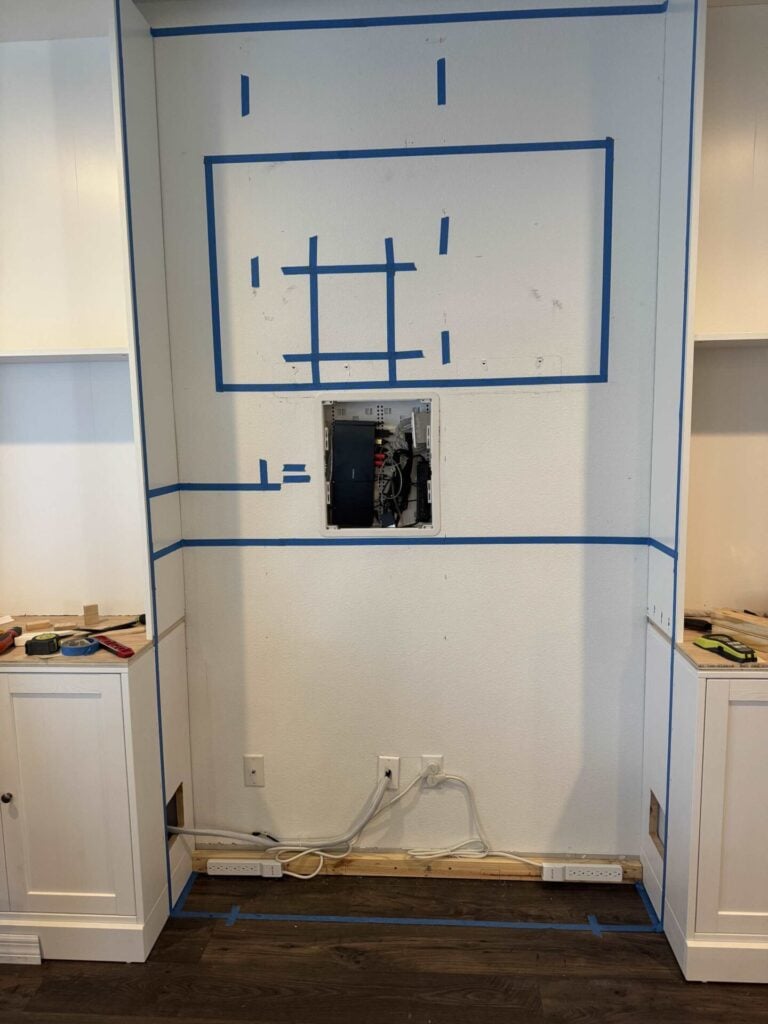
Before we started framing, we used painters’ tape to map out the layout.
This simple step helped us visualize the proportions and make sure everything was balanced before committing to cuts and nails.
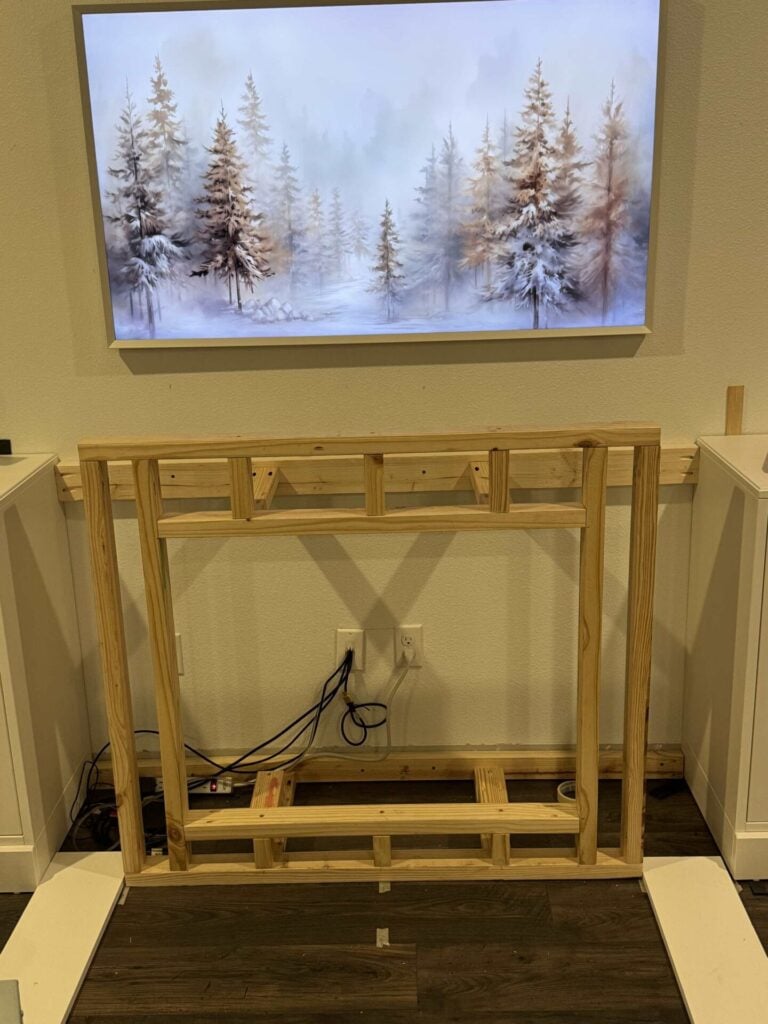
- To maintain a consistent space between the cabinets during installation, we placed a 2×3-inch piece of wood on the floor between them.
- This board not only maintained the gap but also served as the mounting spot for the two power strips we installed in Part 1.
- Later, it will serve as the base for our TV wall and mantel frame.
Using painters’ tape, we marked:
- The top and bottom of the fireplace columns
- The height of the mantle top
- The outline of the TV and the opening for its hookups and electronics
- Vertical strips to indicate wall stud locations for attaching new studs
Laying it all out with tape gave us confidence and made the next steps of framing much easier.
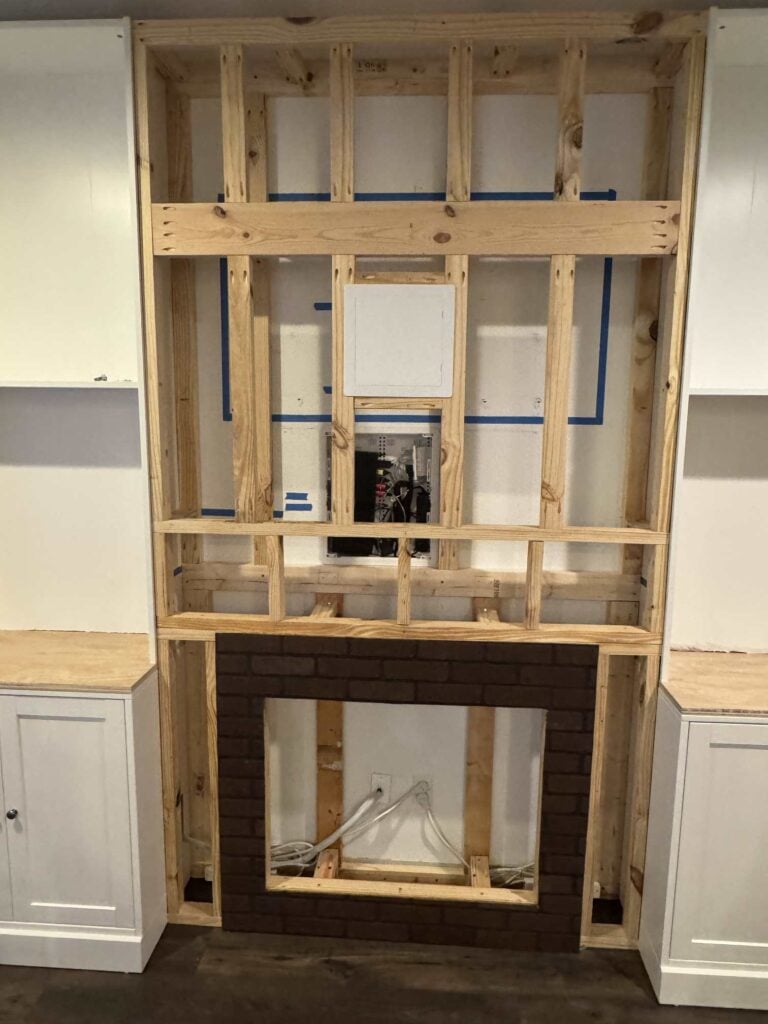
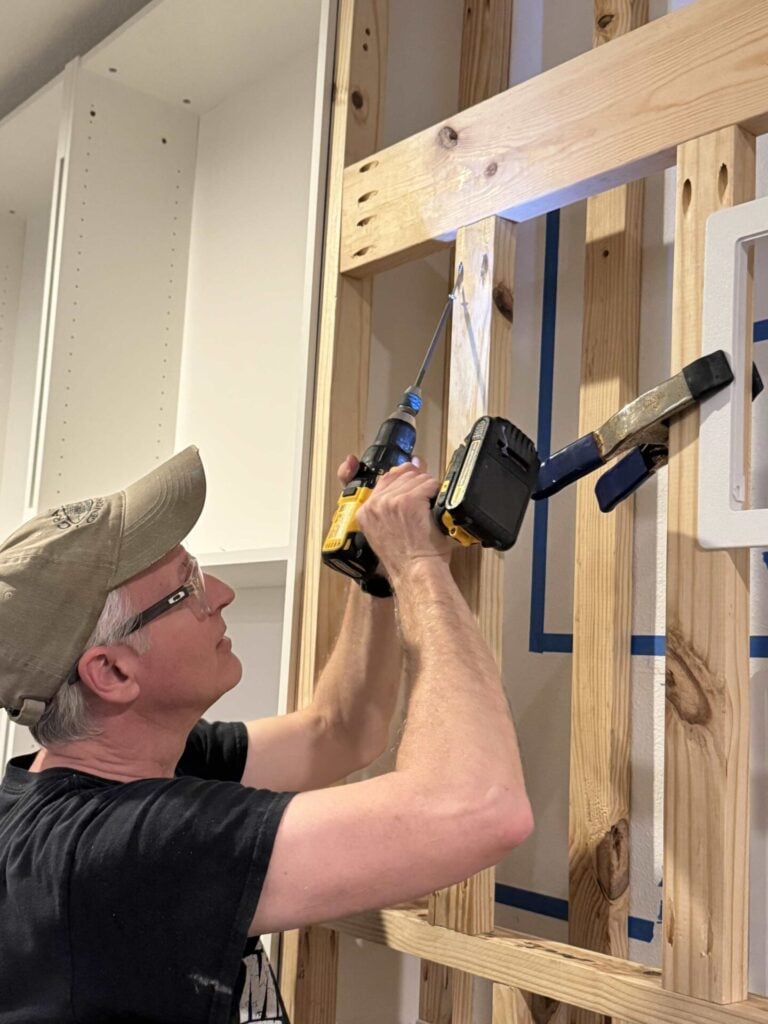
Build the Frame
With our painters’ tape as a guide, it was time to start framing the inner wall. This wall will support the electric fireplace, mantel, and TV.

Establish the Structure
- To begin, we attached 60-inch horizontal 2×4s at the mantel line and again at the very top, between the two bookshelves.
- These boards locked in our 60-inch opening from top to bottom and tied the new frame into both the wall studs and the bookcase shelves. We used pocket holes and screws for extra strength.
- Next, we added vertical 2×3s (and a few 2×4s where necessary) from the bottom board up to the mantel board.
- Then, check each one with a level before securing it to the wall studs and crossboards.
- We repeated this step between the mantel board and the top board of the bookshelves.

Frame Around the Fireplace Insert Wall
- Once the base framing was secure, we installed the mini wall that we had previously built for the fireplace insert.
- Using 2×3s, we framed out the spaces to the right and left where the mantel columns would eventually sit.
- We also added framing across the top of the fireplace wall up to the mantel height.
- One important detail: the front of the TV wall was set back ½ inch from the front edge of the bookcases.
- That way, once we covered it with ½-inch plywood, the finished surface would be perfectly flush with the bookshelves.
- Using the tape lines on the floor and a level, we checked the alignment as we went.
- Then, everything was tied together with horizontal support boards secured with pocket-hole screws.
Add Upper TV Wall Support
- Next, we framed the upper part of the TV wall by attaching 2×3s along the outer edges.
- Next, we attached them to the tops of the bookcases.
- A horizontal 2×6 was installed across the wall at the height where the TV would be mounted.
- This gives us a sturdy anchor point for the bracket.
Fill In and Add the Access Panel
- Finally, we filled in the frame with additional vertical and horizontal supports, tying the front wall to the back wall with pocket hole screws for stability.
- We also framed out a small access opening, using a plastic access panel as a guide to size it correctly.
- This panel will allow us to reach TV connections and electronics later on without hassle.
FINISH the TV Wall
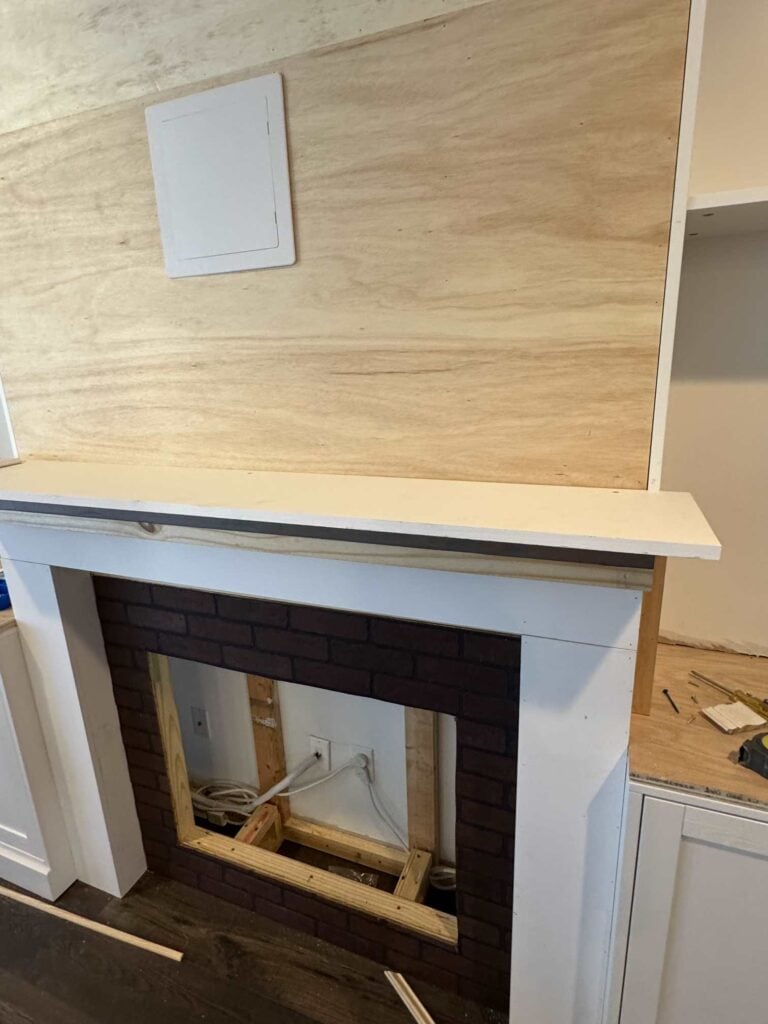
With the frame complete, it was time to enclose the TV wall with plywood for a smooth, sturdy surface.

- First, we cut ½-inch plywood panels to size and attached them to each side of the fireplace using brad nails.
- Next, we measured and cut a panel to fit from the mantel top down to just above the spot where our access panel would be located.

- Once that was in place, we marked and drilled starter holes inside the frame of the access panel.
- Using a jigsaw, we carefully cut out the opening, leaving a clean fit for the panel to be installed later.

- Finally, we measured and cut the last piece of plywood for the upper portion of the wall and secured it with brad nails.
- With that, the TV wall construction was complete—ready for the next exciting step: building the mantel.
Create a Mantel
The mantel design began with the construction of two sturdy columns to frame the fireplace insert.
These columns not only add architectural detail but also provide structural support for the mantel shelf.
Build columns
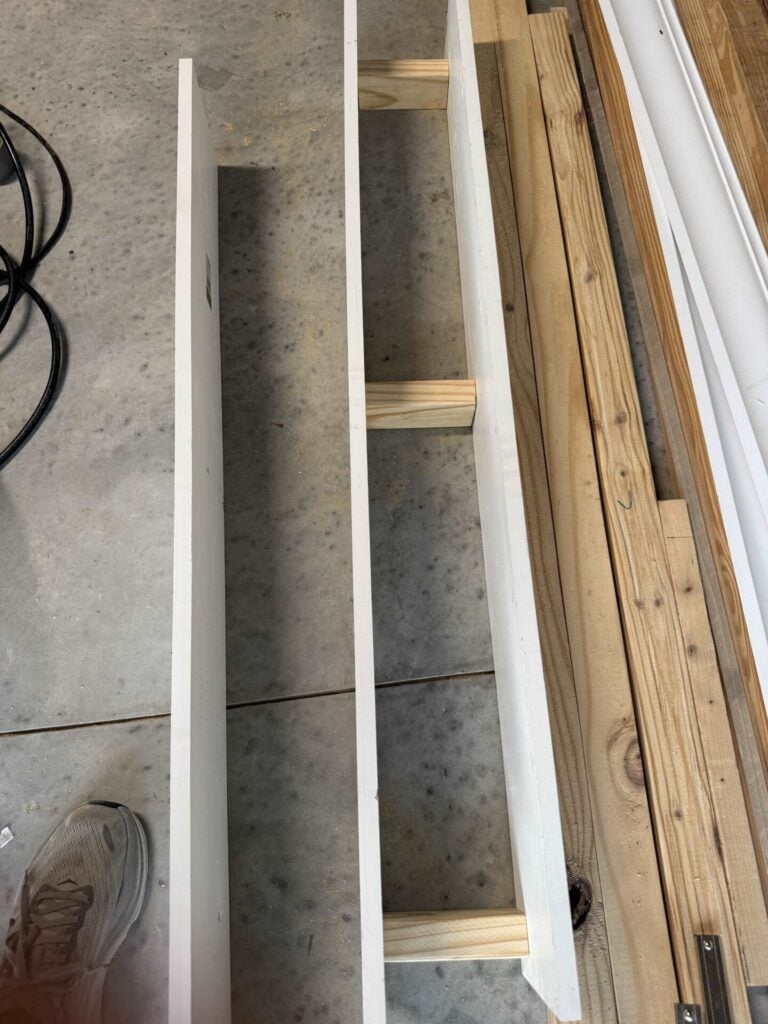
- To build each column, we used a 1×8 board for the front and 1×4 boards for the sides, creating a three-sided box.
- Inside each column, we added three 2×3 block supports as spacers to keep everything aligned and strong.
- Using bar clamps and scrap wood for stability, we secured the boards in place and then brad-nailed through the front 1×8 into the sides.
- Once assembled, the columns were attached to the plywood wall using L-brackets, securing them in place at the top support.
- With both columns in place, the foundation for our mantel was ready and waiting for the next layer of trim and detail.
Create the shelf
With the columns built, it was time to construct the mantel shelf.
This would span from column to column and serve as the focal point of the entire fireplace wall.

- We started by creating a horizontal box to bridge the two columns.
- The front board was a 1×8 (to match the column fronts), while the sides and interior were framed with 1x4s and a 2×3 spacer block for support.
- On top of this frame, we stacked two 2×8 boards (one full-length and one leftover piece) to build up the height of the mantel shelf.
- This thicker profile gave us a solid base for attaching crown molding later.
- Finally, we added a 1×10 board as the actual mantel top.
- Before cutting it to size, we measured carefully to ensure there was enough overhang for the crown molding.
- The overhang allows the molding to sit snugly underneath the board and angle down to meet the bottom edge of the 2x8s, creating a polished, custom look.
Embellish with trim
To take the fireplace wall from simple framing to a polished, custom look, we added trim details that tie everything together.
These finishing touches make the project feel built-in and elevate the entire design.
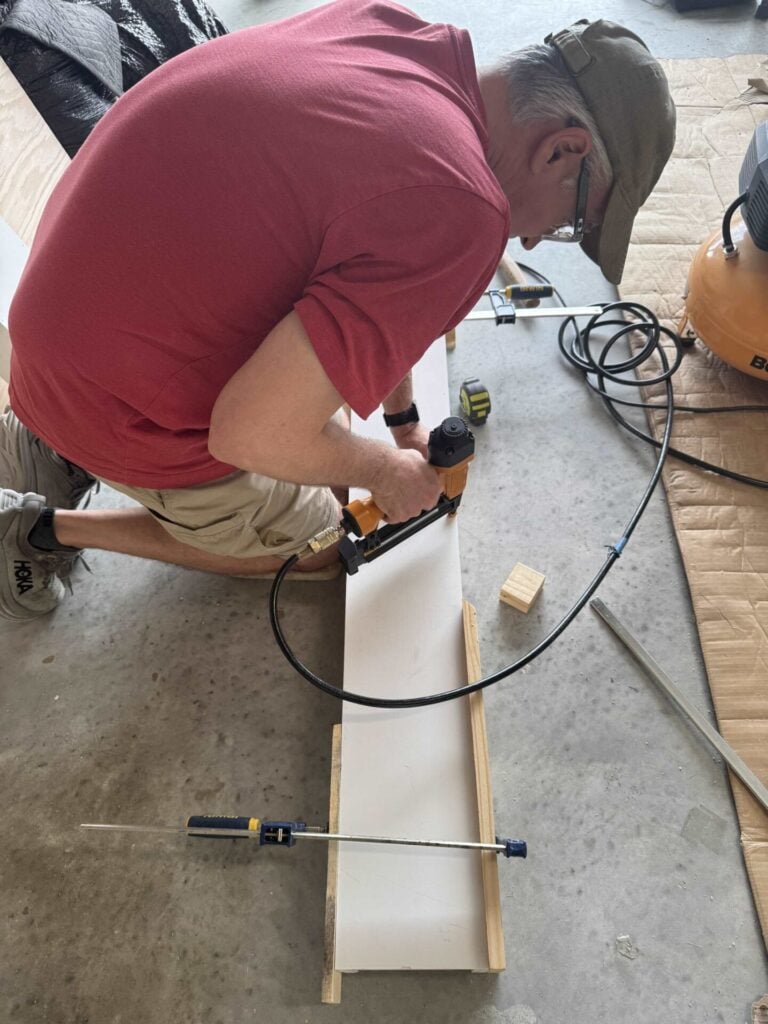
Attach crown molding to the mantel

- We began by adding a 1×2 trim board that ran vertically from the top of the cabinets up to the underside of the mantel shelf.
- This helped create a clean transition between the lower built-ins and the new fireplace feature.

- Next, we installed crown molding beneath the mantel shelf. Here is an article from our bedroom makeover with help on cutting and installing crown molding.
- Using a miter saw, we cut the pieces to fit as outside corners for a seamless look.
- The crown was secured with brad nails into the 2x8s, and we used a small amount of wood glue at the joints for extra strength.
Add trim to columns

- To give the columns a more substantial, custom look, we trimmed them out with a few additional boards.
- We started by wrapping the bottom of each column with 1×8 boards cut to fit around all sides.
- A 1×8 block was also added to the top of each column for balance and structure.
- To add detail to the column faces, we used decorative trim pieces on top and just below the 1×8 boards.
- Lastly, we cut ½ x 2 hobby boards to size and test-fitted them with masking tape before making the fit permanent.
- Instead of brad nails, we secured these trim boards with wood glue to keep the surface smooth and minimize visible holes.
- The result is a set of sturdy, decorative columns that frame the fireplace beautifully and flow seamlessly into the rest of the design.
Place trim above the fireplace insert

- To dress up the front of the fireplace wall and give it a polished finish, we added a layer of trim above the insert.
- A skirt board was already in place above the fireplace surround, so we attached crown molding just beneath it.
- This small detail adds depth and dimension to the design, helping the fireplace feel more substantial and custom-built.
Add embellishment to the top of the columns

- To give the columns a final touch, we added a custom-sized wood block to the top of each one and attached a small decorative medallion featuring a fleur-de-lis.
- This simple addition gives the columns the look of a corbel and adds a touch of character to the overall design.
- The best part? These fleur-de-lis blocks only cost $0.99 each—a budget-friendly detail that makes a big impact.
Attach trim across the top of the feature wall

- Once the mantel construction was complete, we finished off the look by attaching a 1×4 board across the top of the built-ins.
- Using a level and bar clamps, we carefully positioned it and secured it in place with brad nails.
- When adding crown molding, the placement of this board is key.
- You’ll want to position the 1×4 so the bottom edge of the crown can attach securely, while still allowing the molding to reach the ceiling.

- For our project, we chose 5 ¼-inch crown molding and installed it so it attached about ½ inch down from the top of the 1×4. This article with help with crown molding installation.
- Once everything was aligned, we secured the crown with brad nails into both the 1×4 and the ceiling for a crisp, custom finish.
With the framework, mantel, and trim in place, the structure of our DIY electric fireplace and TV wall is complete—setting the stage for paint, finishing touches, and styling.
Finishing Touches
With the construction complete, the final step was to ensure every detail looked polished.
A little prep, caulk, and paint go a long way in transforming raw wood and trim into a seamless, custom feature wall.
These finishing touches are what pull the entire project together and make it look truly built-in.
Fill holes and caulk

- To achieve a smooth, professional look, we began by filling all nail holes and visible seams in the trim and crown molding with wood filler.
- Once dry, we sanded everything to a smooth finish and shaped the filler where necessary to blend in with the surrounding wood.

- Next, we applied caulk with a caulk gun along both interior and exterior seams of the trim and crown molding.
- This step seals gaps, hides imperfections, and ensures the entire fireplace and TV wall looks seamless once painted.
Attach hardware for the TV

- Next, we marked the new location for our Frame TV.
- Using the TV’s measurements, we noted the top and bottom edges of where we wanted it to hang, making sure the access hole would be completely hidden behind it.
- To get the bracket placement just right, we first test-fitted the brackets on the TV and then traced them onto cardboard to create a template (many TVs come with a guide for this step, but if not, this method works perfectly).
- We taped the template in place, double-checked the alignment, and drilled pilot holes through the guide into the TV wall.
- Once the brackets were secured, we test-hung the TV to ensure everything was in line.
- Before painting, we removed the TV but left the brackets attached, as they would be hidden once the TV was mounted again.
Prime

- We coated all the unfinished surfaces with Zinsser primer, applying it with both a brush and a roller to ensure even coverage.
- The IKEA cabinet doors came pre-primed, so they were ready for paint right away.
- For best results, let the primer dry completely before proceeding to paint—this will yield a smoother finish and enhance the topcoat’s adhesion.
- For boards that are bare wood and not coated at all, after applying the primer, sand lightly until smooth again. Primer can often raise the wood grain and needs a little sanding.
Paint
- Once the primer was dry, we applied Sherwin-Williams white paint with both a brush and a roller.
- It took a little over two coats to get full coverage, especially on the plain trim boards and plywood areas of the TV wall and cabinet tops.
- The extra coats were worth it because the crisp white finish really pulled the whole project together.
- Don’t rush between coats—letting the paint fully dry will give you a smoother, more durable finish.
With the caulking, paint, and TV hardware complete, our project finally has the polished, seamless look we wanted—bringing us one step closer to enjoying our finished DIY electric fireplace and TV wall.
Install the Fireplace Insert & Mount TV

Install the fireplace insert
- Before sliding the fireplace insert in, check the opening carefully.
- If anything is uneven, take the time to trim or shim so the unit sits level.
- Also, ensure that any cords or cables running behind the insert are organized and positioned safely so they don’t touch any surfaces that might become warm.
- Next, extend the electric cord and plug it into the outlet you’ve planned for inside the built-ins (in previous pictures, we had two extension cords plugged into the outlet, but had to remove one of them because you need to plug an electric fireplace into a wall outlet, not an extension cord or surge protector).
- With a second set of hands, carefully slide the insert into place and secure it following the manufacturer’s instructions.
- Double-check that none of the ventilation openings are blocked to ensure the unit operates safely.

Important Safety Note:
Electric fireplace inserts should always be plugged directly into a wall outlet. While an extension cord may appear in some of our in-progress photos, the fireplace is not operated using an extension cord. Once installed, the unit is plugged into a dedicated wall outlet, per manufacturer recommendations.
Mount the TV
- For the TV, our Frame model came with special mounting brackets, instructions, and templates that made the job easier.
- If you’re using a standard panel TV, you may need to purchase a mount designed for your model.
- One advantage of the Frame TV is that it allows the electronics and cables to be hidden inside the wall cavity—keeping the look clean and uncluttered.
- When deciding exactly where to mount the TV, we looked at the recommended viewing height but also thought about what we might want to place on the mantel.
- That way, our seasonal decor won’t block the screen.
Final Reveal
It’s always so fun to look back and see just how far a project has come!

Here’s our living room wall before, with just the TV hanging on it.
Then, step by step, the fireplace and TV wall started to take shape.
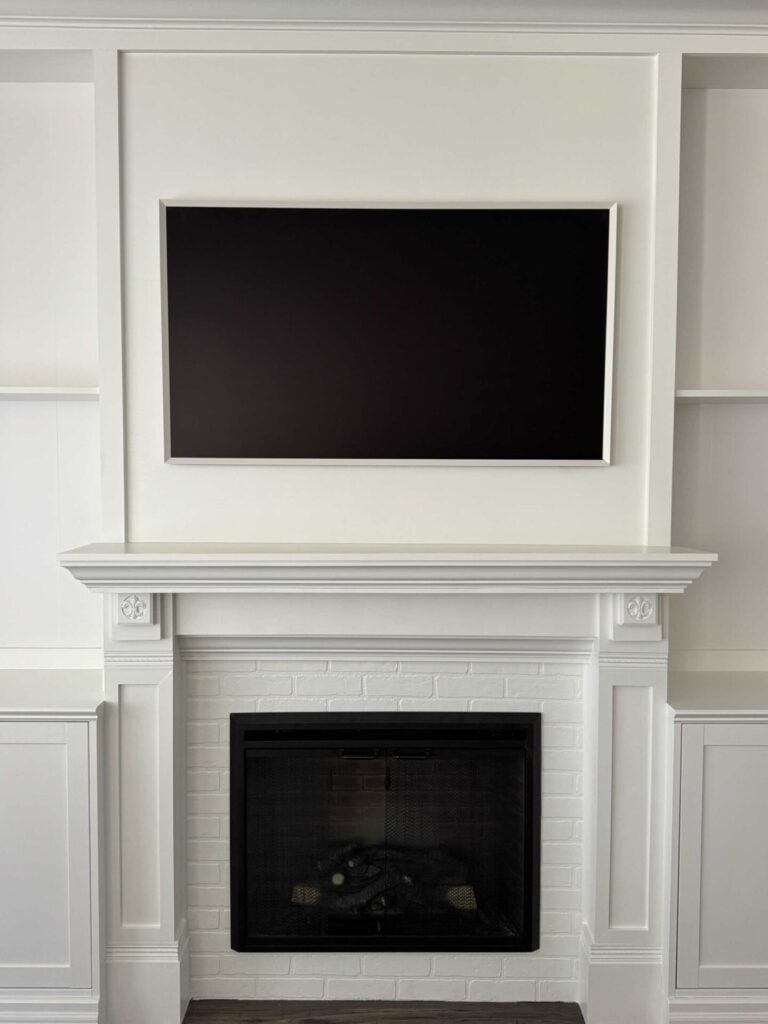
Once the structure was built, we could already see the potential, even before adding decor.

And finally…the whole feature wall came together!
Adding the fireplace, mantel, and all the custom details completely transformed this space.
It feels like a whole new room, and now we have a cozy focal point that makes the living room so much more inviting.
Style the Finished Wall
Now that the fireplace and TV wall are fully built, it’s time for the fun part—styling!
The first detail we added to the wall was an art light above our Frame TV.
Install an art light

One of the things we love about the Frame TV is that it doubles as a piece of art when it’s not in use, displaying digital artwork that mimics a real framed picture.
To enhance that effect, we added an inexpensive art light with a rechargeable battery.
- Installation was simple—the light comes with a hanging bracket, so it can be mounted easily and removed just as quickly for recharging.
- Screw the bracket into the wall and attach the light to it.
- It also includes a remote to turn it on and off, with adjustable brightness levels, making it easy to highlight the “art” on the screen exactly how we like.
Style the mantel

For a clean and balanced look, we started by placing two white ceramic candleholders of varying heights on each end of the mantel, each with a blue taper candle.
This simple arrangement creates symmetry while leaving ample room in the center to add seasonal decor, such as pumpkins in the fall or greenery during the holidays.
It’s a classic foundation that can easily be updated to match any style or season.
Frame TV Art
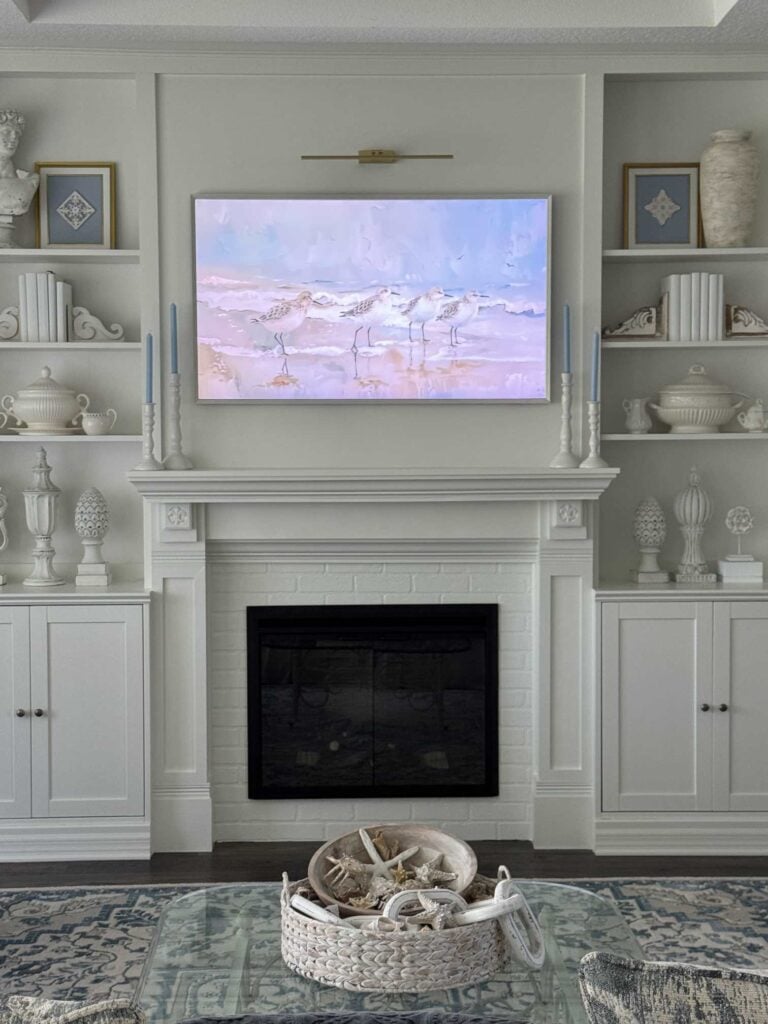
To complement the calming, coastal vibe of our summer living room decor, we chose a piece of art featuring four seabirds standing on the beach for the Frame TV.
When the TV is off, it resembles a framed photograph, and the subtle colors blend beautifully with the mantel decor and surrounding built-ins.
It’s a simple way to add personality and style to the wall, even when the TV isn’t in use.
And here’s a look at the entire feature wall!
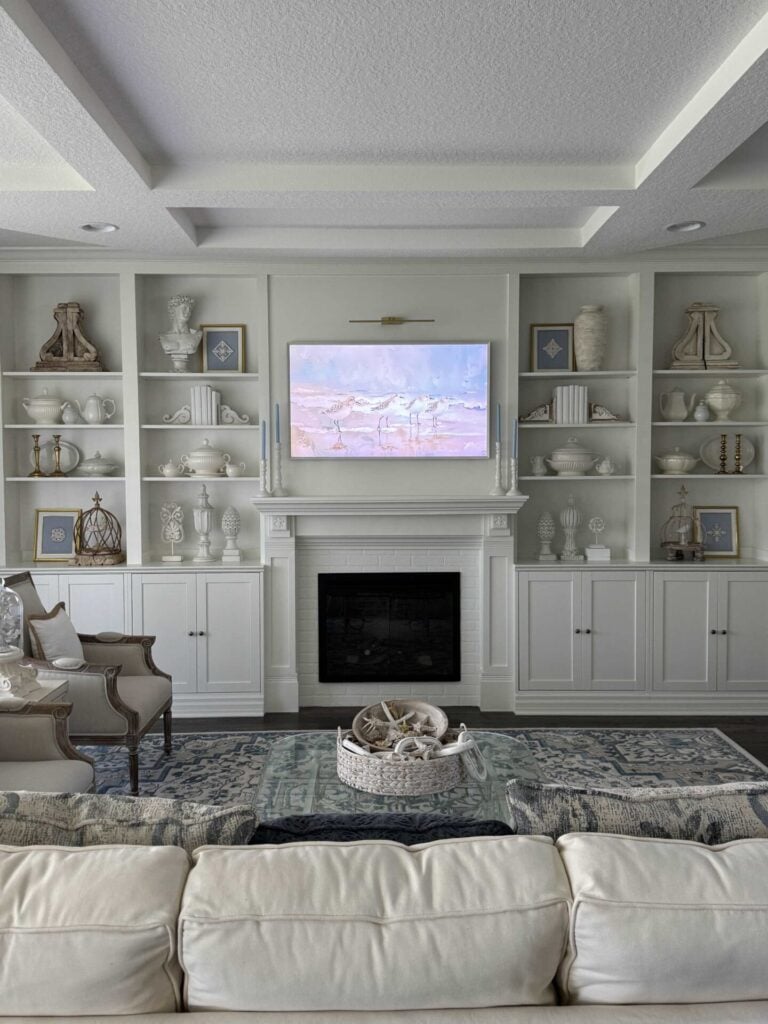
Stepping back and looking at the entire feature wall fully styled, it’s incredible how the combination of built-in cabinets, open bookshelves, fireplace, and TV all work together to create a cohesive, polished look.
Between the mantel decor, subtle art lighting, and carefully arranged shelving, the space feels inviting, functional, and completely custom—exactly what we were hoping to achieve.
For more details on our decorating approach, please refer to our living room makeover post here.
Closing thoughts
Building this DIY electric fireplace and TV wall was a big project, but it was worth every bit of the effort.
Not only do we now have a cozy fireplace to gather around, but we also gained a custom feature wall that completely transformed our living room.
If you’ve been dreaming about adding warmth and character to your home, we hope our project inspires you to try creating your own DIY electric fireplace and TV wall.
Curious how the cabinets and bookshelves came together? See Part 1 for the complete step-by-step guide.
Stay tuned for future projects where we continue to make our home both beautiful and functional, one DIY at a time!
If you enjoy the blog, please sign up for our email list to stay updated!
Until next time, follow us on Pinterest, Facebook, and Instagram!
Blessings, Donna and Rich
More DIY Home Improvement Inspiration
Looking for more inspiration?
We love tackling projects that make our home both functional and beautiful.
If you enjoyed this post, be sure to check out some of our other DIY home projects for more budget-friendly ideas to transform your spaces:
- How to Make a DIY Plate Rack for a Kitchen
- Upgrade Your Bathroom Mirror With a DIY Frame
- Tips to Install Pendant Lights
- How to Install Cabinet Hardware
- Build an Accent Wall for a Bedroom
Pin it for Later
Save this project now so you can come back when you’re ready to start your own!
Just click the red Pin button in the top left corner and follow us on Pinterest!
Related Posts:


**Some of the links in this post are affiliate links. This means if you click on the link and purchase the item, we will receive an affiliate commission at no extra cost to you. We appreciate your support. (disclosure policy)
So much love, time, detail and attention went into this project and it shows! I can’t get over how much it changed the look of your space. It feels like it should have always been this way. Can’t wait to see how you decorate the mantel for the holidays! Hugs, CoCo
Thank you for your kind words! We really did put tons of time and attention into making it our own! I couldn’t be happier with it! It’s going to be so fun to decorate!