We’ve always loved the look of custom-built-in cabinets, but the price tag? Not so much. That’s why we decided to tackle an IKEA cabinet hack and create our own version of built-ins for a fraction of the cost.
This is Part 1 of our Living Room Feature Wall series. In Part 2, we’ll share how we added a DIY electric fireplace and TV wall to complete the look, see it here.
**Some of the links in this post are affiliate links. This means if you click on the link and purchase the item, we will receive an affiliate commission at no extra cost to you. We appreciate your support. (disclosure policy)
With a bit of planning, some budget-friendly IKEA pieces, and a few finishing touches, we were able to transform a plain wall into a beautiful and functional storage solution.
In this post, we’ll walk you through exactly how we built these cabinets and shelves to get that high-end, built-in look without the custom price.
Why We Chose an IKEA Cabinet Hack
When we started dreaming about a feature wall for our living room, we knew we wanted the clean, timeless look of built-ins.
The problem?
Custom cabinetry can cost thousands of dollars, which just wasn’t in our budget.
That’s when we decided to use an IKEA cabinet hack we had seen.
We knew with a bit of creativity, we could dress them up with trim, paint, and hardware to make them look like they were made special for our home.
This seemed like a win because we don’t have the necessary skills in woodworking or all the tools to make proper cabinet doors.
IKEA to the rescue!
Their cabinets are affordable, come in a variety of sizes, and are easy to adapt to different spaces.
And they also have easy-to-assemble shelf units.
This option gave us the flexibility to design a wall that fit our style, provided extra storage, and looked completely custom—without the high price tag.
Plan the Built-Ins
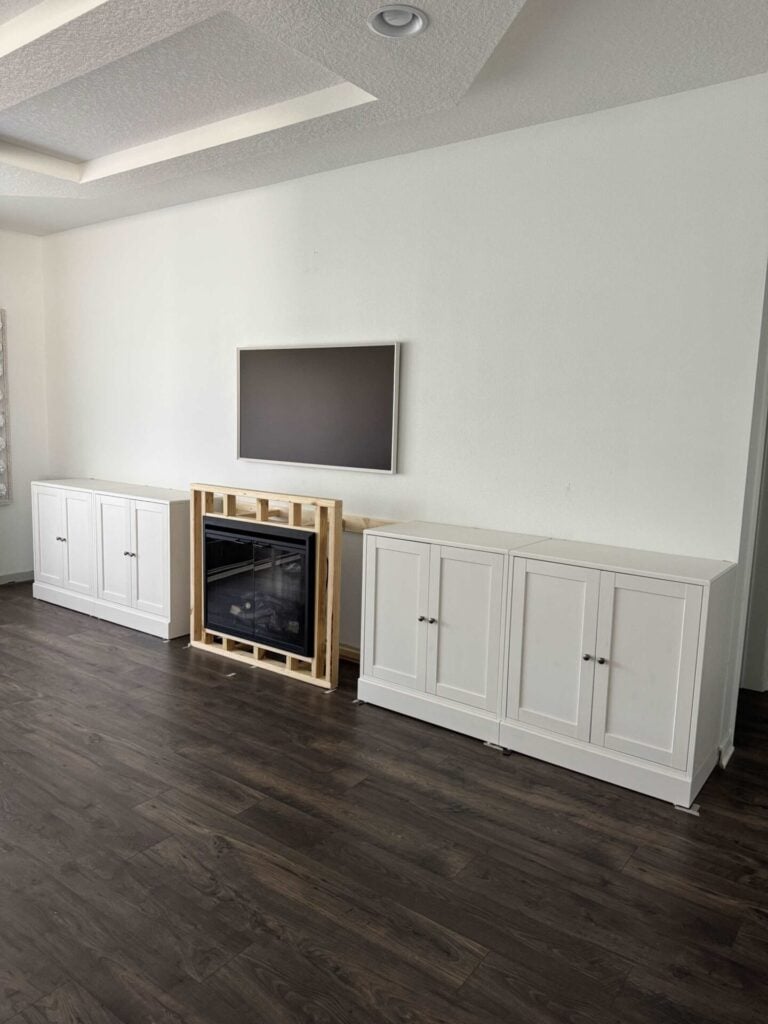
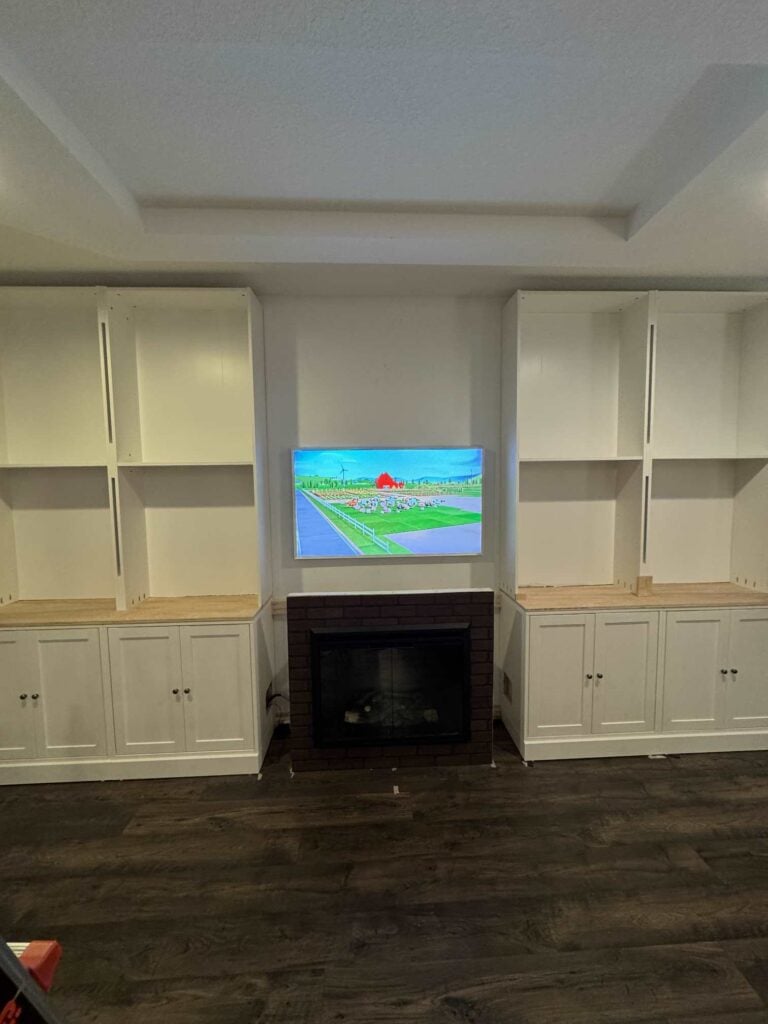
From the start, we knew exactly what we wanted: closed base cabinets for hidden storage and open shelving that stretched all the way to the ceiling, finished off with crown molding.
The idea was to place two base cabinets and shelving units on each side of the TV wall and fireplace mantle, creating balance and symmetry.
The first step was to measure the entire wall.
Once we had those numbers, we compared them with IKEA’s cabinet and shelving dimensions to figure out a combination that would fit the space.
We also needed to leave enough room in the center for a TV wall and mantle with an electric fireplace insert.
Since our 55” Samsung Frame TV (Amazon or Best Buy), which is about four feet wide, would hang above the mantle, that measurement became a key factor in the design.
By subtracting the width of the four base cabinets from the total wall measurement, we could determine the exact space left for the fireplace insert and mantle.
One additional challenge?
Our dropped ceiling.
To keep the design looking natural, we had to align the built-ins with the center of the dropped ceiling rather than the center of the wall itself.
It was a small detail, but it made all the difference in creating a balanced, built-in look.
Planning Tip: 3 Things to Measure Before You Buy IKEA Cabinets
- Total wall width – Make sure you know the exact space you’re working with.
- Cabinet + shelving dimensions – Compare IKEA’s product sizes to your wall space for the best fit.
- TV + fireplace space – Subtract the cabinet widths to ensure you leave enough room in the center for your TV and electric fireplace insert.
Choose the Right IKEA Products
Once we had all of our wall and TV measurements, it was time to start shopping.
To pull off this IKEA Cabinet hack, we browsed their inventory and studied other built-in projects online to see what might work for our space.
In the end, we found the perfect combination:
- BILLY Bookcase, white, 31 1/2x11x79 1/2”
- HAVSTA Cabinet with base, white, 31 7/8×18 1/2×35”
We ordered four of each unit, which gave us two base cabinets and two bookcases for each side of the wall.
This layout fit our measurements perfectly and left about 58–60 inches of open space in the middle — just enough room for the TV, mantle, and electric fireplace.
One challenge we anticipated was height.
When placed on top of the HAVSTA base cabinets, the BILLY bookcases would be slightly too tall for our wall.
But thanks to their simple design, we knew we could trim the bottoms to achieve the perfect floor-to-ceiling fit.
Steps to Build the Cabinets and Shelves
Ready to see how we transformed our living room with this IKEA cabinet hack!
1) Prep the room
Before bringing in the cabinets, we had to get the room ready for a significant transformation.
That meant clearing out all the furniture along the wall so we had plenty of space to work.
We also removed the existing baseboards where the cabinets would sit.
Skipping this step would have left awkward gaps and prevented the units from sitting flush against the wall.
We also ended up marking the wall where wall studs were located for later use to secure cabinets, shelving, and trim during construction.
It is best to mark them in several places vertically up the wall since we are going to attach several things to the wall from floor to ceiling.
Prepping the room may not be the most exciting part of the project, but it’s essential for getting that seamless, built-in look.
2) Move the Electrical Outlets
Before installing the cabinets, we needed to address the electrical outlets on the wall.
Since this project included an electric fireplace and TV in the center, we wanted to make sure we had enough power sources not only for those, but also for anything we might want to plug in on the cabinets or shelves, like Christmas lights or decorative accents.
Fortunately, there were already two outlets in the middle of the wall—one high and one low—that we could dedicate to the TV and fireplace.
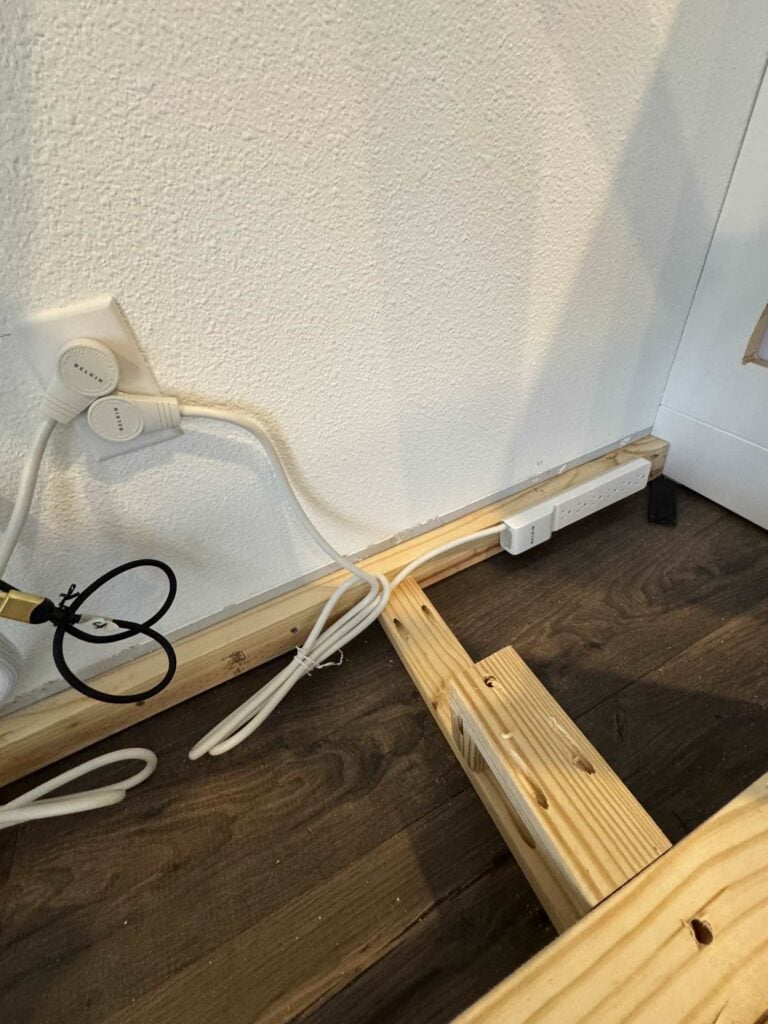
We decided to use these two surge suppression power strips from Belkin to add more access to outlets.
They have rotating plugs that allow us to plug in two of them into one power outlet.
However, as the project progressed and the fireplace wall was built in Part 2, one extension cord was removed, and the electric fireplace was plugged directly into a wall outlet, per manufacturer recommendations.
To make the built-ins even more functional, we wanted an outlet inside the base cabinets.
There was an existing outlet on the right side of the wall for those cabinets, but we needed to add one on the left side of the wall for that set of cabinets.
Since we’re not comfortable working with electrical wiring, we hired a handyman to take care of this step.
If you’re tackling a similar project, we definitely recommend bringing in a professional.
It was a simple change for him, and it will make a big difference in the functionality of our built-ins.
Pro Tip: If electrical work isn’t in your skill set, hire a licensed electrician or handyman. It’s the safest way to make sure your outlets are placed correctly and up to code.
3) Assemble the Base Cabinets
We started by putting together the HAVSTA base cabinets.
If you’ve ever built IKEA furniture, you know the drill—lots of pieces, a handful of screws, and those little Allen wrenches.
The good news is that IKEA instructions are very clear and include step-by-step illustrations, so just take your time and follow them carefully.
Once the cabinets were assembled, we placed them against the wall to double-check that everything lined up with our measurements.
To help visualize the layout, we also used painter’s tape on the floor to mark where the cabinets and the future mantle would sit.
It may feel like a simple step, but getting the base cabinets correctly assembled and aligned is crucial—this foundation sets the stage for the entire built-in project.
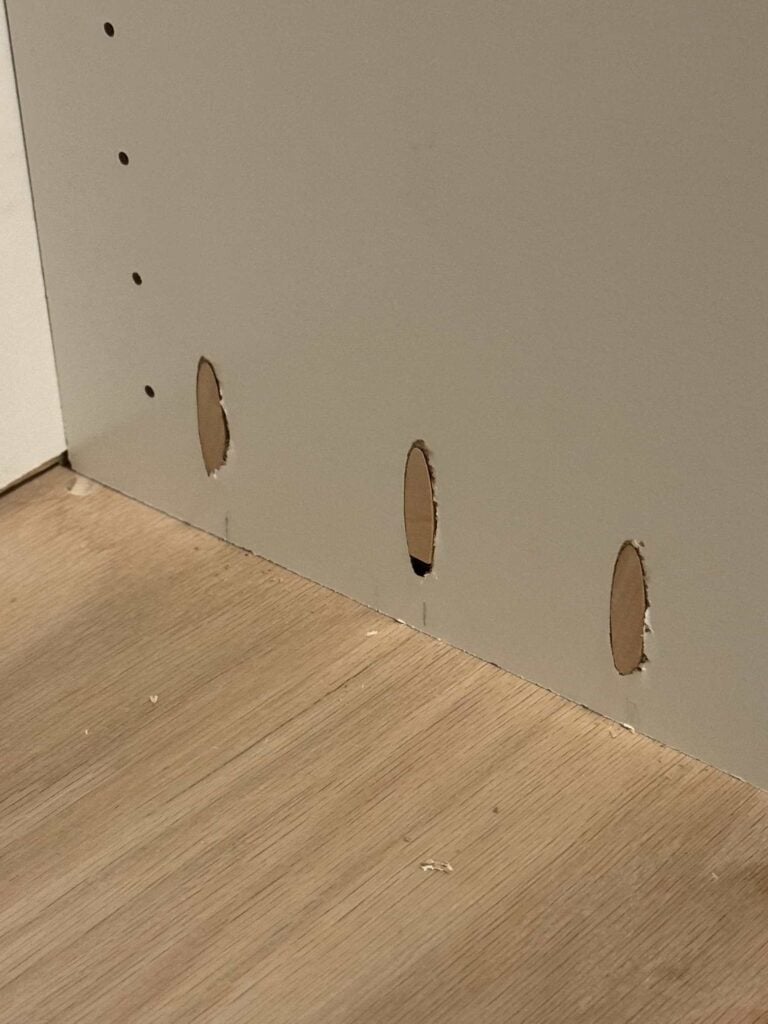
4) Cut holes for outlets and cord access
Before we could permanently position and secure the base cabinets, we needed to address the electrical outlets on the wall.
It’s against housing codes to cover outlets, and we also wanted them accessible for plugging in electronics, lamps, or even seasonal decor.
That meant cutting access holes in the backs of the cabinets.
Here’s how we handled cutting holes for the outlets:
1) Measure carefully
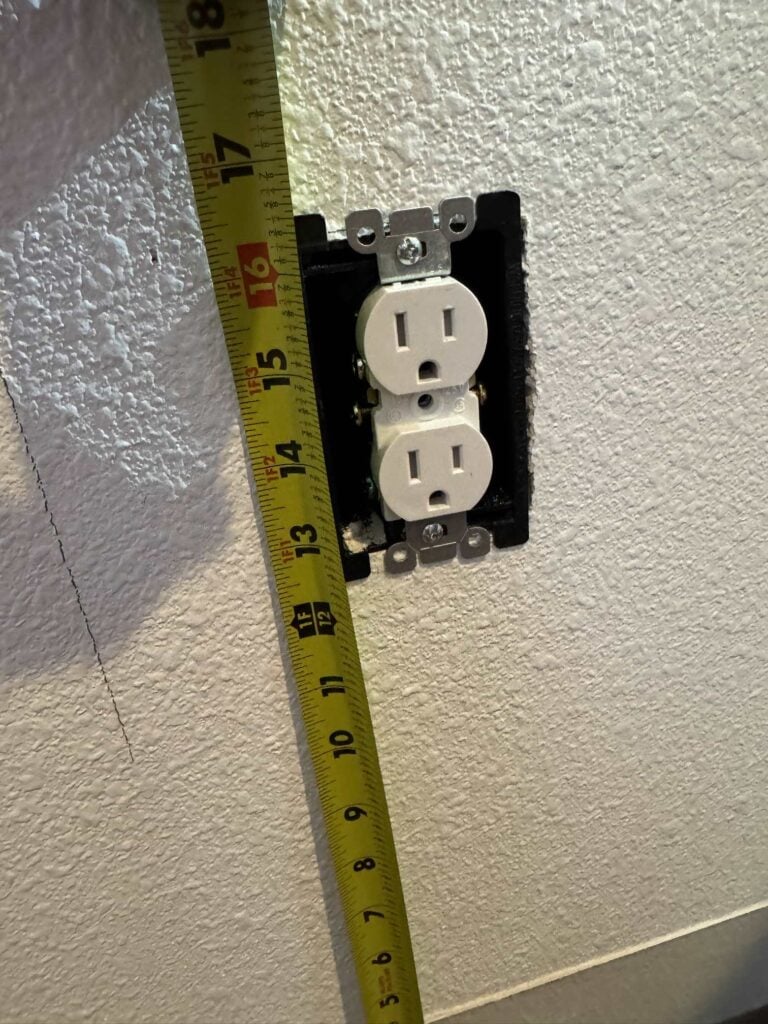
Remove the outlet plate so you’re measuring the actual outlet box, not the cover.
Measure from the floor up to the bottom of the box and from the side wall to the edge of the box.
Transfer those measurements to the back of the cabinet.
2) Cut the opening
Drill a hole in each corner of your outline, then use a jigsaw to cut out the box shape.
Note: the HAVSTA IKEA cabinets have a small gap between the back panel and the wall, so outlet box extenders are essential to make everything line up correctly.
3) Install the outlet
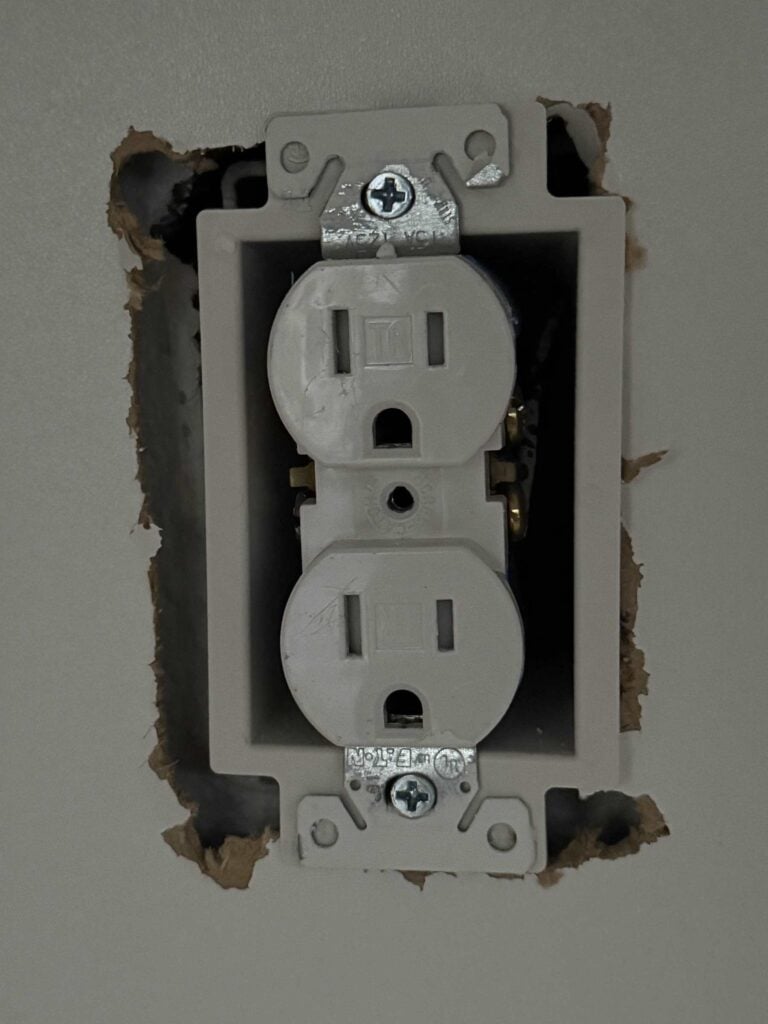
Turn off the power at the breaker.
Position the cabinet against the wall, pass the outlet receptacle through the hole, and use an outlet box extender to bring it flush inside the cabinet.
Reattach the receptacle and cover plate for a clean, finished look.
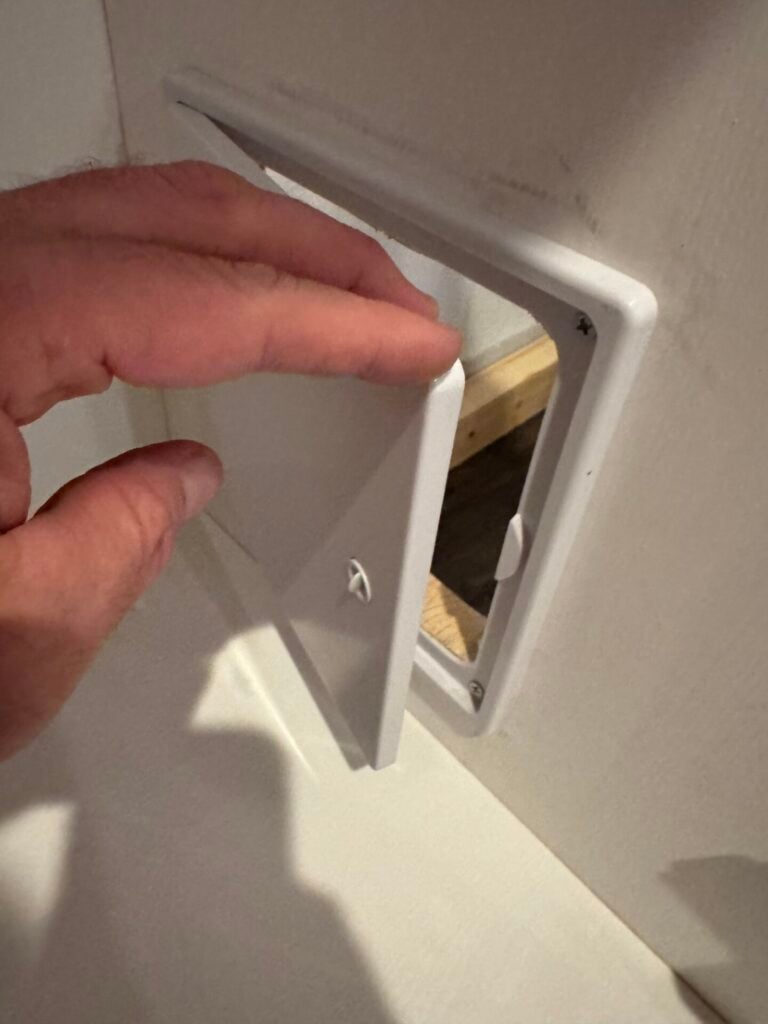
Here’s how we cut holes for cord access between cabinets:
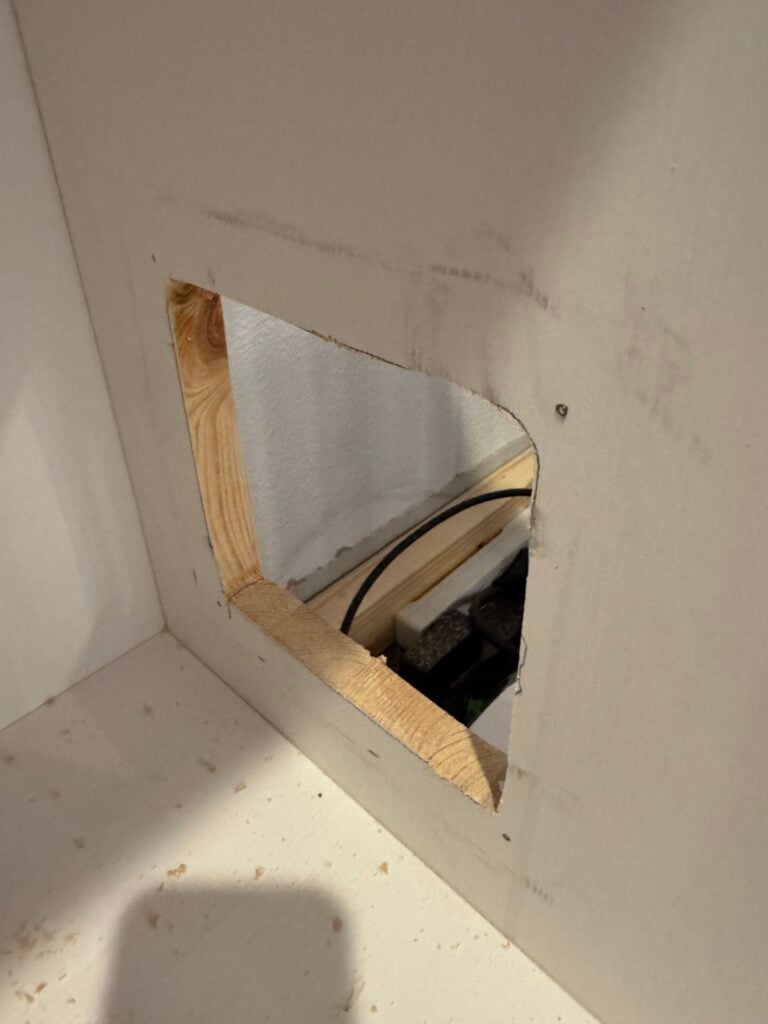
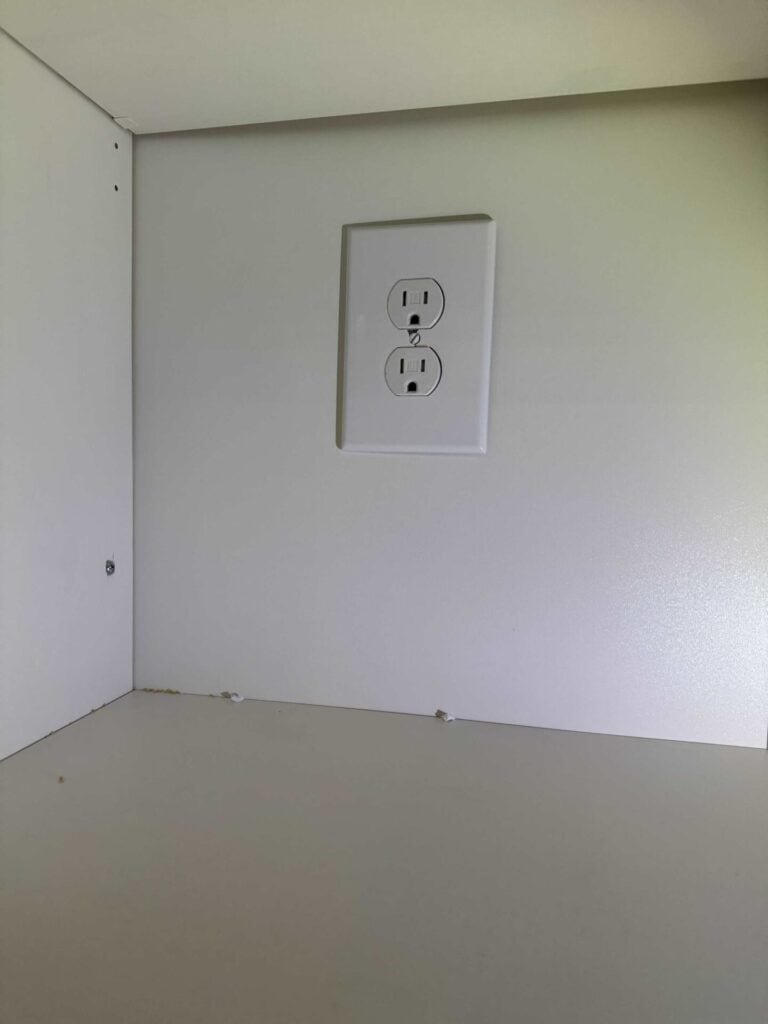
Since we also planned to use power strips inside the center section for the fireplace and TV, we installed 10” x 10” access panels in the side walls of the cabinets.
These openings allow cords, plugs, and speaker wires to pass easily between cabinets and to the power source.
Safety Tip: If you’re not comfortable working with electricity, hire a handyman or electrician. We felt comfortable tackling this step because the wires weren’t being rewired—just repositioned with the power turned off.
5) Secure the Cabinets
With the base cabinets assembled and positioned, the next step was making sure they were safely secured.
We used two HAVSTA base cabinets on each side.
To start, we screwed the pairs together so they functioned as one solid unit.
Since these bases would eventually support tall bookcases, everything needed to be adequately anchored.
We pushed the cabinets flush against the wall, checked that they were perfectly level, and used shims where needed to adjust for minor floor variations.
Once satisfied with the placement, we anchored the cabinets to the wall studs using screws.
This step not only keeps the units from shifting but also ensures they won’t tip once the upper shelving is installed.
Taking the extra time to get the bases level and securely attached made the rest of the installation smoother—and gave us confidence the finished built-ins would look seamless and professional.
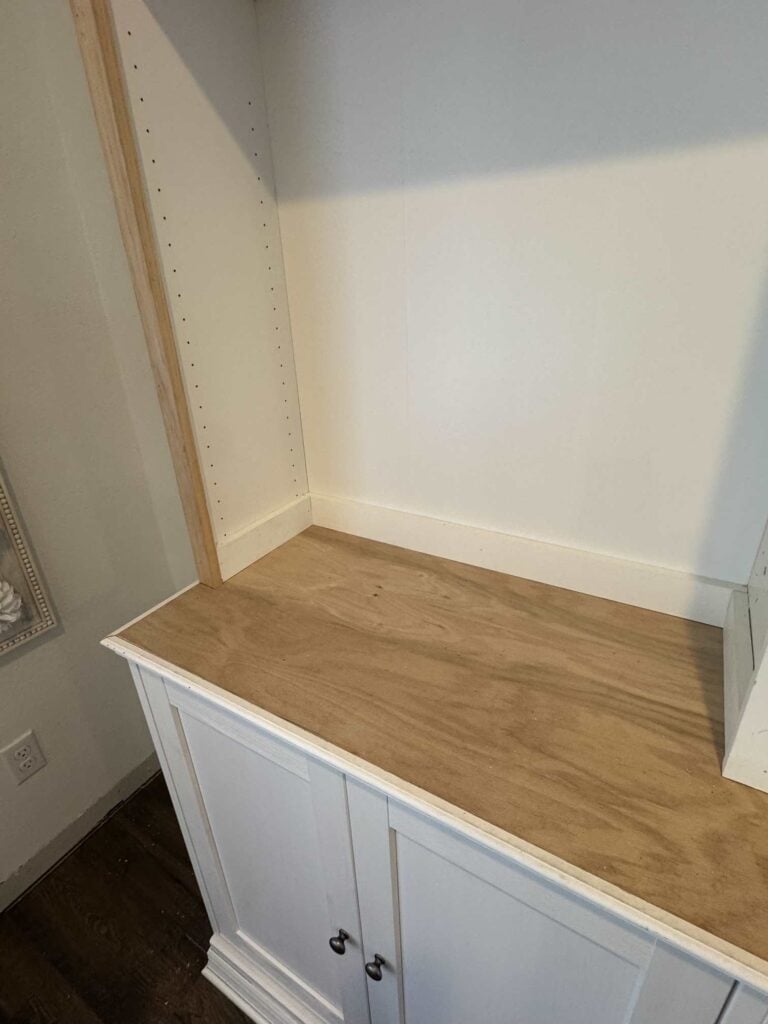
6) Add a wood Countertop
Since we placed two base cabinets side by side, there was a visible seam where they met.
That seam definitely didn’t give us the custom look we were going for.
To fix it, we added a single piece of wood across the top of both cabinets to act as a countertop.
This simple step not only covered the seam but also created a smooth, seamless surface for the bookcases to sit on.
We measured the full length of the base cabinets and cut a solid piece of wood to fit.
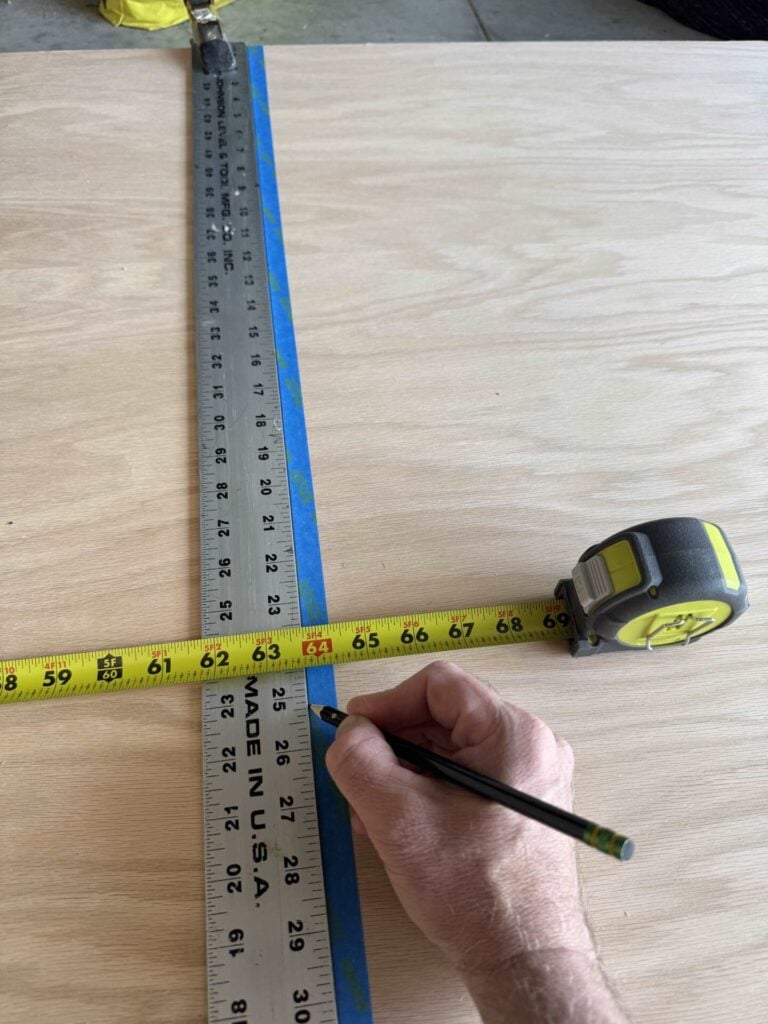
A helpful tip: place painter’s tape along the cut line and mark your measurements on the tape.
This helps prevent splintering when cutting plywood.
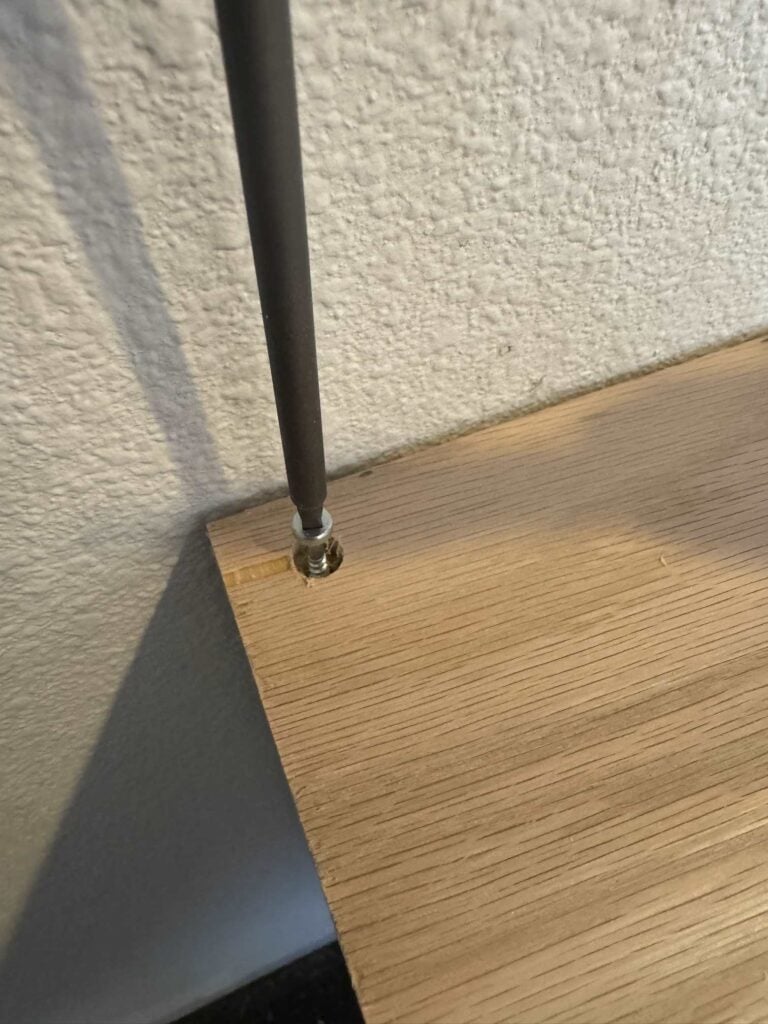
To secure the countertop, we pre-drilled holes using a Kreg countersink drill bit, drove in the screws, and then concealed them.
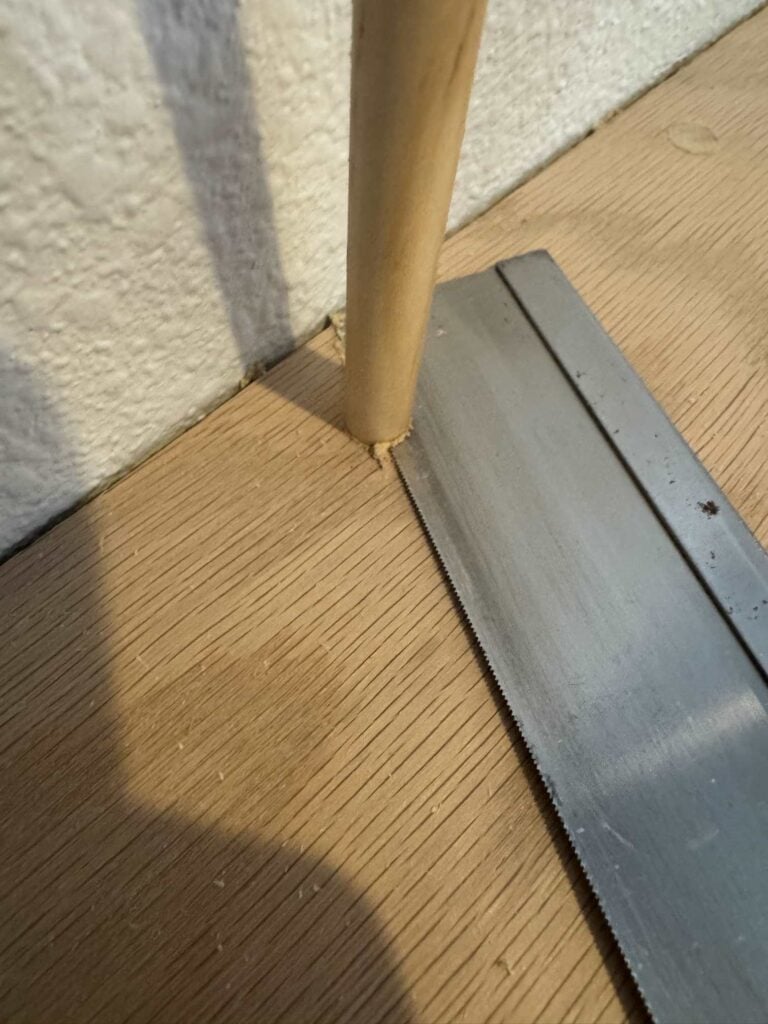
To do this, insert a small dowel rod into each countersink hole, trim it flush with a razor saw, and sand it smooth.
Once painted, the screw holes virtually disappear.
Adding the countertop instantly gave the cabinets a more built-in, custom appearance and provided a sturdy, polished base for the upper shelving.
We’re so excited to have the first half of our IKEA cabinet hack finished!
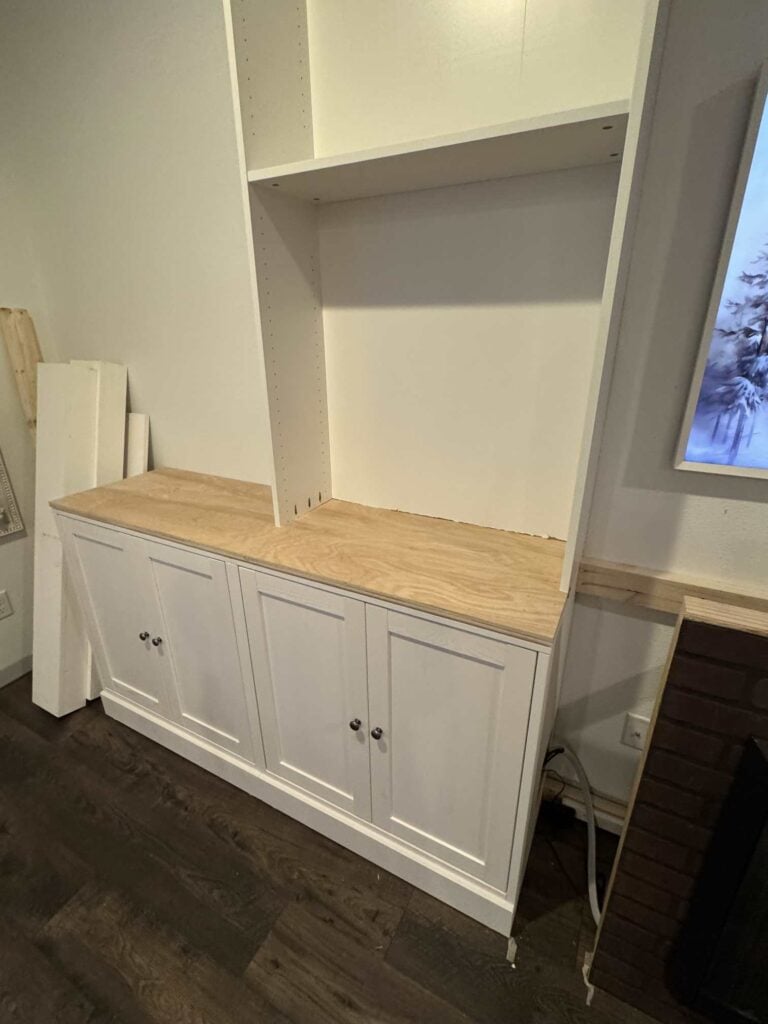
Sorry, we forgot to take a picture of the counter before we started installing the bookshelves, but this gives you an idea of what it looks like.
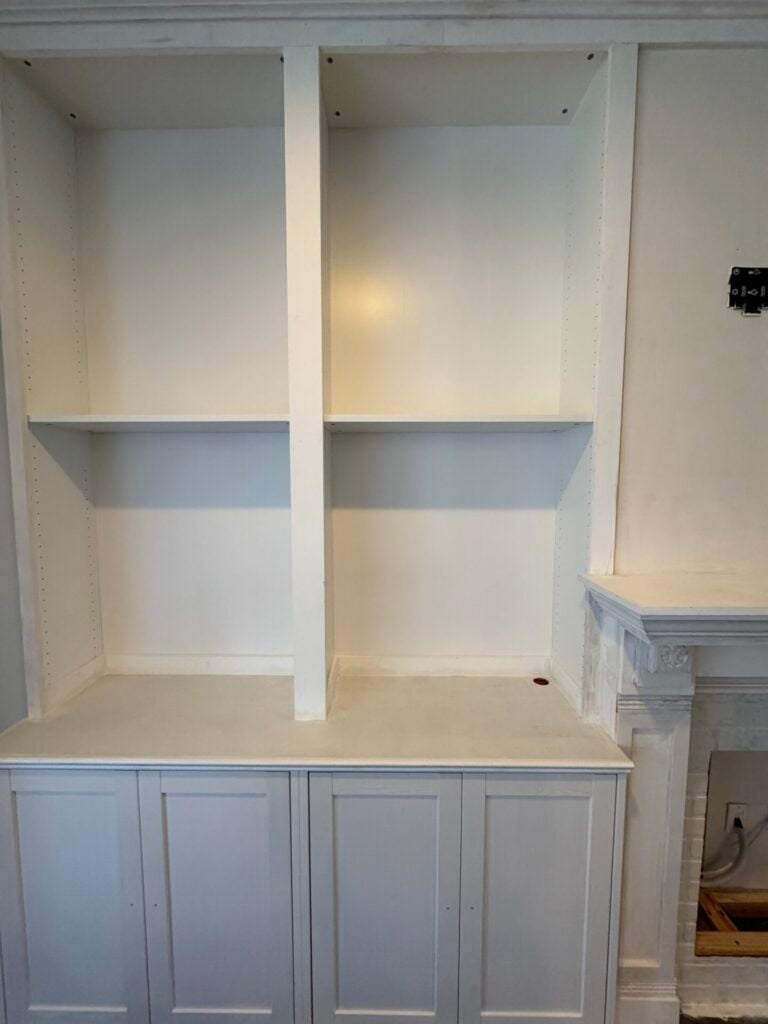
7) Put the Bookshelves on Top
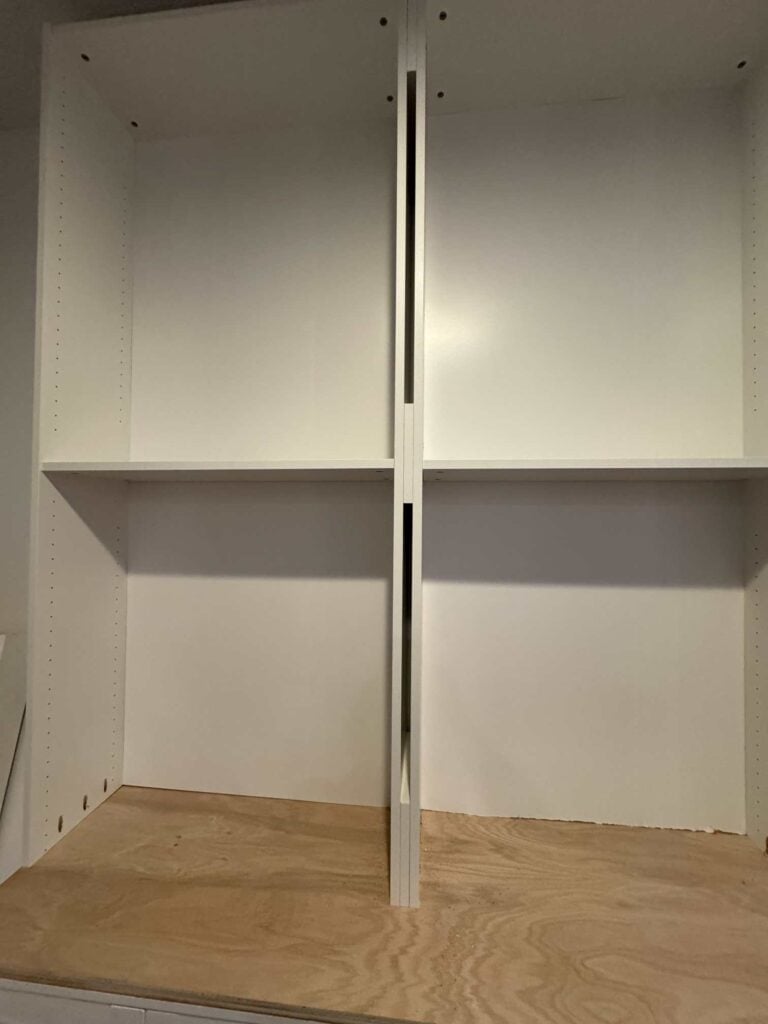
Once the base cabinets were secure, it was time to add the BILLY bookcases on top.
1) Cut the bookshelves
Because the shelves were taller than we needed, we trimmed them to fit our design.
First, we measured from the cabinet countertop to the ceiling, keeping in mind that we planned to finish the top with crown molding.
We test-fitted the molding where the ceiling and wall meet, then marked how far down it would sit.
To make the molding look seamless, the bookcases needed to reach just below that point—plus an extra ½” to ¾” to allow for a 1” x 3” board we would attach across the top.
This board would serve as a backing for the crown molding and give the final design a professional finish.
This approach left a small gap between the top of the shelves and the ceiling. That gap was intentional—it gave us space to secure anti-tip brackets into wall studs.
Tip: attach the brackets to the tops of the bookcases before lifting them in place, leaving them loose for adjustment.
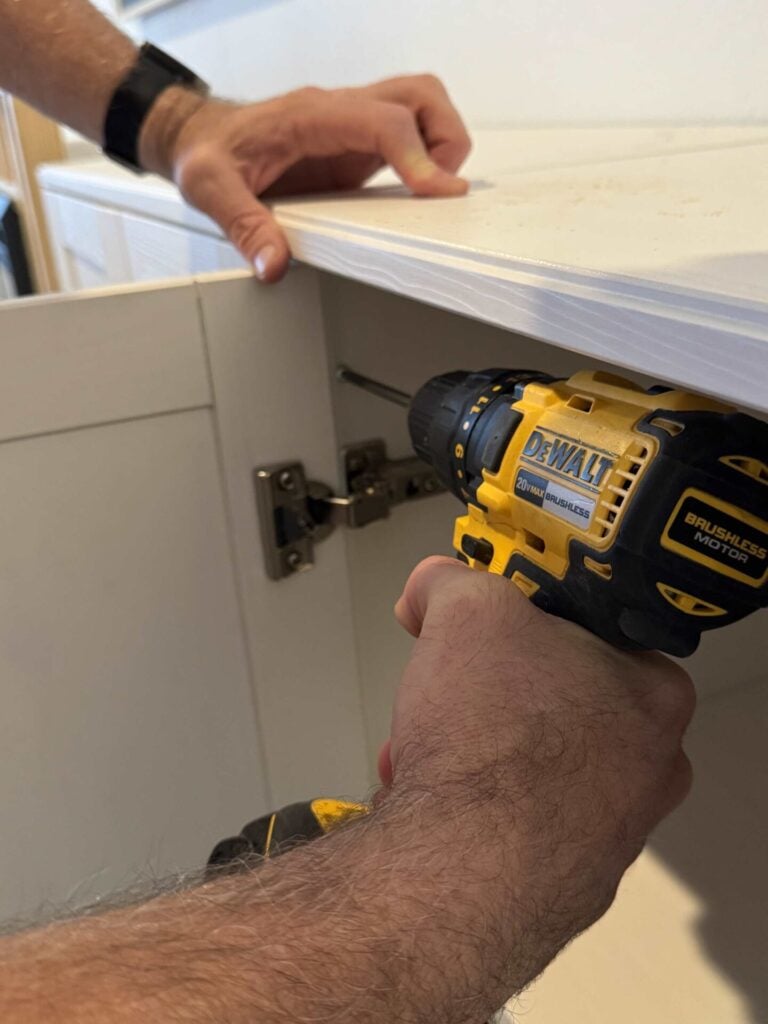
2) Place bookshelves on the cabinets
After cutting the shelves to the correct height and assembling them according to the instructions, we carefully lifted two BILLY units onto the HAVSTA base cabinets.
3) Secure bookshelves
Since the bookcases weren’t the exact width of the cabinets, we aligned each one with the outer edge, leaving a small gap in the middle.
To close the gap and tie the units together, we inserted scrap wood pieces between the bookcases and secured them with countersunk screws through one unit, into the scrap piece, and then into the other unit.
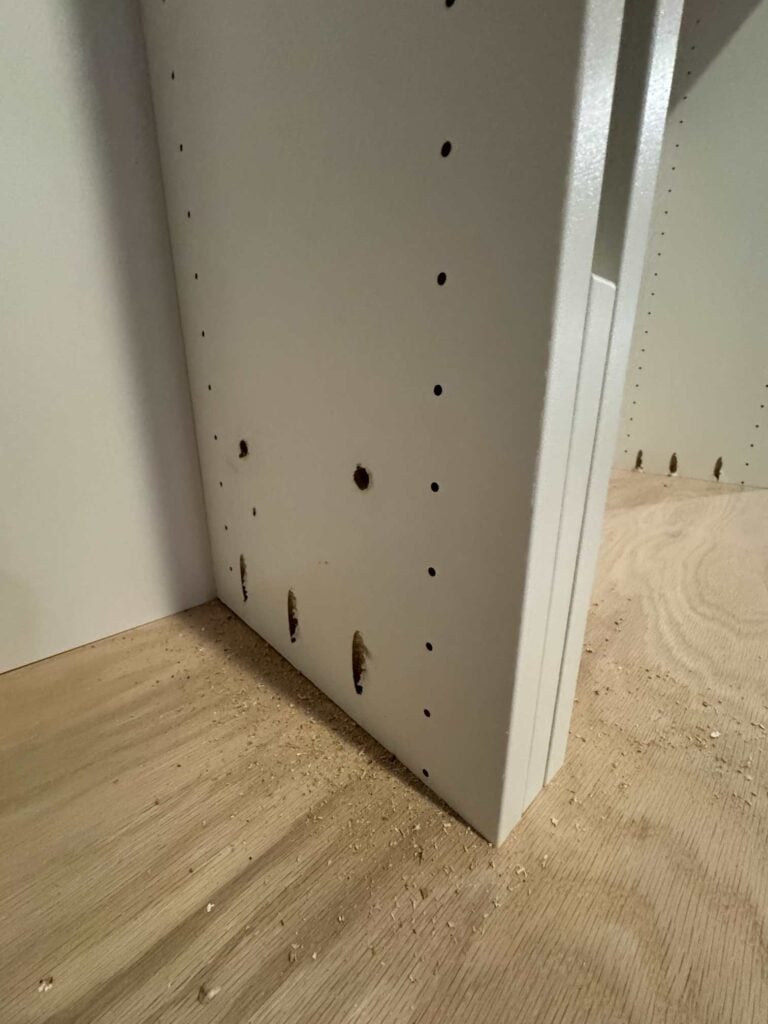
To attach the bookcases to the countertop, we used a Kreg Pocket hole jig to drive pocket hole screws down through the shelves into the countertop.
Pocket hole plugs can then be added, sanded smooth, and painted to conceal the screws.
Finally, we anchored the bookcases to the wall studs using the anti-tip brackets.
This step was crucial since the units are tall, and we wanted them to stay perfectly stable before moving on to trim and finishing work.
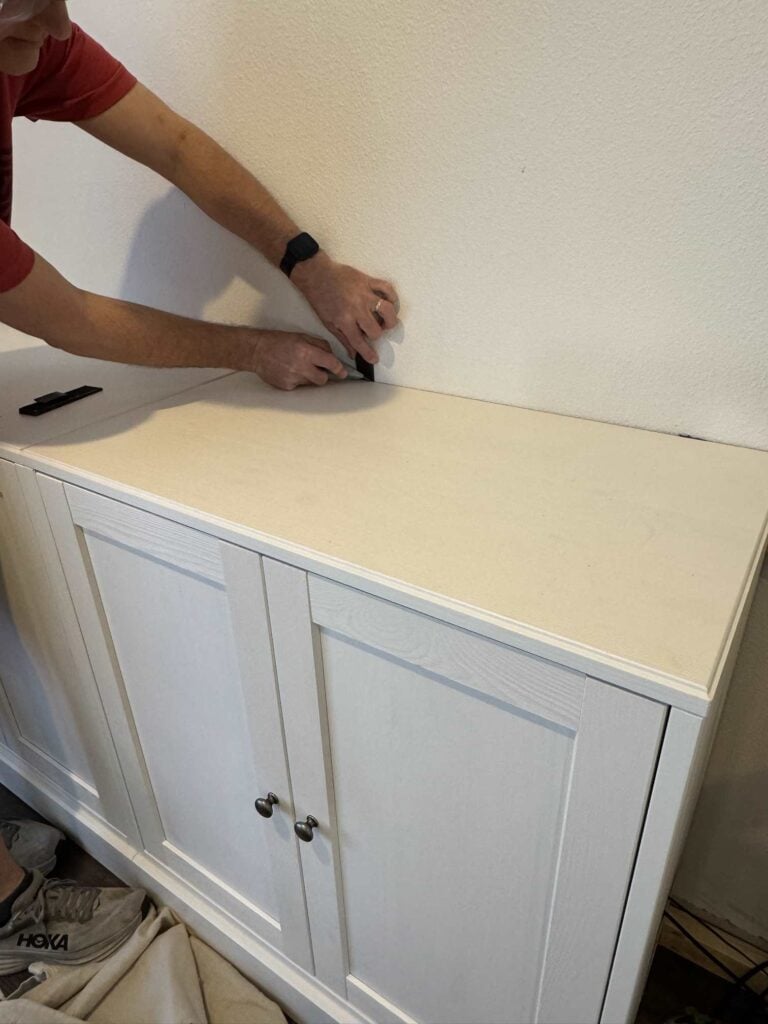
8) Create the Built-In Look with Trim
This is the step that really transforms the project from “IKEA cabinet hack” to “custom built-in.”
We trimmed the outside edges of each bookcase with 1” x 2” boards for a clean, finished look.
Since the center gap was wider, we used a 1” x 4” board there so it would visually balance with the slimmer side trim.
At the base, we reused the original baseboard from the wall and attached it across the bottom of the cabinets.
We finished it off with quarter-round molding to create a smooth, seamless transition to the floor.
This step not only hid any gaps but also made the built-ins feel fully integrated into the room.
Next, we covered the pocket hole plugs at the base of the shelves by wrapping the bottom with 1” x 3” boards. This simple step not only hid the joinery but also added a sturdy, built-in feel.
Finally, we trimmed the top edge of the cabinet countertop with colonial-style base cap molding, which tied the two sections together and created a more cohesive design.
Pro Tip: We attached all of the trim using a brad nail gun. It’s a quick, precise way to secure boards without splitting the wood and creates a clean finish ready for caulking and painting.
We’ll also be adding crown molding along the top of the shelves, but since it connects with the fireplace and TV wall, that will all be revealed in Part 2.
9) Add Holes for Electrical Cords (Optional)
There’s one more feature we want to share.
We wanted a way to light up Christmas village houses and other decor during the holidays, so we drilled small holes in the tops of the cabinets to run lights and cords.
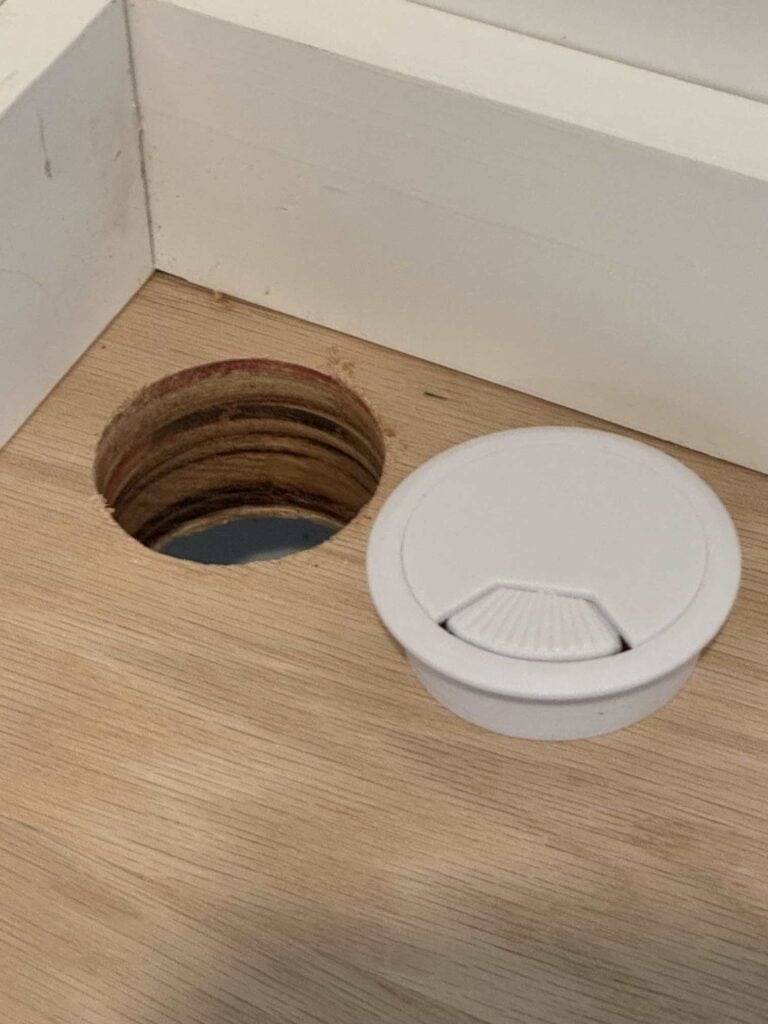
Once the cabinets are painted, we’ll install white desk grommets over the holes to give a clean, finished look while still allowing wires to pass through.
This simple addition not only makes decorating for the holidays easier but can also be used year-round for lamps, string lights, or other electronics.
Well, the building process is done!
What do you think of our IKEA cabinet hack so far?
Now, let’s add the finishing touches to make it look fabulous!
Paint & Hardware
1) Prep
Start by filling any nail holes or imperfections with wood filler.
Once dry, sand the surfaces smooth.
Clean off all dust by vacuuming and wiping with a tack cloth to ensure a flawless finish.
2) Prime
Next, cover any bare wood areas with primer.
We used Zinsser B-I-N primer for its excellent adhesion and coverage.
The IKEA cabinets themselves were already pre-primed, so this step was mainly for the trim and countertop.
3) Paint
To ensure a cohesive look across all elements, we took one of the shelves to Sherwin-Williams for a color match.
While we didn’t paint the shelves, we painted the cabinet fronts, countertop, and trim so everything looked unified and polished.
4) Add Hardware
After installing the hardware that came with the IKEA cabinets, I didn’t like the cool tones.
So we gave the knobs a little upgrade by applying Rub ‘n Buff in Gold Leaf.
This added a subtle, elegant touch that matched the gold frames and brass candlesticks.
It’s incredible how this transformation helped the hardware feel more custom and high-end.
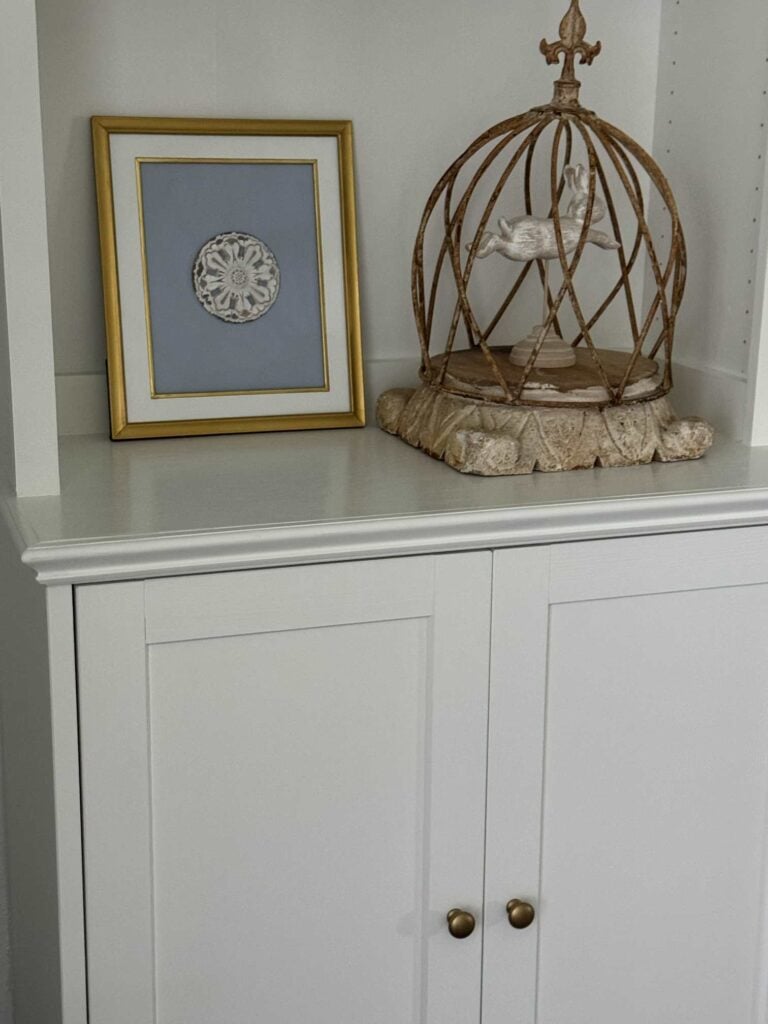
Style the Shelves
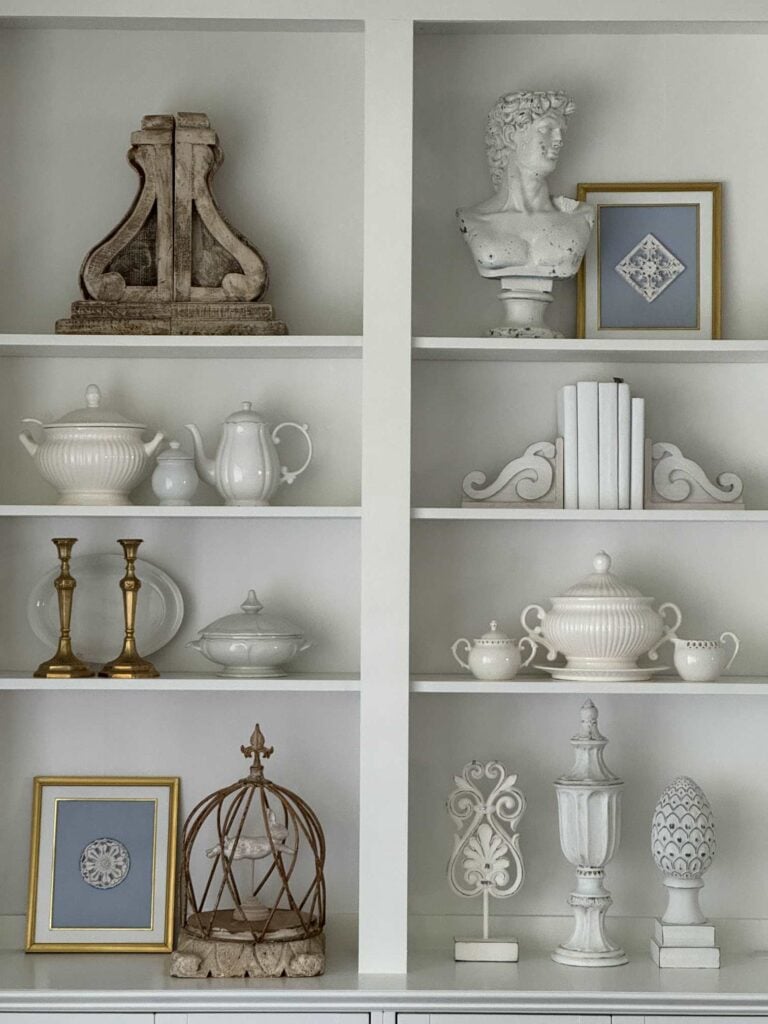
Our IKEA cabinet hack is finished, and now it’s time for the fun part—styling!
I filled the shelves with a mix of books, decorative accents, and personal treasures to give the space warmth and character.
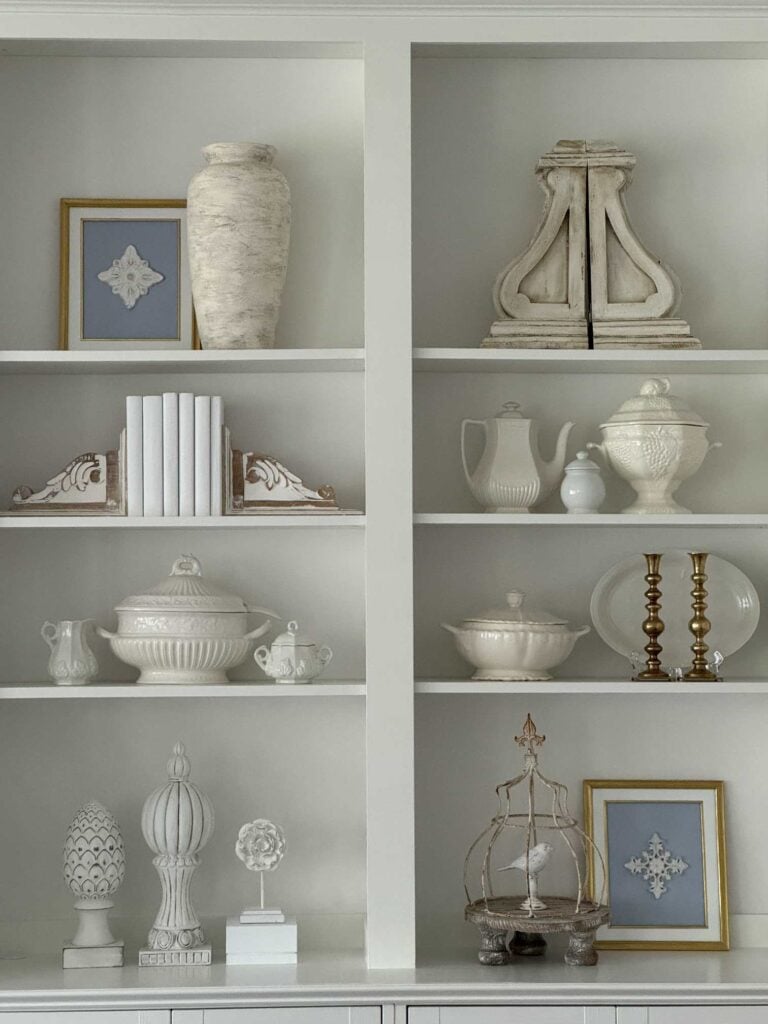
You may recognize these photos from our Living Room Makeover post, where we share more details about the decorating process.
Be sure to check it out if you want extra inspiration for arranging bookshelves.
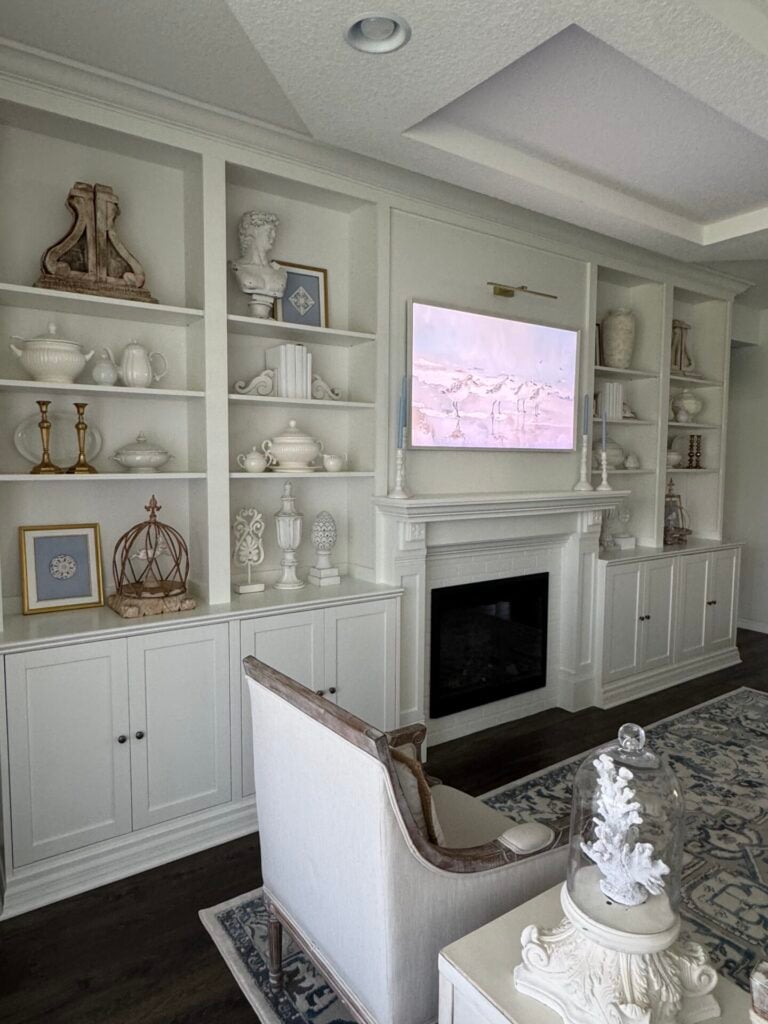
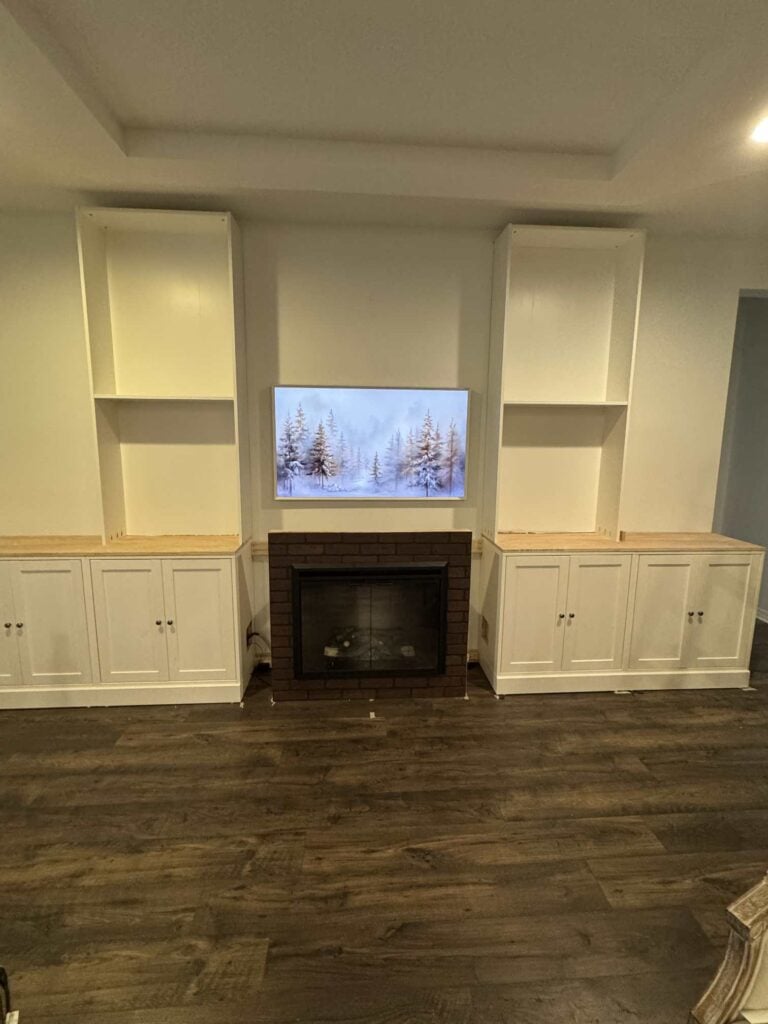
Final Reveal and Thoughts
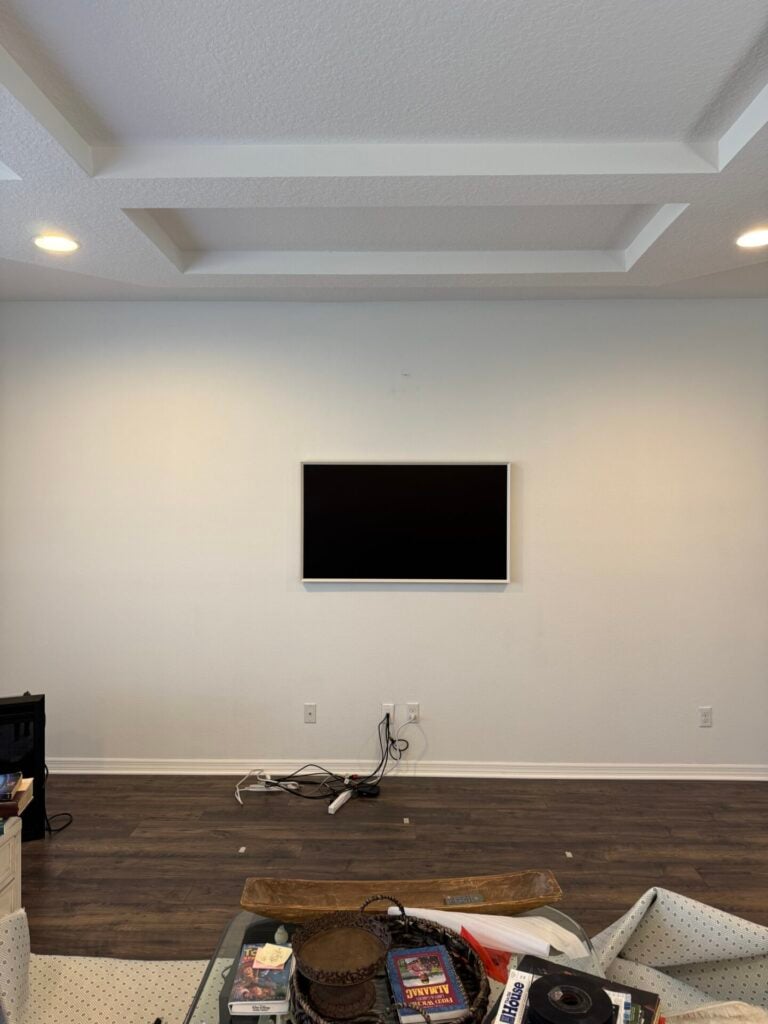
Nothing tells the story better than a good before-and-after.
When you compare the blank wall we started with

to the finished built-ins, the transformation is dramatic!

Standing back and looking at the finished built-ins, we couldn’t be happier with how this IKEA cabinet hack turned out.
And it gets even better after we decorated!
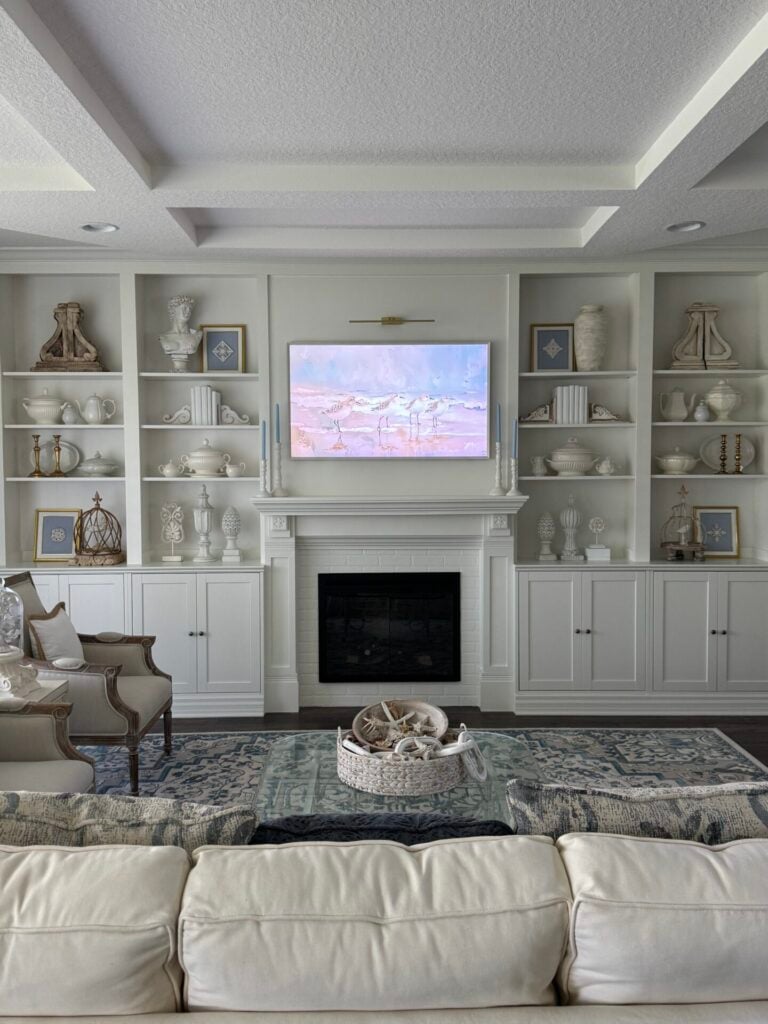
The combination of closed storage, open shelving, and trim details gave us the custom, built-in look we were hoping for—at a fraction of the cost of hiring it out.
These cabinets completely transformed our living room, making the space feel more polished and functional.
And the best part?
This was only Part 1 of our feature wall makeover!
In Part 2, we’ll show you how we took these built-ins to the next level by adding a cozy electric fireplace and TV wall. See it here.
If you enjoy the blog, please sign up for our email list to stay updated!
Until next time, follow us on Pinterest, Facebook, and Instagram!
Blessings, Donna and Rich
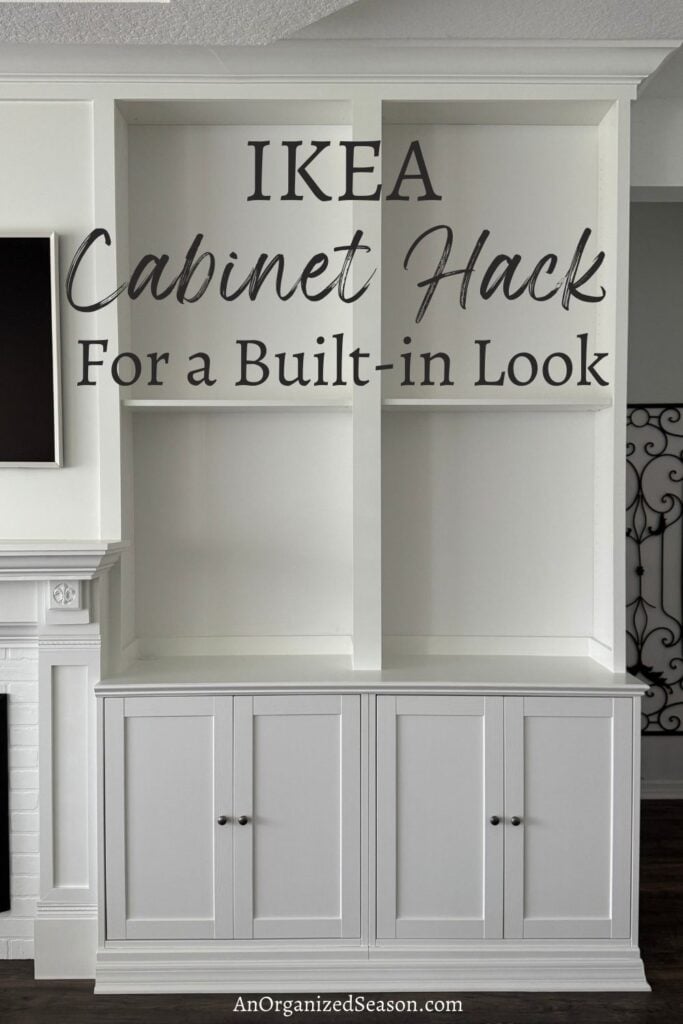
Pin It For Later
Don’t forget to pin the image below to one of your Pinterest boards (hover over the picture and click the red Pin button in the top left corner).
More DIY Home Improvement Inspiration
Interested in seeing more DIY projects we’ve done to improve the beauty and function of our home?
You won’t want to miss these posts:
- How to Build a DIY Plate Rack
- Upgrade Your Bathroom Mirror
- Learn to Hang Pendant Lights
- Install Overhead Storage in Your Garage
- How to Build an Accent Wall
Related Posts:


**Some of the links in this post are affiliate links. This means if you click on the link and purchase the item, we will receive an affiliate commission at no extra cost to you. We appreciate your support. (disclosure policy)
Love the IKEA built in hack!
Thank you! We are so happy with how it turned out!
Thank you for giving detailed instructions. I want to do a similar project!
You are welcome! I’m so glad you found it helpful! Have fun making something of your own!