Do you wish you could learn how to decorate a Christmas tree like the pros? You’ll be happy to know it’s not about having expensive, high-end decorations—it’s all about how you place each item on the tree!
In this post, I’ll walk you through how to decorate a Christmas tree step by step, so you can create a stunning display that looks designer but stays budget-friendly.
**Some of the links in this post are affiliate links. This means if you click on the link and purchase the item, we will receive an affiliate commission at no extra cost to you. We appreciate your support. (disclosure policy)
I know it’s October, but we’re decorating early this year because I want to give you plenty of time to find the perfect tree if you’re in the market for one.
Now’s also a great time to start shopping for ornaments and ribbon before the styles or colors you need sell out!

And if you notice a few pumpkins or fall leaves hanging out nearby—don’t worry!
My house currently looks a bit like the stores this time of year… a mix of Halloween, fall, and now Christmas all at once!
Are you ready to grab some inspiration and learn a few simple tricks so you can turn your Christmas tree into the sparkling centerpiece of your holiday home?
Let’s get started!
Choosing the right tree
Before we dive into decorating, let’s talk about the most essential element of your holiday setup—the tree itself!
This post is part of a product exchange partnership with King of Christmas. As always, all opinions and experiences are my own. You can read our full disclosure policy here.
Although this tree was gifted, I truly believe that investing in a high-quality artificial tree is worthwhile because it can be used year after year.
I’m a fan because their trees are lovely, easy to assemble, and look incredibly realistic.
Whether you love a traditional full tree, a slim design for tighter spaces, or the soft, snowy look of a flocked style, they have something for every home.
So let’s get our new tree set up!
Setting up our new tree
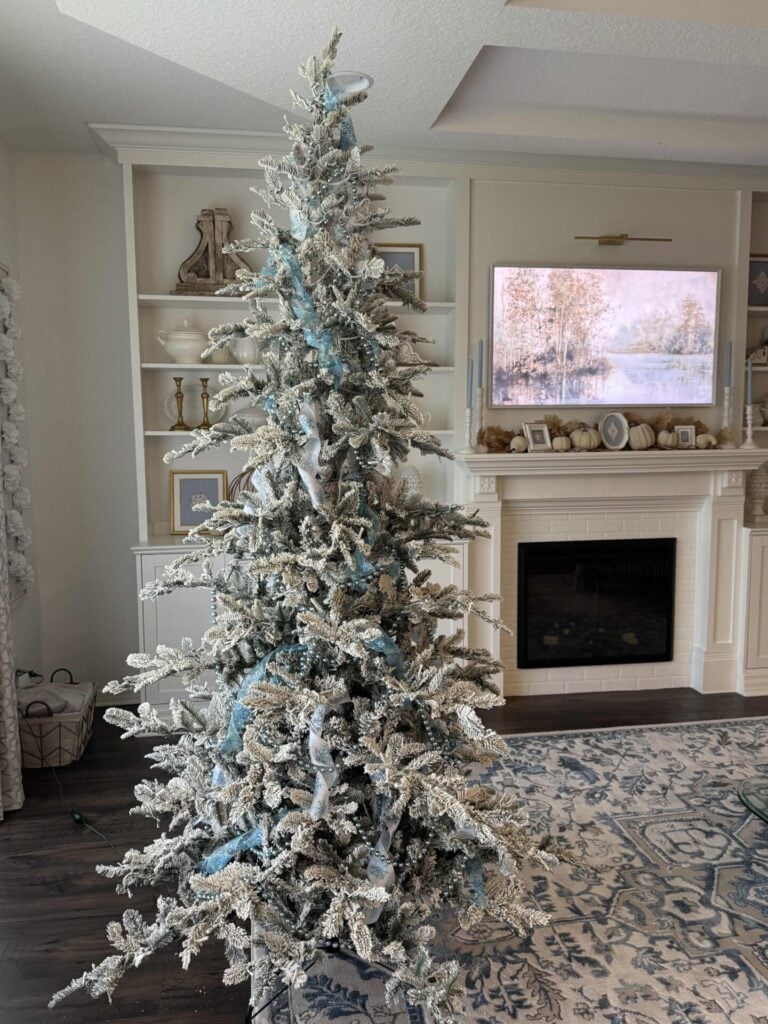
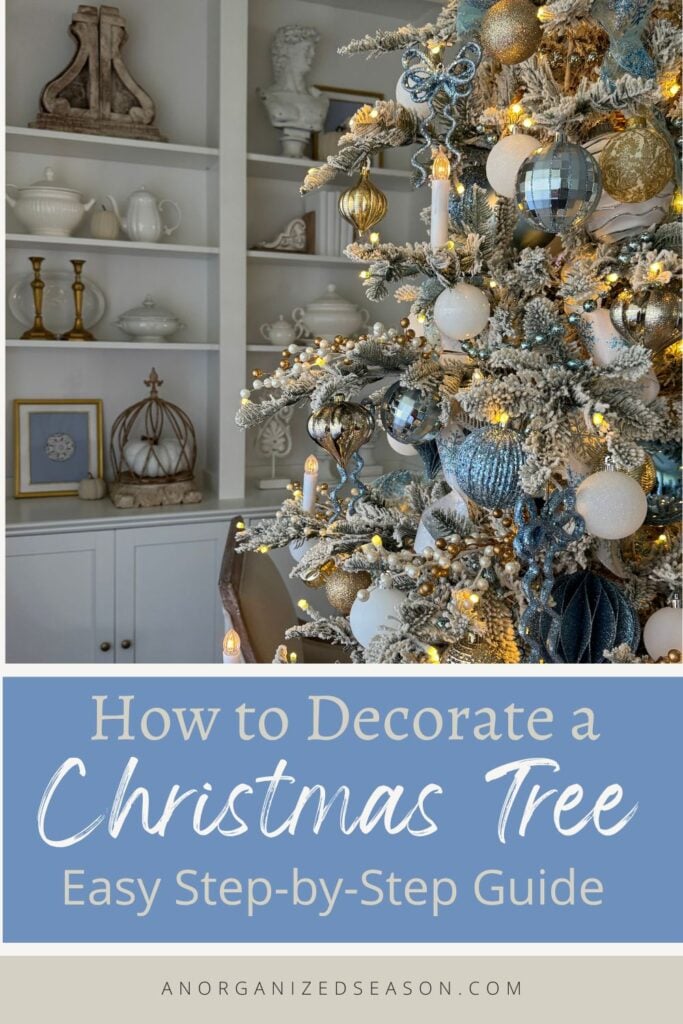
The tree I’m decorating this year is the 8-foot King Noble Fir Tree, which is flocked and has 600 warm LED lights, and I love how realistic it looks!

Each section is marked with a letter, making it easy to assemble. Just put sections A, B, and C together and plug the tree in!
And here’s what it looks like after it’s fluffed (we’ll discuss this in more detail in just a minute)!
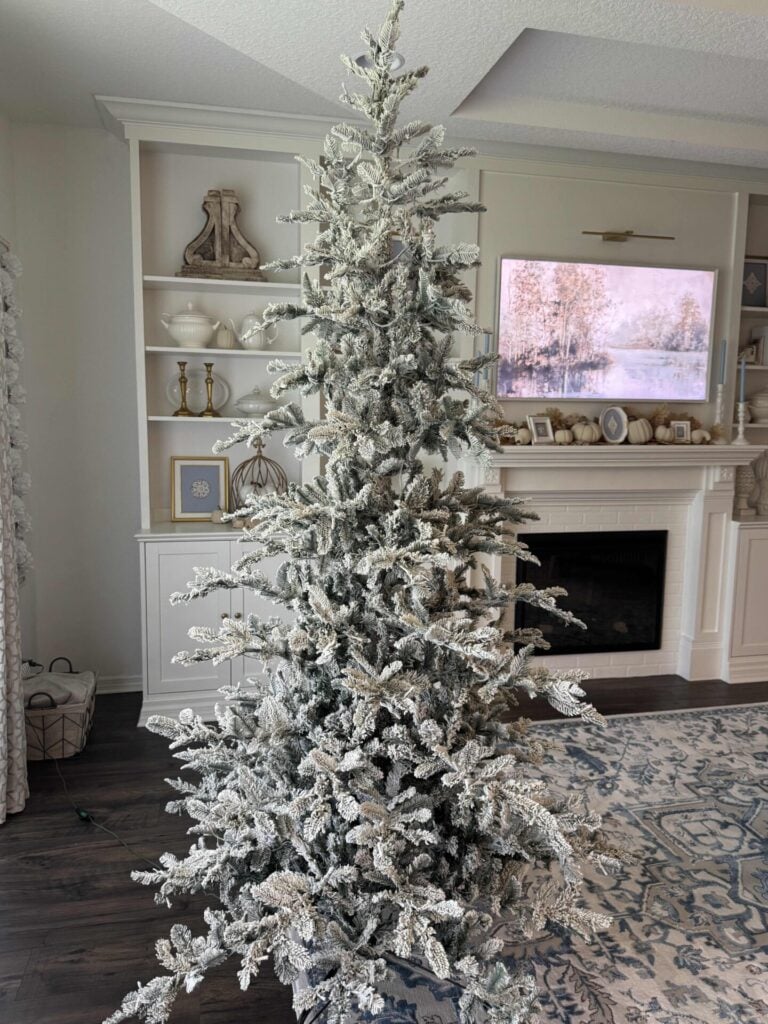
Isn’t it gorgeous!
It’s truly one of the most lifelike styles you can choose—and it makes decorating so much easier!
Bonus tip: Noble firs are known for their natural spacing between branches, which makes them perfect for showcasing ornaments and layered ribbon. The lush, layered needles mimic the look of a fresh evergreen, while the branch structure provides plenty of depth for decorations to sit both inside and outside the tree.
If you’re shopping for a new tree, I highly recommend checking out our post How to Choose the Best Artificial Christmas Tree for tips on finding the perfect size, shape, and style for your space.
If you’re not in the market for a tree but are interested in a beautiful garland, wreath, or tabletop tree, click here.
Once you’ve decided on a Christmas tree and set it up, you’re ready for the best part—decorating!
How to Decorate a Christmas Tree

Decorating a Christmas tree might seem overwhelming at first, but once you know the correct order, it’s surprisingly simple!
I created this tree to match our living room, but I also use the same strategy for our family tree, which features ornaments our boys have made and collected over the years.
Following these easy steps will help you create a tree that looks cohesive, balanced, and beautifully styled—just like the pros do.
From adding lights and ribbon to finishing with ornaments and stems, you’ll see how layering each element brings your tree to life.
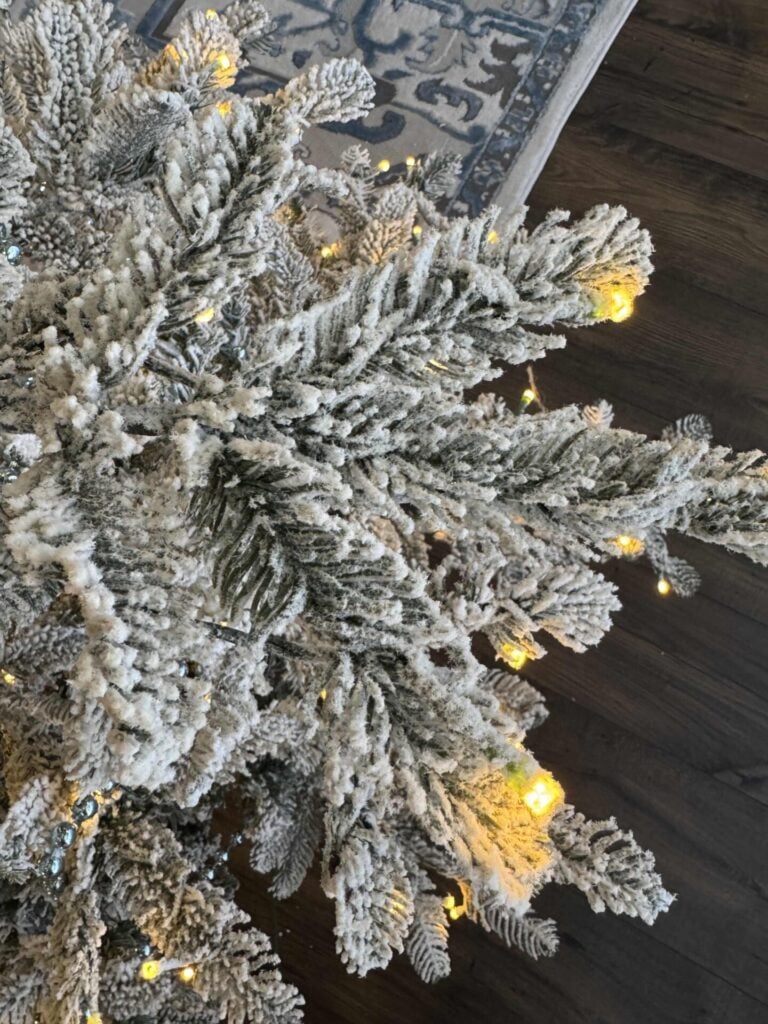
Fluff the branches
The first step to decorating a Christmas tree like a pro is to fluff the branches.
Please don’t skip this step; it’s essential to have a fabulous base.
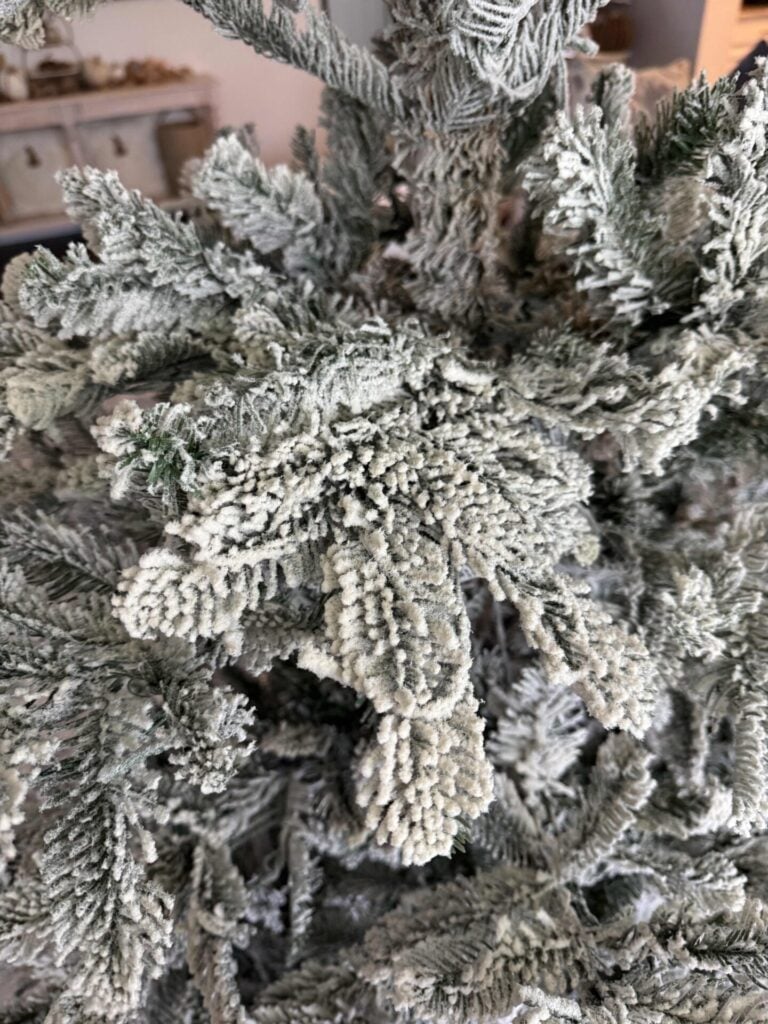
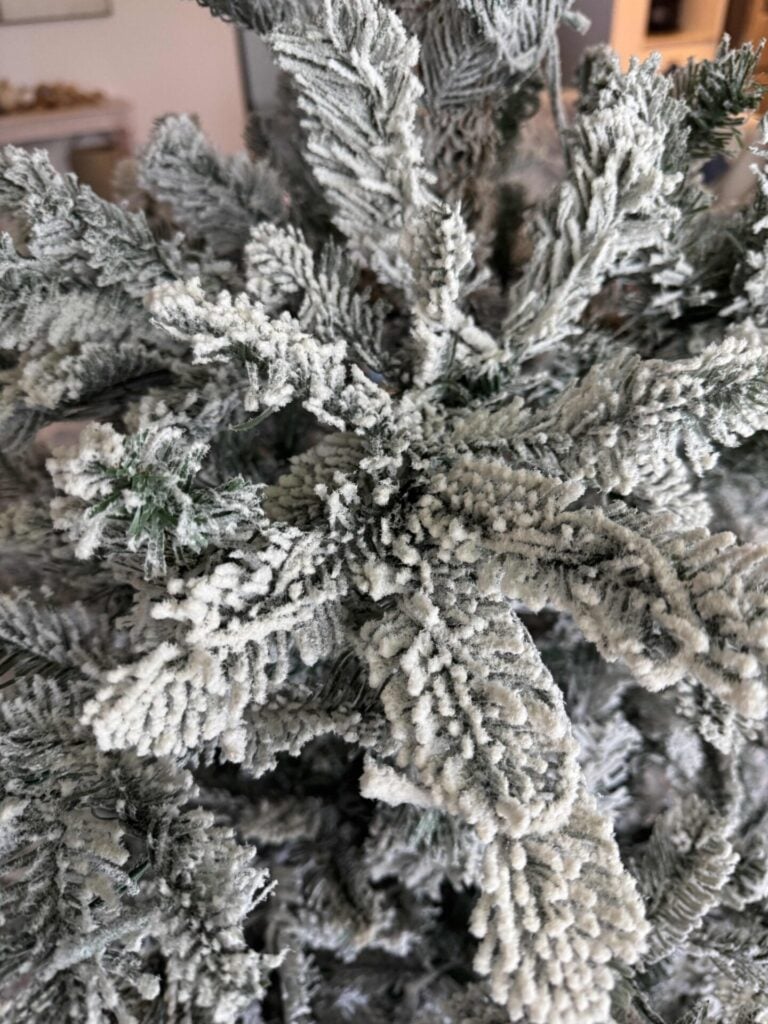
Look how much better that branch looks now!
I know this part may seem tedious, but it makes a significant difference in how full and realistic your tree appears.
Start at the bottom and work your way up, gently separating each branch and spreading the tips in different directions to fill any gaps.
Take your time with this step—it’s the foundation for a beautiful tree and helps everything you add afterward, from lights to ornaments, look more natural and evenly distributed.
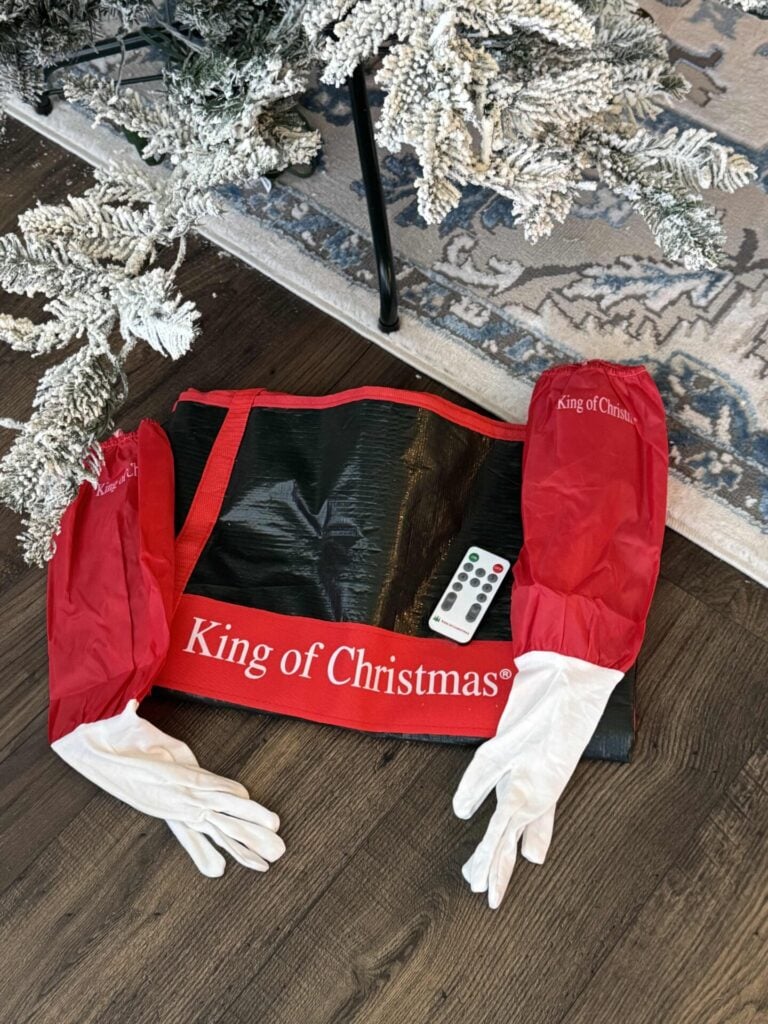
Bonus tip: One of the things I love most about King of Christmas trees is that they include a pair of long gloves with each tree! These make the job of fluffing so much easier—and much more comfortable. The gloves protect your hands from scratches from the branches as you shape and adjust each section. It’s a thoughtful touch that shows just how much King of Christmas cares about the little details! Plus they give you a bag to store your tree in and a remote control for the lights!
Add the Lights (if not pre-lit)
One of the best parts about my King of Christmas tree is that it’s pre-lit, so I can skip this step and move right on to decorating!
But if your tree doesn’t have built-in lights, here’s a trick the pros use to get that beautiful, even glow: instead of wrapping the strands around the tree, weave the lights up and down each branch, moving from the trunk toward the tip and back again.
This helps conceal the wires and adds depth and dimension to your tree.
Step back every few feet to ensure the lights appear balanced before proceeding to the next section.
Incorporate Garland
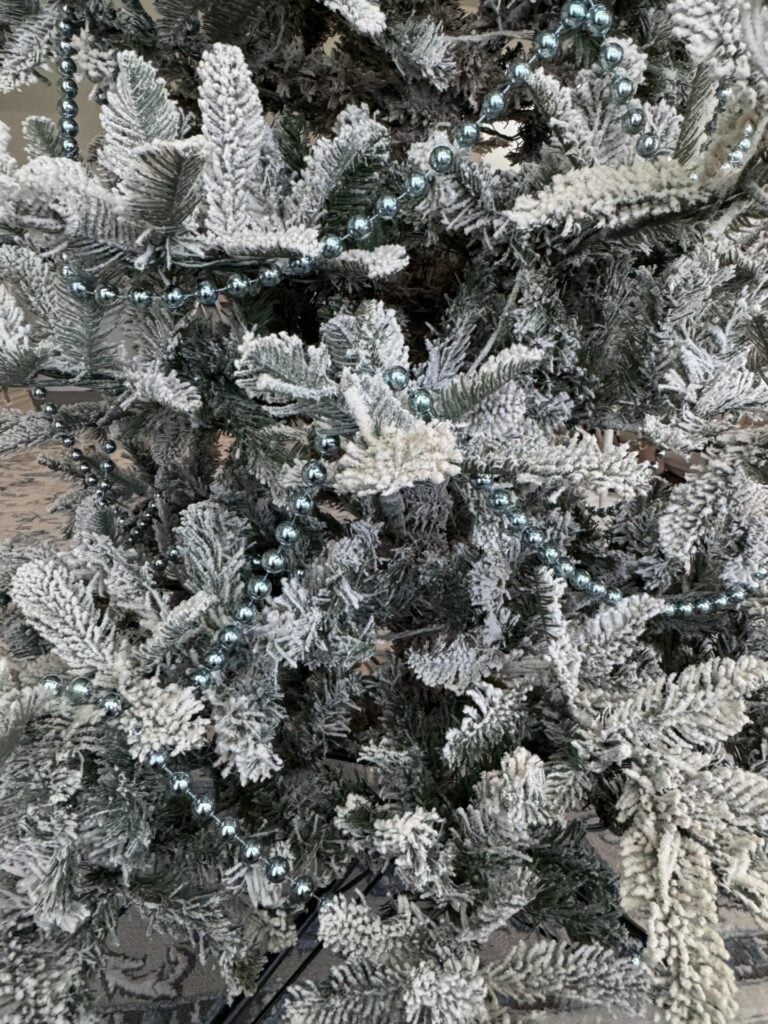
Once your lights are in place, it’s time to decorate your Christmas tree with garland.
This layer helps create flow and adds another dimension to your tree’s design.
For this step, I’m using blue bead garlands to tie in the color scheme of our holiday decor.

Instead of wrapping them in circles around the tree, I prefer to drape the garland in a scalloped pattern, allowing it to hang gracefully between the branches.
This technique gives your tree a softer, more natural appearance, preventing it from looking too uniform.
If you’re using a different type of garland—like ribbon, tinsel, or wood beads—use the same draping motion and tuck it slightly into the branches to help it look integrated, not just sitting on the outside edges.
Layer in Ribbon
Ribbon is one of my favorite ways to make a Christmas tree look full and professionally decorated.

This year, I’m using two coordinating ribbons in shades of blue and white to complement the rest of our holiday decor.
Instead of wrapping the ribbon all the way around the tree, I like to cut it into pieces (mine are 18 inches long, but you can make them any length you prefer), twist each piece slightly, and then tuck it into the branches in a cascading or zigzag pattern.
This technique makes the ribbon appear as if it’s naturally woven through the tree, rather than circling its outside.
Bonus tip: For added dimension, try layering your ribbons—start with a wider one and then add a narrower ribbon on top or nearby. Mixing textures (like satin and velvet, or metallic and sheer) can also create a luxurious, custom look.
Secure the Tree Topper
While many people save the tree topper for last, I’ve found that if you plan to use something more substantial than a traditional star or angel, it’s best to add it before the ornaments.
This way, you can secure it firmly without disturbing the rest of your decorations.
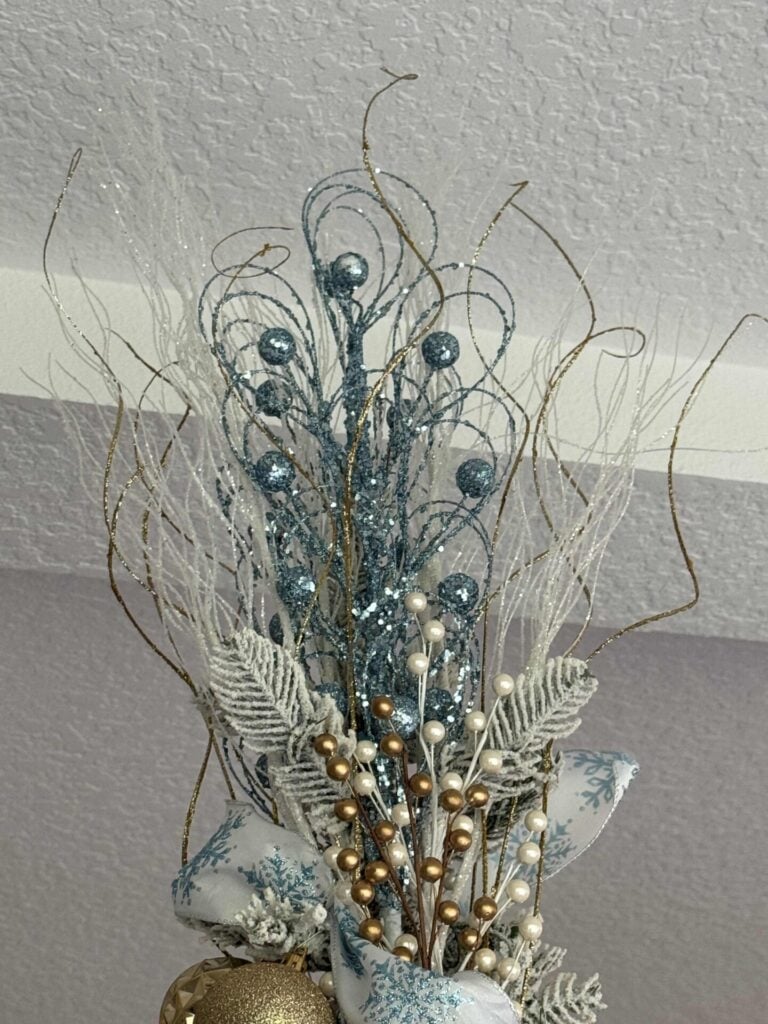
For my tree, I created a custom topper using a mix of blue, white, and gold picks (50% off at Hobby Lobby). I inserted them into the top of the tree and attached them with floral wire to keep everything in place.
This method enables you to create a topper that complements your color scheme, adding height, texture, and a designer look to your tree.
If you prefer a more classic look, you can still use a star or bow—just make sure it’s proportionate to your tree’s size and style.
Bonus Tip: If you love the look of a designer-style topper but don’t want to buy a pre-made one, try creating your own. You can make a topper to match the theme of your tree like I did with this nutcracker or this gingerbread house! This simple DIY approach gives you a high-end, personalized topper for a fraction of the cost!
Hang Large or Statement Ornaments
Now that the topper is in place, it’s time to start decorating!
Begin with your large or statement ornaments—these set the foundation for your entire tree design.
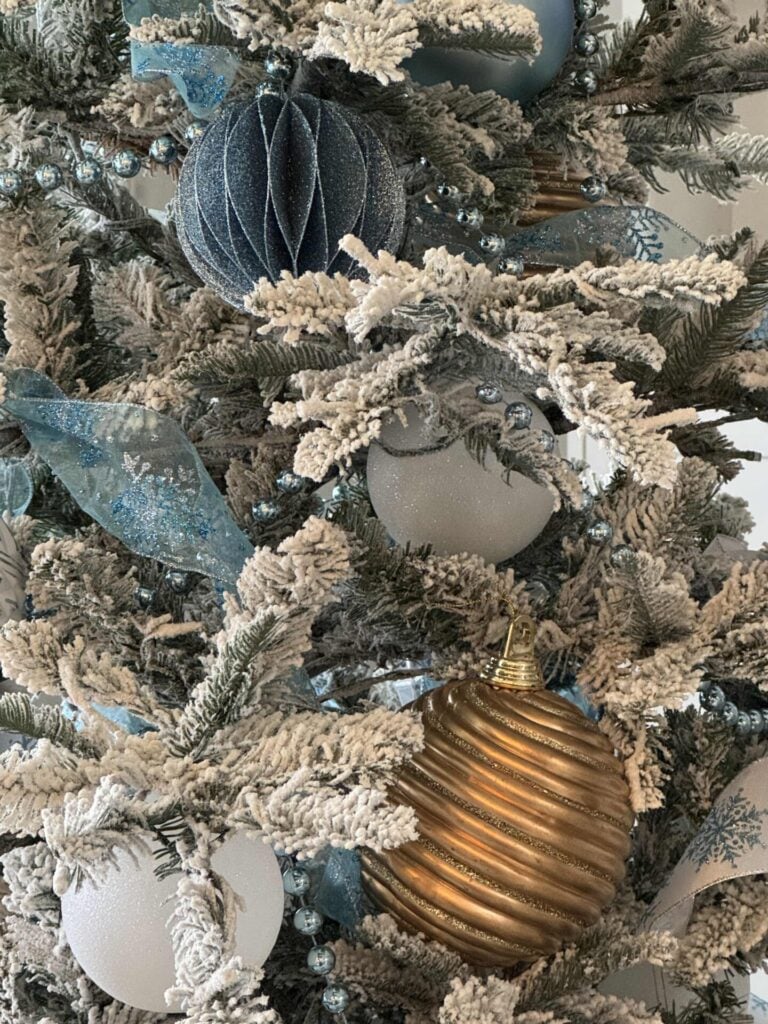
I’m using oversized ornaments in gold, white, and blue to coordinate with the rest of my decor.
Instead of hanging them on the outer branches, I place them deeper inside the tree, closer to the trunk, adding depth.
Bonus tip: Over the years, I’ve learned that it’s smart to collect basic round ornaments in different sizes and colors. They’re inexpensive and can easily be reused year after year—no matter what theme or color palette you choose. Then, you can add a few specialty or themed ornaments to give your tree a fresh, updated look each season without breaking your budget.
Add the Rest of the Ornaments
Once your large ornaments are in place, it’s time to decorate your Christmas tree with the rest of your ornaments.
This is where your tree’s personality really shines!

I’m using a mix of orbs in coordinating shades of blue, white, and gold for a cohesive look.

To add variety and texture, I also included some of my DIY decoupage ornaments, which I made a few years ago.

And to add a little sparkle, I purchased these beautiful blue bow-shaped ornaments (50% off at Hobby Lobby).

Last, but certainly not least, I incorporated two battery-operated candle sets onto the branches for a warm, nostalgic touch.
The sets come with a remote control, making it easy to turn them on and off.
They add a soft, cozy glow that complements the tree lights beautifully, giving the whole display a magical, old-fashioned charm.
Bonus tip: When decorating, try to mix finishes and textures—such as matte, glossy, glittered, or patterned pieces—to make your tree more visually interesting. Step back periodically to assess your spacing and color distribution, making adjustments as needed to achieve a balanced look.
Fill Gaps with Stems and Picks
The final layer of decorations is often what makes a Christmas tree look professionally styled.
Stems and picks add texture, fill in any sparse areas, and give your tree that lush, finished look.

This year, I’m using two different berry stems (I’ve had for many years, but I think you can still get them at Hobby Lobby)—one gold and one white. To create a fuller, more custom look, I layered them together, twisting the stems around each other before placing them on top of some of the branches.

I adore how these look layered over the pretty branches.

I couldn’t resist these white sparkly picks I saw at Hobby Lobby (50% off), so I grabbed six of them to finish off the tree.

The picks add just the right amount of sparkle and tie in beautifully with the rest of the tree.
Bonus tip: When placing picks, focus on areas that look a little bare or need a pop of shine. Angle them in different directions—some pointing up, others out to the sides—for a natural, organic feel. Don’t be afraid to mix materials like berries, sparkly picks, or flowers for extra dimension.
Finish with a Tree Skirt or Collar
The final step to decorating your Christmas tree is to complete the look at the base.
Whether you prefer a classic tree skirt or a more modern tree collar, this finishing touch helps hide the stand and ties your entire design together.
I was originally planning to use a white throw blanket around the base of the tree, but then I spotted a metal tree collar (50% off at Hobby Lobby) that I really liked.
However, it was silver and I wasn’t sure how that would look.
I put it in my cart anyway because I knew I could paint it white and add gold accents.
However, when I placed it under the tree to ensure it fit around the stand, I really liked it as is.

It adds just the right amount of shine and coordinates beautifully with the blue, white, and gold color palette of my tree.
Bonus Tip: Even on a budget, you can achieve a polished look without spending much. Try draping a cozy throw blanket around the base of your tree, or get creative and make your own collar—you can see one that I made by clicking here!
Final Touches and Clean-Up

Once everything is in place, take a few minutes to step back and admire your work!
This is the time to make any small adjustments—move an ornament here or there, fluff a branch, or reposition a ribbon tail—to get the perfect finished look.
If you have a flocked tree, you know that decorating can leave a light dusting of flocking on the floor.
A quick vacuum or sweep around the base will take care of it in no time.

After cleaning up, turn on your lights (and remote-control candles!) and enjoy the cozy glow.
There’s nothing quite like the moment your Christmas tree is complete—it instantly makes your home feel warm, festive, and ready for the holidays.
Closing Thoughts
There you have it—your step-by-step guide on how to decorate a Christmas tree like a pro!
I hope these tips inspire you to try a few new techniques this year and give you the confidence to create a tree you absolutely love.
If you’re still searching for the perfect tree, be sure to check out King of Christmas—their trees are truly stunning and make decorating so much easier.
I’d love to know what colors or theme you’re using to decorate your Christmas tree this year, so be sure to share in the comments!
If you enjoy the blog, please sign up for our email list so you won’t miss a post!
Until next time, follow us on Pinterest, Facebook, and Instagram!
Blessings, Donna and Rich
More Christmas Decorating Inspiration
If you loved seeing how to decorate this Christmas tree, you might enjoy looking back at some of our past holiday decor ideas!
Each one has its own unique theme and color palette, and I share plenty of tips to help you decorate for the holidays in a way that fits your home and budget.
Check out these posts for even more inspiration and creative ideas:
- Gingerbread Christmas Decor Theme
- Nutcracker Holiday Decor Ideas
- Winter Wonderland Woodland Theme
- Neutral Christmas Decor Ideas
- Pretty In Pink Holiday Decor
Pin It For Later
And don’t forget to pin this post so you can refer back to it when it’s time to decorate.
Related Posts:


**Some of the links in this post are affiliate links. This means if you click on the link and purchase the item, we will receive an affiliate commission at no extra cost to you. We appreciate your support. (disclosure policy)
Hey Donna! I just had to say that your tree is GORGEOUS! I hope all is well with you and the family!
Much Love,
Shar
Hi Shar! It’s so wonderful to hear from you! Thank you so much for letting me know that you like it! We are all doing well! Tell your sis I said hi! Blessings to you and yours!
This is such a pretty tree, Donna. I love the mix of blues, golds, silvers and whites. It’s such a beautiful combination. Our tree is up but it’s decorated for Halloween so I’m bookmarking this post for next month. The holidays will be here before you know it and I can’t wait to get started. Hugs, CoCo
Hi CoCo! I would love to see your Halloween tree, I hope you’re going to share it, I’m sure it’s fabulous! I’m so thrilled with our new tree and how well all the colors combined to match the living room! We love turning the lights on every night!
Donna, your tree is spectacular! I love all the layers of decor you added. It really makes for a full and festive tree. I actually have a few King of Christmas trees and I agree, they’re super easy to put up and they include everything you need to make set up quick and easy so you can get to the fun stuff!! Love the candle lights, too. They’ve always been my favorite. I might need to add them to our tree this year!!
Thanks so much Kim! Sounds like you love King of Christmas as much as we do! Their products really are fabulous! I am loving those Christmas candles, you’ll have to let me know if you get them! Take care!
Beautiful tree Donna and your decorations are absolutely gorgeous! Love the color pallet too, so elegant!
Thank you so much Michelle! I’m thrilled with how those colors look together!
Oh my goodness! What a beautiful tree! You know how I love all those blue accents! They would look so great in my living room!
I always wear winter gloves to fluff my tree (lol), but those long gloves that came with your tree are amazing! What a great idea! I can’t wait to see all of your Christmas decor a little later! It’s my favorite!
Thanks Missy! You are right, this tree would look lovely in your home! I’m thrilled with how pretty the blue, white, and gold ornaments look on it! And yes, those gloves are a game changer! Planning more Christmas decor now!
Even though I work in a Christmas store during the busy season, I always appreciate some tips on how to decorate a tree. Thanks for sharing your post, and I plan to return and read it again before I start designing a tree this weekend for a fundraiser event. This post will be a feature this week. #HomeMattersParty
Hi Donna, I’m so glad you enjoyed the post and I really appreciate you sharing it at your party! Thanks and I’ll see you on Friday!
Hi Donna! Your tree looks stunning. Every single detail is precious. Thanks for sharing. Pinning since so many great tips here. Thanks friend. XO- MaryJo
I’m so glad you enjoyed all the tips I shared MaryJo! Now I can’t wait to decorate more trees, lol! Thanks so much!
STUNNING tree, Donna!! You did such an amazing job with the decor…I especially love the tree topper!! Beautiful tree for the holiday season!
Thank you Rachel! It’s amazing how good DIY and inexpensive ornaments can look on a beautiful tree!!
WOW, you already have Christmas decorations going mid-October. Amazing, you’re well prepared
Thank you for linking to HIH 606. See you again!
Thank you Esme! Yes, we put our tree up early so others will have time to order a new tree or find similar ornaments before they sell out, if they’re interested!!
Wow, your tree looks perfect Donna. I am usually in the process of decorating myself, but I haven’t thought about it yet this year. Love your colors, our living room tree is typically decorated in many of these same tones, so your tree is really speaking to me. Hope you enjoy this holiday season!
Hi Cara! My aunt always had a flocked tree decorated in blue and white (because she was a UK fan) and although I thought it was pretty, I never thought I would do that. Then after we did a makeover on the living room I changed my mind. And boy am I glad I did! Have fun decorating your tree this year!