Looking for a meaningful Christmas craft this year? These DIY piano hammer ornaments are a special way to preserve family memories by upcycling parts from a beloved piano.
Table of Contents
**Some of the links in this post are affiliate links. This means if you click on the link and purchase the item, we will receive an affiliate commission at no extra cost to you. We appreciate your support. (disclosure policy)
The Story Behind the Piano
My grandmother was a fabulous pianist and owned a beautiful baby grand piano.
I have so many fond memories of our family gathered on Christmas Day, listening to her play and singing along to our favorite holiday songs.
When she passed, I inherited the piano, and I hoped one of our boys would learn to play.
Although each played an instrument, none were interested in piano, and over time, it sat untouched and out of tune.
Eventually, we decided it was time to let it go, and selling it wasn’t an option—it would cost too much to repair.
So, we carefully took it apart, saving several of the pieces to use in future DIY projects.
We made a desk for my office using the piano’s legs (you can see that project here), and for years I’ve wanted to create something meaningful with the piano hammers.
When I found out that the November Handcrafted Society challenge was to make something using sheet music, records, hymnals, CDs, or musical instruments, I immediately knew what I wanted to do.
I may be pushing the theme here, as I’m only using a small part of a musical instrument, but this project holds big sentimental value—and I can’t wait to share it with you.

Join me as I create Christmas ornaments to gift to my brother and cousins.
And don’t forget, at the end of this post, you can see what my talented friends from the Handcrafted Society came up with!
Gather Materials
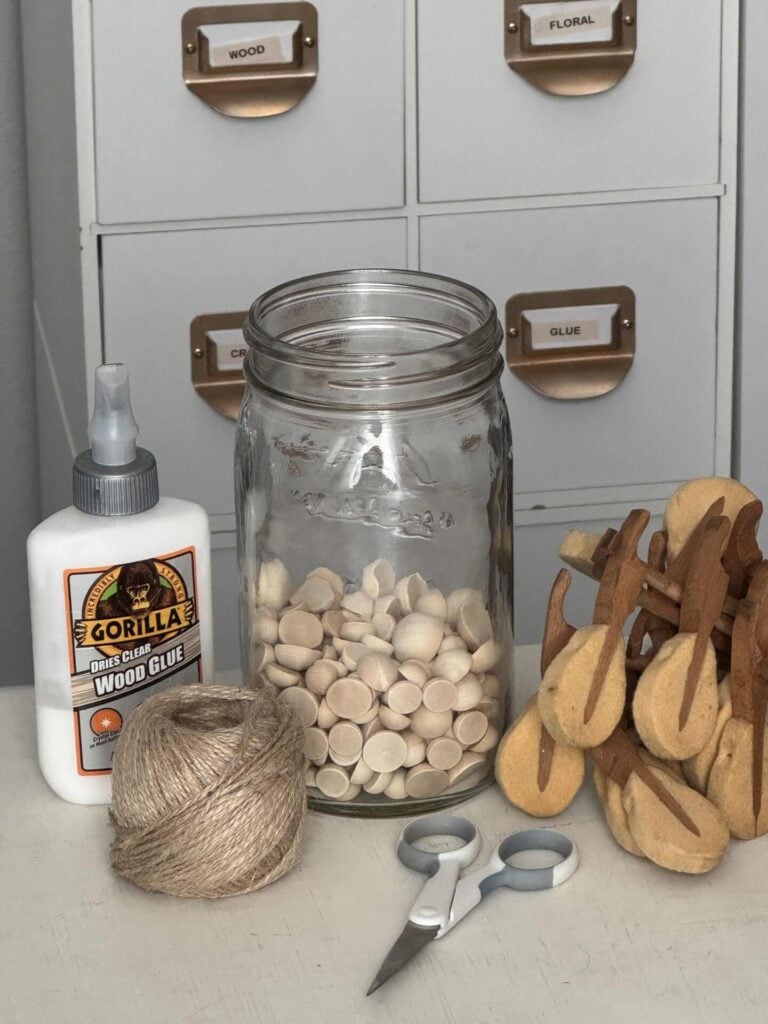
Gather the following materials to complete this DIY project:
- Piano hammers
- Miter box and saw
- Wood glue
- Wax paper
- Wood bead halves
- Cutout wood stars- Dollar Tree
- Paint and paintbrush- optional
- Twine
- Ruler
- Scissors
- Hot glue gun and glue sticks
- Silicone finger protectors
Steps to make DIY Piano hammer Ornaments
Now that we’ve gathered our supplies, it’s time to start crafting the DIY piano hammer ornaments.
Follow these simple steps to turn old piano parts into meaningful keepsakes for your Christmas tree.
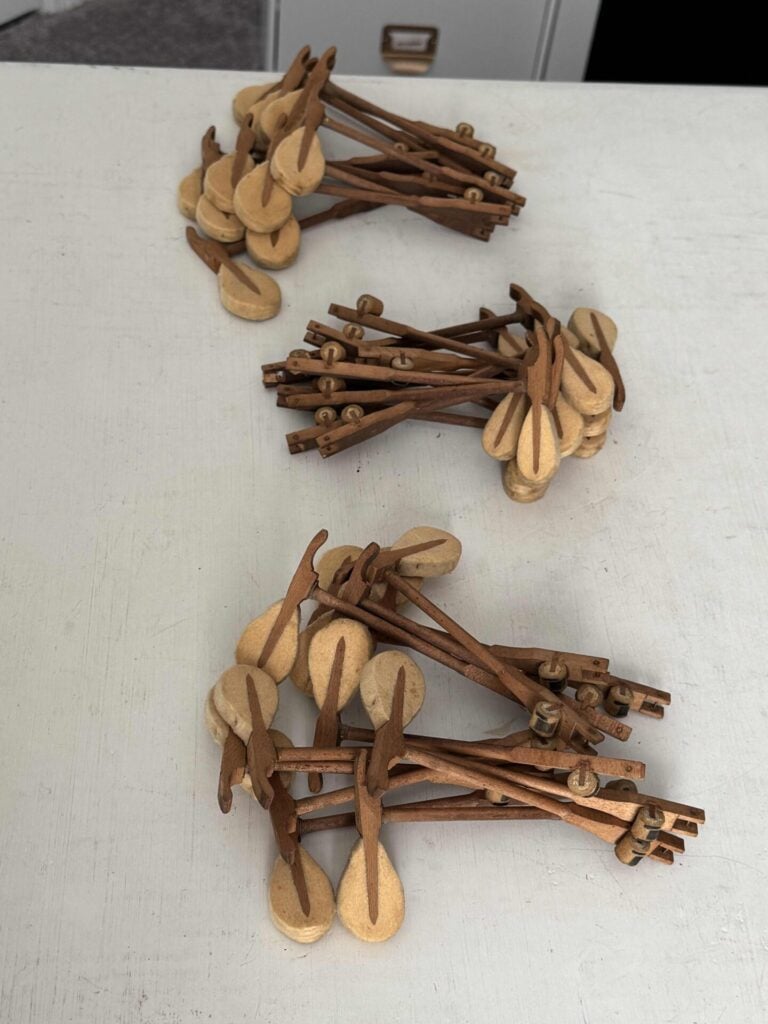
Cut the Piano Hammers

Use a small miter box to carefully cut the shank from each piano hammer.

Then, trim the head molding so there’s about ¼ inch of wood left on the felt hammer.
Clean the Piano Hammers
After cutting, clean away any sawdust or debris.
A pet hair roller works perfectly to remove dust from the felt without damaging it.
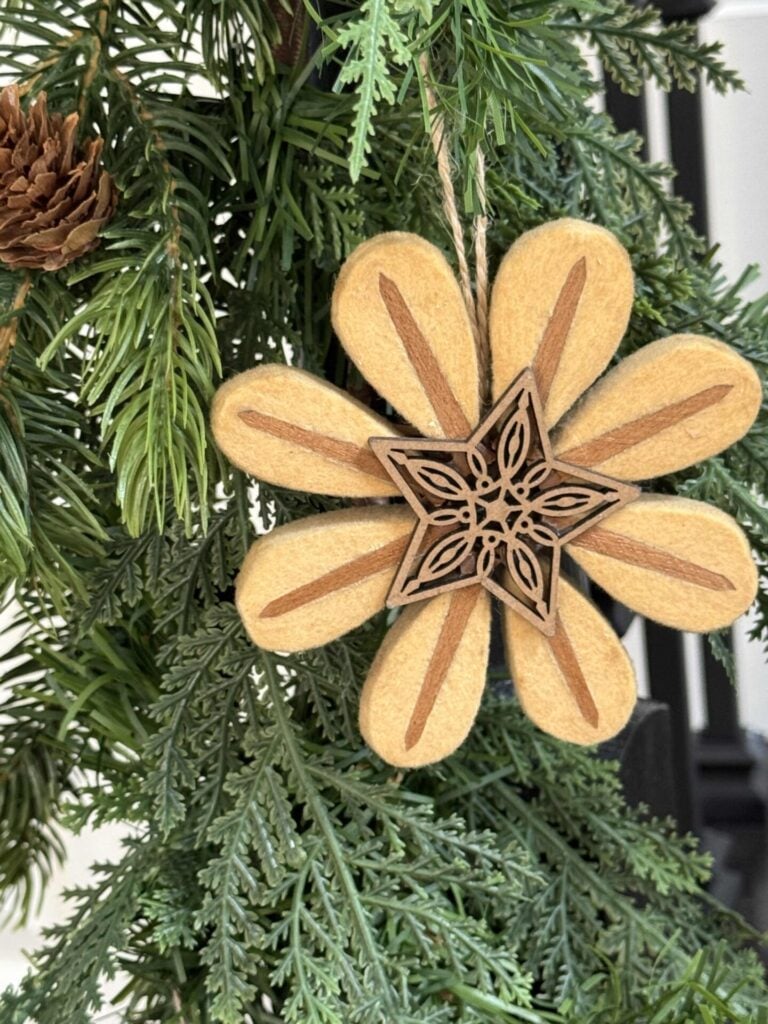
Arrange the Hammers

Decide how you want your ornaments to look.
I arranged my piano hammers into the shape of a flower.
- For larger hammers, use six “petals.”
- For smaller ones, use eight “petals.”
Place a wood bead half or a wooden star in the center of your arrangement.
Experiment with placement until you’re happy with the shape and balance of the flower.
Paint the Wood Beads (Optional)

If you’d like, paint the wood beads to match your Christmas decor.
I used FolkArt Vintage White paint for a soft, classic look.
Protect your surface with wax paper, paint each bead, and allow them to dry completely.
Glue the Flowers

Spread wood glue around the wooden ends of each hammer, then press your bead or star firmly in the center.
Hold for a few seconds to make sure it’s secure.
Allow the glue to dry overnight for optimal adhesion.
Attach the Hangers

Cut pieces of twine about six inches long for the ornament hangers.
Fold each piece in half and hot glue the two ends to the center of your flower, between two petals.
Finish the flower
Turn the flower over and glue another bead or star to the back.
Let dry completely.
Styling The Piano Hammer Ornaments
I’ll be wrapping these DIY piano hammer ornaments as gifts for my family members and giving them out over Thanksgiving weekend.
But before I packaged them up, I wanted to style them so you could see how wonderful they turned out!

First, I tucked several into a garland, hanging on our stairs, waiting to be decorated for Christmas.

Next, I added them to a small tabletop Christmas tree.
I’m so happy with how cute these turned out and can’t wait to wrap them up for my family members!
Closing thoughts
This project holds great significance for me because it’s more than just a craft—it’s a way to keep my grandmother’s memory alive.
Every time I look at these DIY piano hammer ornaments, I’m reminded of the beautiful music she played and the joy our family shared around her piano on Christmas Day.
I’m so thankful that the Handcrafted Society’s November challenge inspired me to finally create these keepsakes for my loved ones.
It feels wonderful to give each family member a piece of our shared history—something small but filled with love and meaning.
If you have a sentimental item tucked away, I hope this inspires you to turn it into a meaningful project that celebrates your own family story.
Don’t forget to visit my friends from the Handcrafted Society; all the links are at the bottom of this page!
If you enjoy the blog, please sign up for our email list to stay up-to-date with our latest posts.
Blessings, Donna and Rich
More DIY Christmas Ornament Inspiration
Making Christmas ornaments is so fun! Here are some of my favorites!
- How to Decoupage Christmas Ornaments with Napkins
- Vintage-Inspired DIY Christmas Ornaments
- Transform Plain Birdhouses Into Christmas Ornaments
- Tips to Make Pinecone and Wood Slice Ornaments
- Gorgeous DIY Gold Leaf Christmas Ornaments
Pin It For Later

The Handcrafted Society
If you’re new here, the Handcrafted Society is a talented group of bloggers and creators who come together each month to share a themed DIY project.
Each challenge is based on a specific material or idea, and it’s always so inspiring to see how differently everyone interprets the theme.
This month’s challenge was to create something using sheet music, records, hymnals, CDs, or musical instruments—perfect inspiration for my piano hammer ornaments!
I’d love for you to check out the beautiful projects the rest of the Handcrafted Society members created.
Click the links or pictures below to see how everyone brought this musical theme to life.


Related Posts:


**Some of the links in this post are affiliate links. This means if you click on the link and purchase the item, we will receive an affiliate commission at no extra cost to you. We appreciate your support. (disclosure policy)
Wow! What a wonderful keepsake from your Grandma. And this is such a lovely project you came up with. And I love that you don’t really have to tuck it away after Christmas. I expect will see those piano flowers popping up i multiple ways. Absolutely brilliant!
You’re so right Diane! Those sweet flowers could be displayed year round! Glad you enjoyed the post and thanks so much for your kind words!
Donna – I love the story behind this special project. As I was reading it, I thought that these would make such wonderful keepsakes for other family members, and of course that is what you are doing. The story they will tell for generations to come! I just love this –
Thank you Lynn! I can’t wait to give them to other family members! Such a fun way to keep our Grandmothers memory alive!
I love this idea Donna! It is so creative. What a meaningful way and sentimental way to incorporate old piano parts into your decor.
Thanks Anna! This was such a fun project to work on! I love how this group challenges me to think out of the box!
Donna, wow!!! What an incredible use of vintage piano hammers. These ornaments are not only stunning but also unique. Love it, my friend!
Thank you Tammy! I adore how they turned out and am so excited to add this sentimental ornament to our family tree this year!
SO COOL, Donna!! How precious to use those old piano parts…these pretty ornaments are for sure a one-of-a-kind gift that will hold so much meaning for your family! Love!!
Thank you so much Rachel! I think they’re super special and now I can’t wait to put up our family tree!
These are amazing, Donna! What an extra special way to honor your grandmother. I know your family members are going to be so excited to have this ornament hanging on their tree. It’s really thoughtful! Hugs, CoCo
Thank you very much CoCo! It will be such a fun surprise for my family members! I hope our Grandma will be smiling down when she sees us hang these on our trees!
I love sentimental keepsakes like this Donna! Your pretty piano hammer ornaments are so unique, and will be such a lovely addition to your holiday decorations! As always thank you for the inspiration! Hugs!
You are so kind Michelle, thanks! I’m so happy to have such a wonderful keepsake to add to our tree!
Donna, what a sweet sweet story! and such a creative project. Thank you for sharing this. I happened to pick up a bunch of piano keys at a local thrift store and they have been sitting in my drawer for a white. Now you have my brain ticking. Thank you for being such a great partner with the HCS, we love having you with us.
Hi Wendy, and thank you! You are so kind! I’m so happy to be a part of this wonderful group that challenges me to come up with fun DIY ideas! I can’t wait to see what you’ll do with the piano keys! Thanks again!
Wow Donna! I love this story and the upcycle. They are both beautiful. I have 1929 player piano in my home that was in my grandmother’s house. Growing up we all played it and now it – and all its memories – have made their way to me. Sounds like you have your memories on display for Christmas. Love that!
Hi Kim! That’s so wonderful that you you have your grandmothers piano! Looking forward to displaying our new ornament on our family tree! Thanks for stopping by!
Hi Donna – I love the sentimentality behind your project. You also win the prize for the most creative project this month! Wow! Your piano hammer ornaments turned out amazing. Their generous size is one of the many attributes I love. Thanks for the inspiration and great story to go along with this project.
Hi Anna! Thank you so much! I’m so happy to be a part of this group where I’m encouraged to think out of the box and try new things! So glad you enjoyed the post!
Thank you for sharing, I’m featuring you next week when the next To Grandma’s house we go link party starts!
That’s so wonderful! Thank you! It’s always an honor to be featured at your party! See ya there!