Have you ever wondered how to make air-dry clay snowflakes for your Christmas decor? These delicate little castings are easier than you might think, and they add such a beautiful, handmade touch to any holiday project.
I originally bought papier-mache trees and a snowflake mold last year, planning to paint the snowflakes to look like gingerbread cookies for my gingerbread Christmas theme.
**Some of the links in this post are affiliate links. This means if you click on the link and purchase the item, we will receive an affiliate commission at no extra cost to you. We appreciate your support. (disclosure policy)
I ran out of time—and honestly, I’m so glad I did!

This year’s blue, gold, and white holiday color scheme inspired me to use the supplies in a whole new way, and these air-dry clay snowflake trees turned out to be the perfect addition.
Today, I’m sharing exactly how to make the snowflakes and assemble the trees so you can create your own beautiful version.
Gather Materials

Gather the following materials to complete this project:
- Air-dry clay
- Snowflake mold– similar mold by Redesign
- Cornstarch
- Popsicle stick
- Paint- Annie Sloan Louis Blue and FolkArt Metallic Pure Gold
- Paintbrushes
- Papier-mache cones- 2 Hobby Lobby
- Wood glue
- Star embellishments- 2 Hobby Lobby
Prepare The DIY Cone Trees

Before we start making the air-dry clay snowflakes, it’s vital to get your cone tree ready.
A smooth, painted surface will help the snowflakes adhere properly and give your finished tree a clean, polished look.
In this step, we’ll paint the cone and prep the star so both are fully dry and ready to assemble once your snowflakes are complete.
Note: When I bought the trees last year, they were brown. I painted them white, but I never finished the project. There is no need to paint your trees white before painting them your base color.
Paint the trees

I painted the cone trees with Annie Sloan’s Louis Blue chalk paint so they will match the DIY artwork I created for the living room (do not paint the bases).
I applied two thin coats to get the soft, even coverage I wanted.
Be sure to let the first coat dry completely before adding the second.
Once the paint is fully dry, your tree is ready for the next step.
Prep the stars and base of trees

Here are the stars I found at Hobby Lobby for the tops of the trees.
The rustic look does not match our decor, so I will paint the stars and the tree bases with gold paint.

Rich found a handy little tool with spring clips that makes painting small items so much easier.
I used it to securely hold the stars while I brushed on a coat of FolkArt Metallic Pure Gold.
Once the first layer dried, I added a second coat to achieve full, even coverage.
Now your stars are ready to shine on top of the trees.
I also painted the tree bases gold.
How to Make Air-Dry Clay Snowflakes

With your cone trees prepped and ready, it’s time to create the air-dry clay snowflakes that give this project its beautiful handcrafted charm.
These molds are incredibly intricate, and I’ll admit—I was a little nervous about how the snowflakes would turn out.
But once I released the first one, I realized I had nothing to worry about.
They came out absolutely fabulous!
In the steps below, I’ll show you how to prep the mold, shape the clay, and release each casting so it’s ready to attach to your tree.
The process is simple and relaxing, and the molds do most of the work for you!
Prep the Mold

Start by brushing a light layer of cornstarch into your mold using a small paintbrush.
Then turn the mold upside down and gently tap it on the table to remove any excess—this helps the clay release cleanly later.
Next, open your air-dry clay and place it immediately into a zipper-top plastic bag to keep it from drying out.
When you’re ready to fill the mold, pull off only the amount of clay you need, then seal the bag again.
Roll the clay between your hands until it’s roughly the length and shape needed to fit into the mold.
Now you’re ready for the next step!
Mold the snowflakes

Press the clay firmly into the mold, making sure it fills all the details.
Use your thumbs to push off any excess clay around the edges.

Then take a popsicle stick and drag it across the back of the mold to remove any remaining overflow—the back of the clay should be flat and even.
Once the shape is clean, turn the mold over and gently lift one corner.

The snowflake should begin to release on its own.
Carefully guide it out, and you’re ready to move on to the next one.
Note- the molds are designed as ornaments, so I had to cut off the circular pieces from each one.
Adhere Snowflakes to the Tree

While your snowflake casting is still wet, coat the entire back with wood glue using a cotton swab.
This helps the snowflake adhere securely to the painted cone.

Press the casting lightly onto the surface, making sure it’s positioned exactly where you want it.
If any glue seeps out around the edges, simply wipe it away with a clean cotton swab.
Allow the snowflakes to dry for 24 hours so they bond fully to the tree.
The next day, turn the tree over and adhere snowflakes to that side.
Note: Air-dry clay can shrink slightly as it dries, and small cracks may appear. You can either embrace the handmade look or back fill any cracks once the snowflake is completely dry.

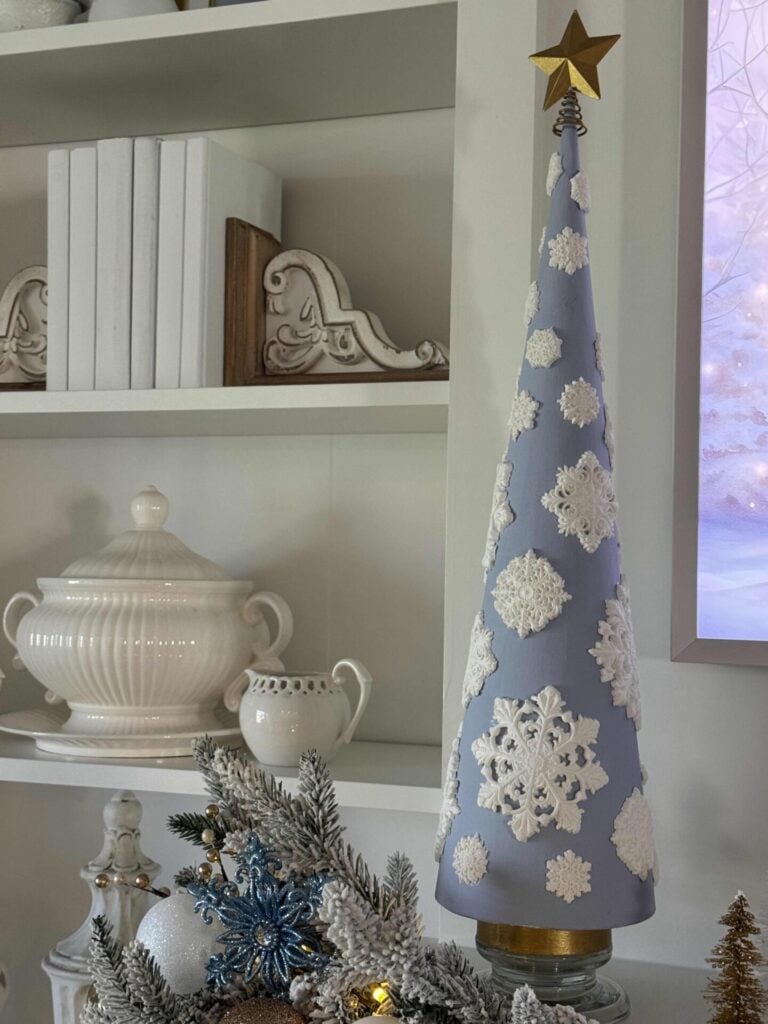
Aren’t the snowflakes gorgeous?
I adore how they look next to the pretty blue color!
In fact, they remind me of Wedgewood!
Finishing touches
With your snowflakes molded and attached, it’s time to bring everything together.
These last steps add the extra detail and polish that make your DIY tree truly shine.
From deciding whether to paint the snowflakes to placing the star on top, here’s how to complete the project beautifully.
Paint the snowflakes
At first, I planned to add a touch of gold paint to the snowflakes to highlight all the beautiful details in the design.
To test it out, I made two extra snowflakes and experimented before committing.
I tried the same gold paint I used on the star, but the finish looked a little blotchy.
Then I tried Rub ’n Buff, and while it highlighted the raised areas nicely, the color didn’t match the gold on the star or the tree.
In the end, I decided the clean, crisp white looked best—classic, bright, and snowy!
Here’s a look at the two I tested.

What do you think?
Would you have left them white, too?
Attach the stars

I placed the stars on top of my trees to finish the look, but I decided not to hot glue them in place.
If they were permanently attached, the trees would be too tall to fit inside my storage boxes.
Feel free to use your own judgment here—if your trees won’t run into storage issues, you can secure the stars with a dab of hot glue, or set them in place like I did.
And here are the finished trees!

Display The Finished Trees

I styled the finished trees on our mantel, placing one on each side of the Frame TV.
To give them a little extra height and presence, I set them on top of glass candlestick holders.

If you want more tips on styling a Christmas mantel— including how to layer garland effectively—click here.
Closing thoughts
I hope you enjoyed seeing how these air-dry clay snowflake trees came together!
What started as leftover supplies from last year turned into one of my favorite Christmas projects ever!
I love how the crisp white snowflakes, blue trees, and the gold accents complement our living room decor.
If you decide to make your own version, I’d love to hear how you decorate yours and where you display them.
If you enjoy the blog, please sign up for our email list so you won’t miss a post!
Until next time, follow us on Pinterest, Facebook, and Instagram!
Blessings, Donna and Rich
More DIY Christmas Inspiration
- Learn to Make a Christmas Tree Collar From a Lampshade
- DIY Gingerbread Christmas Ornaments
- Easy DIY Christmas Artwork
- Gorgeous DIY Gold Leaf Christmas Ornaments
- How to Make DIY Wooden Christmas Trees
Pin It For Later
Don’t forget to pin the image below to one of your Pinterest boards (hover over the picture and click the red Pin button in the top left corner).

Related Posts:


**Some of the links in this post are affiliate links. This means if you click on the link and purchase the item, we will receive an affiliate commission at no extra cost to you. We appreciate your support. (disclosure policy)
Beautiful!!!! I would love to try this project. Also love the pic on the frame tv. Where did you find it. I have a frame tv and haven’t seen that one.
So glad you loved this project and I hope you’ll try it! I’m sorry to say it doesn’t look like the picture we have on our TV is available anymore, the Etsy sellers shop is inactive. We purchased a bundle on Etsy by searching Samsung Frame TV Art Neutral Christmas Bundle. Maybe try that and you can find something similar. Hope that helps!!
This is amazing, Donna! I love the way these came together and I can’t get over how much the color looks like Wedgewood. Yoiu’ve done some fabulous projects using air dry clay. It definitely makes me want to try more too. Those snowflakes are gorgeous! Hugs, CoCo
I can’t get over how much they look like Wedgewood too! I wish I could say that was the look I was going for, but I didn’t realize it until I was done, lol! Those snowflakes would make such pretty Christmas ornaments! Next year, I might try making some but with resin instead of clay. I’ve never used resin before and it would be fun to learn something new! Thanks so much!
These came out gorgeous Donna. They totally look like jasperware pieces which I adore. The color totally looks like Wedgwood blue. They look stunning n your Christmas mantel. Love! XO- MaryJo
Thank you MaryJo! So glad you like them! You have such a pretty collection of jasperware!