Do you have a piece of worn-out clothing in your closet that you can’t bring yourself to throw away? Maybe you’ve considered repairing it, or perhaps you’ve wondered if there was a way to turn it into something completely different. Today, I’m sharing how to make DIY fabric orbs by upcycling an old pair of shorts into decorative home decor.
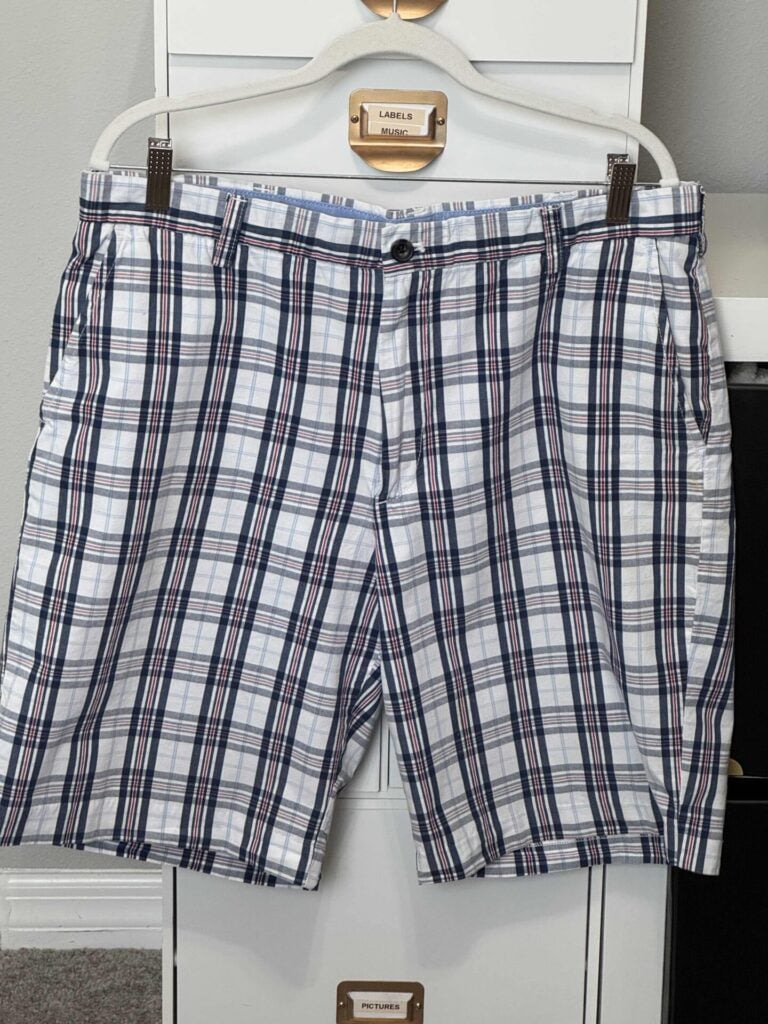
These are my husband’s well-loved plaid shorts.
**Some of the links in this post are affiliate links. This means if you click on the link and purchase the item, we will receive an affiliate commission at no extra cost to you. We appreciate your support. (disclosure policy)
They’ve seen plenty of summer adventures over the years and, with their red, white, and blue colors, have always made an appearance during our 4th of July celebrations.
Now it’s time to retire them.
They’re too worn to donate, but they’re still filled with beautiful fabric just waiting for a second life.
When I learned that this month’s Handcrafted Society challenge was all about upcycling fabric and giving worn textiles a new purpose, I knew exactly what I wanted to make.

Instead of letting these old shorts end up in the trash, I transformed them into DIY fabric orbs that can be displayed in bowls, baskets, and seasonal vignettes throughout the home.
I’m so excited to show you how easy these are to make, and don’t forget, at the end of this post you can see how my talented friends transformed worn-out textiles into beautiful new creations.
Supplies Needed to Make DIY Fabric Orbs
Before you head to the craft store, take a few minutes to search your closets and drawers for fabric you can upcycle.
Old clothing, fabric scraps, and leftover sewing materials are perfect for making DIY fabric orbs.
If you come up empty-handed, don’t worry!
There are plenty of other fabric options that work beautifully for this project, and I’ll share some of my favorites below.
Materials
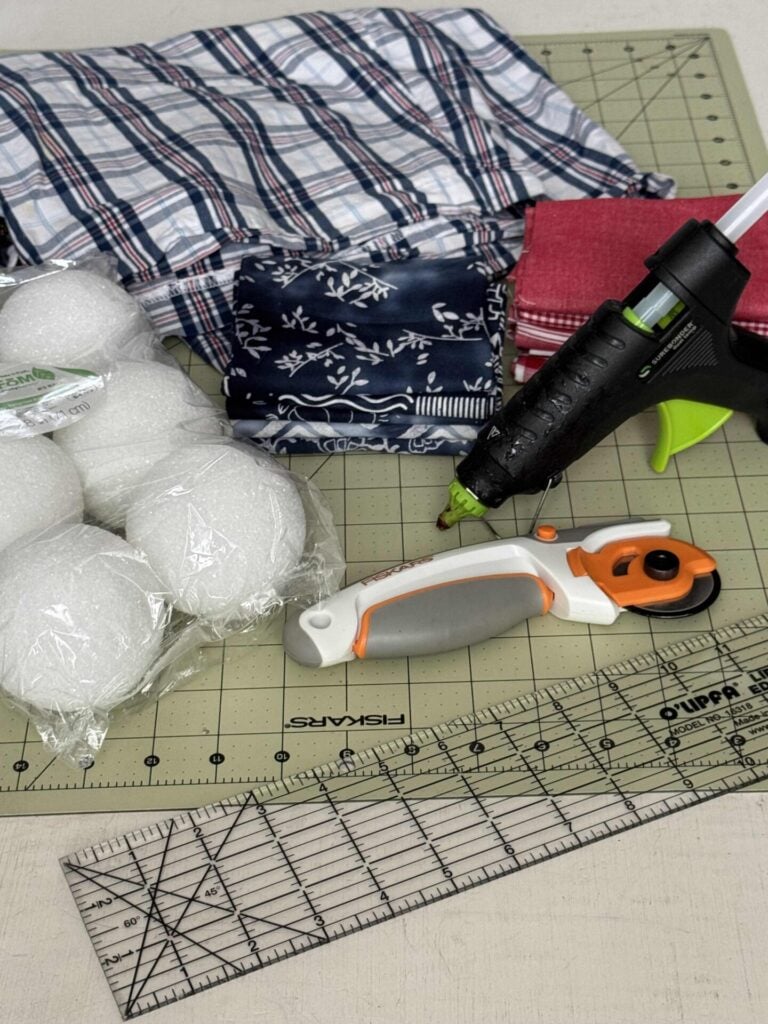
Gather the following materials to complete this project:
- Fabric- old shorts/red fat quarters /similar navy fabric bundle
- Iron
- Scissors and/or rotary cutter
- Cutting mat
- Ruler- mine has a lip edge
- Styrofoam balls -I used 2inch and 1 inch
- Hot glue gun and glue sticks
- Silicone finger protectors
Fabric Ideas for DIY Fabric Orbs

One of the things I love most about this project is how easy it is to customize.
It’s also a great way to give leftover fabric or worn clothing a second life instead of throwing it away.
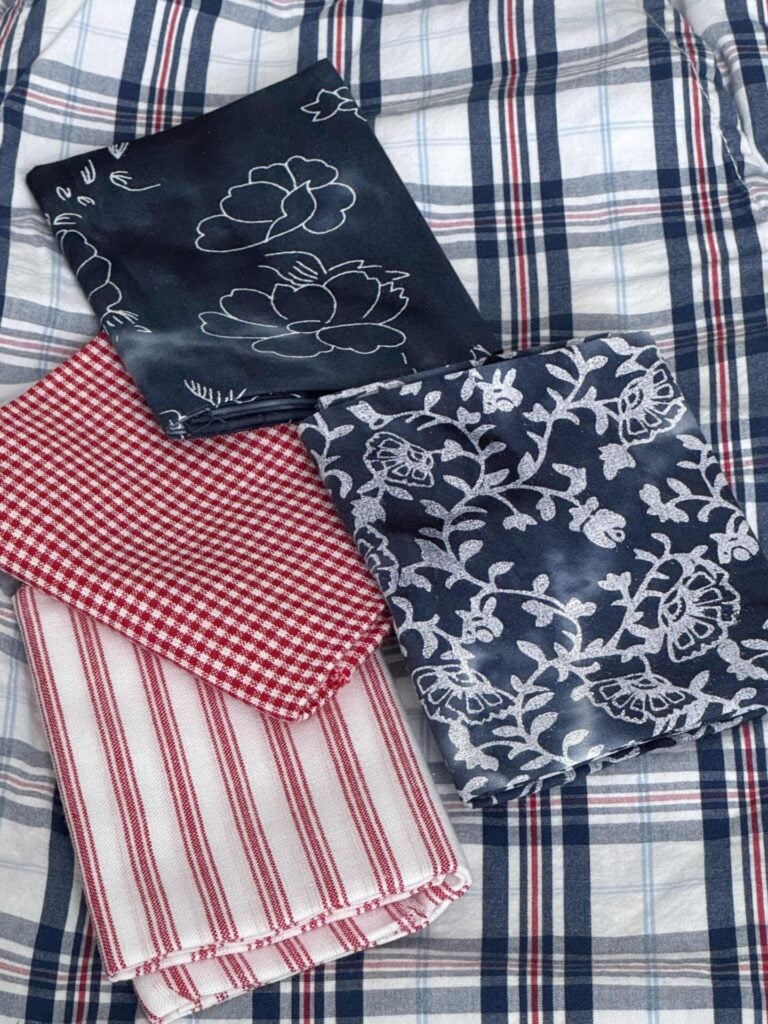
I’m excited to use my husband’s old shorts, but I wanted a larger collection with a variety of patterns and textures.
To complement the plaid fabric, I picked up several coordinating fabric squares that paired perfectly with the shorts’ colors.
The mix of plaids, stripes, checks, and floral prints creates a collected look while allowing each orb to have its own personality.
Other fabric options include:
- Fabric scraps from previous sewing projects
- Quilt squares
- Bandanas
- Tea towels
- Flannel shirts
- Old jeans
- Seasonal fabrics
- Fat quarters
When selecting fabrics, look for colors and patterns that coordinate with your decorating style.
Mixing different patterns can add visual interest, while keeping each orb covered in a single fabric helps the overall display feel cohesive rather than busy.
How to Make DIY Fabric Orbs
These DIY fabric orbs come together quickly once your fabric is cut.
The process is simple: cut fabric strips, wrap them around a styrofoam ball, and secure them with hot glue.
Here’s how I made mine.
1. Prepare and Cut the Fabric
Before cutting anything, I ironed both the shorts and the fabric squares using the steam setting on my iron.
Removing the wrinkles helps the fabric lie flat, making it much easier to measure and cut accurately.
The hardest part of upcycling old clothing is making that first cut.
Somehow, it feels wrong to take scissors to a pair of shorts, even when they’re worn out and no longer in use.
So remind yourself: if they’re just hanging in the closet collecting dust, why not turn them into something beautiful you can enjoy in your home?
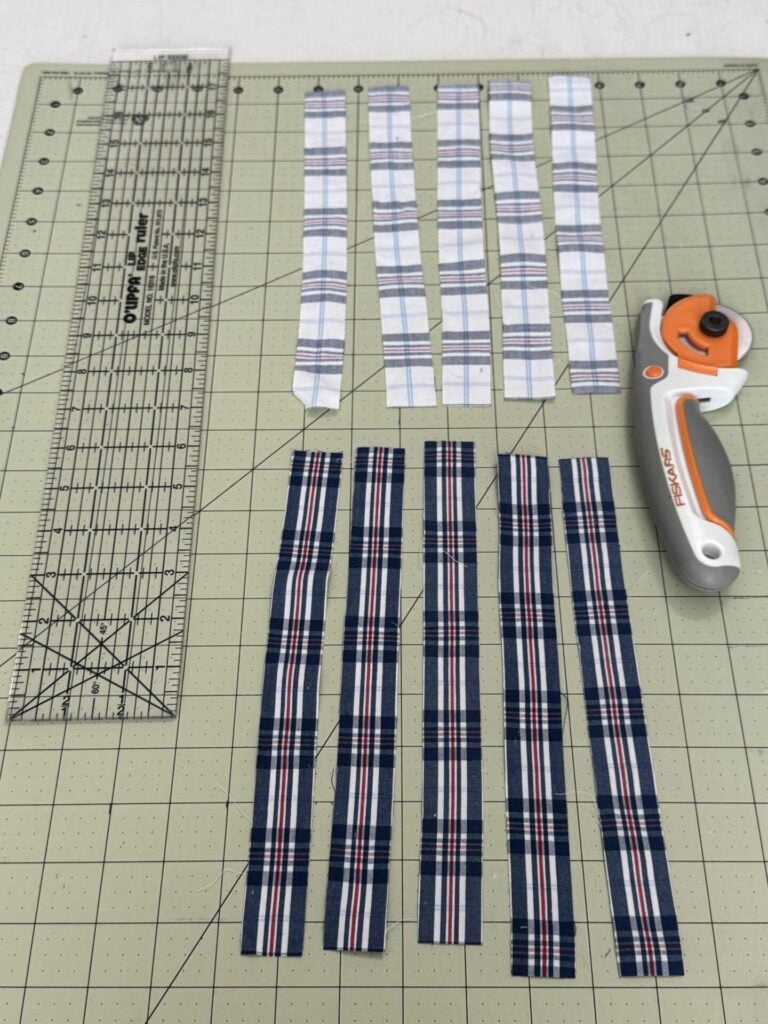
I used scissors to cut along the seams of the shorts, separating them into flat pieces of fabric.
This makes the fabric much easier to work with.
Next, I used a cutting mat, rotary cutter, and lip-edge ruler to cut strips measuring 1 inch by 10 inches.
For my smaller DIY fabric orbs, I cut strips approximately ½ inch wide and 7 inches long.
Keep in mind that the exact strip measurements may vary depending on the size of your styrofoam balls.
The goal is simply to cut strips long enough to wrap around the ball, with the ends slightly overlapping as you work your way around it.
Of course, it’s better to be too long because you can just cut away the excess.
If they’re too short, you can’t use them.
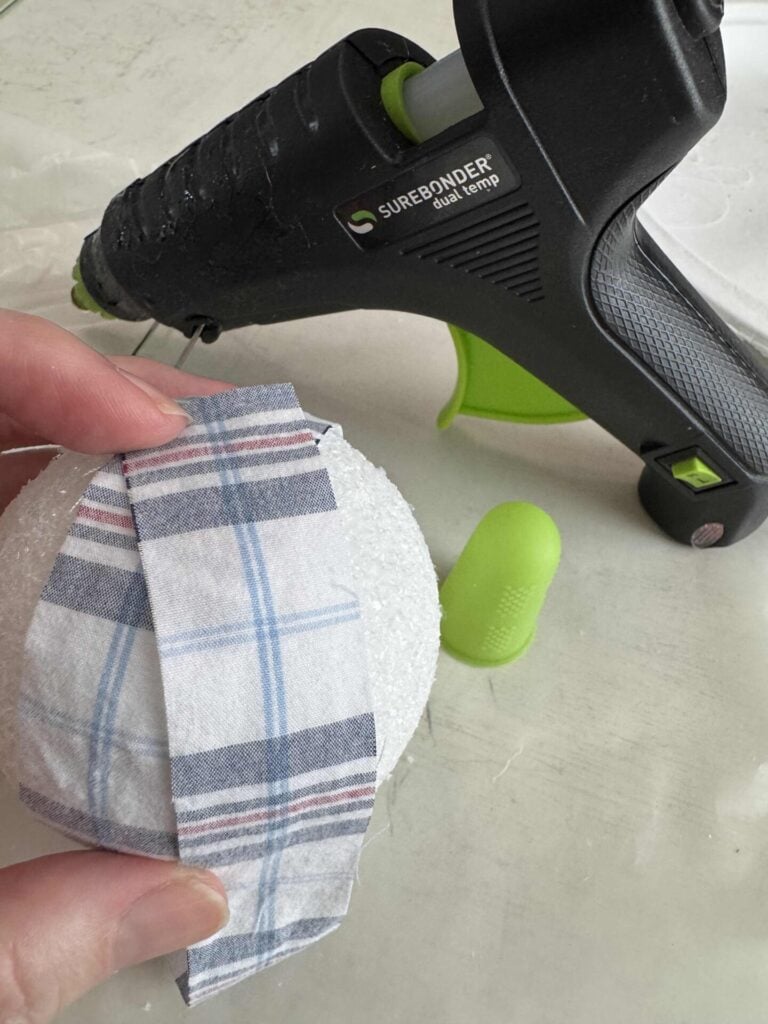
2. Attach the First Fabric Strip
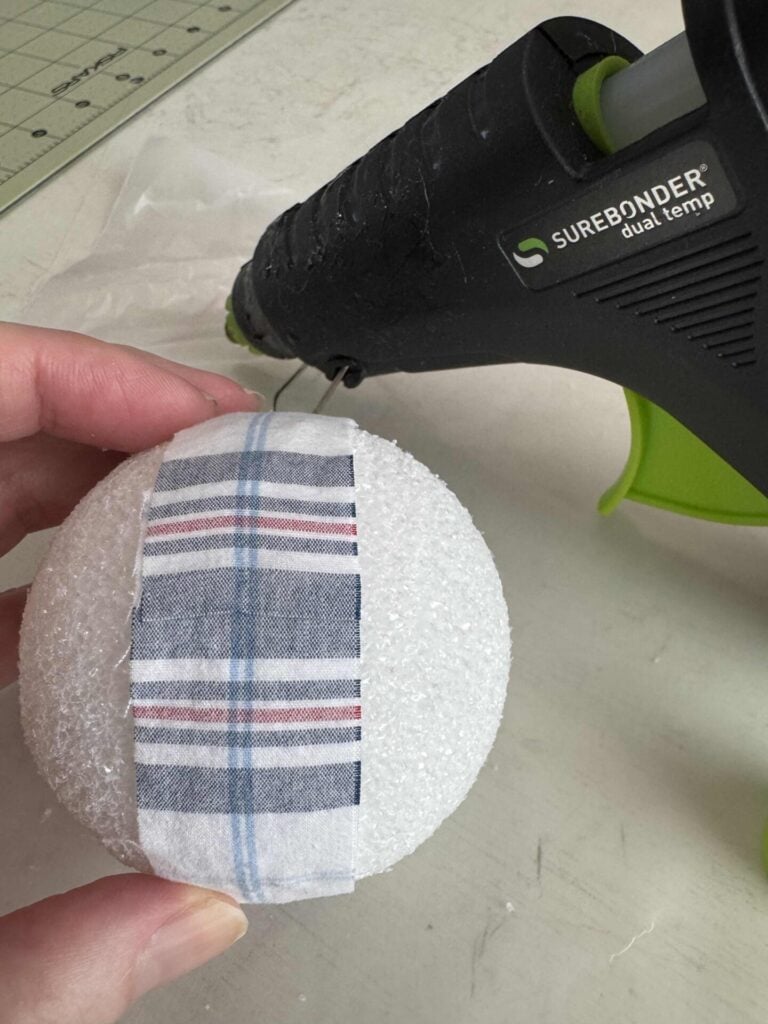
To attach the fabric to the styrofoam ball, you’ll want to use a dual-temperature hot glue gun set on the low setting.
The high setting gets hot enough to melt the styrofoam, so it’s best to stick with low heat for this project.
Place a small dab of hot glue on one end of a fabric strip and press it onto the ball.
Begin wrapping the strip around the ball, stopping about halfway.
Add another small dab of glue to secure the fabric before continuing.
A little glue goes a long way here.
Avoid using large blobs of glue because they can show through the fabric and create dark spots on your finished orb.
Ask me how I know!
Continue wrapping the strip around the ball until you reach your starting point.
Slightly overlap the ends and secure them with another small dab of glue.
If the strip extends beyond the overlap, trim away the excess fabric before gluing it down.
Leaving too much fabric at one end can make your orb look more like an egg than a ball, so taking a few seconds to trim the strip will help keep the shape nice and round.
Be careful when working with hot glue, as it can easily burn your fingers.
I like to wear silicone finger protectors to make the process a little safer.
3. Wrap the Remaining Fabric Strips
Now it’s time to cover the rest of the styrofoam ball.
Position the next fabric strip slightly to the side of the first strip, overlapping the edge so none of the styrofoam shows through.
Wrap the strip around the ball and secure it with small dabs of hot glue just as you did with the first strip.
Continue adding strips in the same manner, slightly overlapping each one until the ball is completely covered.
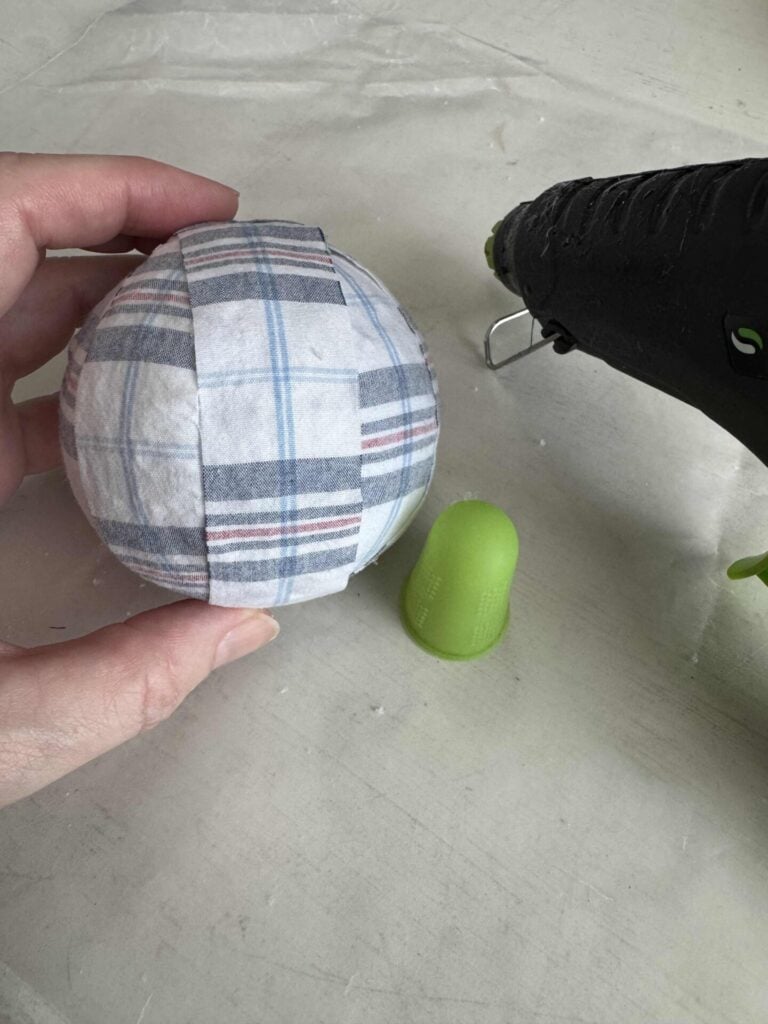
I wrapped all of my fabric strips in the same direction to create a neat, uniform look.
If you prefer a less structured appearance, try wrapping some of the strips in different directions.
As you work, check for any gaps where the styrofoam might be visible and adjust the fabric to ensure complete coverage.
4. Repeat to make a collection
Once you finish your first orb, repeat the process using additional fabrics and styrofoam ball sizes to create a collection that coordinates with your decor.
I covered each orb with a single fabric rather than mixing multiple fabrics on one ball.
This allowed the different patterns to stand out while still creating a cohesive display.
Using a variety of patterns, such as plaids, stripes, checks, and florals, adds visual interest without making the arrangement feel too busy.
Varying the size of the styrofoam balls also helps create a more collected and natural look when the orbs are displayed together.
The best part about this project is that you can customize it to fit any decorating style or season.
Choose fabrics that coordinate with your home, use scraps from previous sewing projects, or upcycle old clothing to create one-of-a-kind decorative fabric orbs that are uniquely yours.
Tips for Creating Beautiful Fabric Orbs
These DIY fabric orbs are simple to make, but a few small details can make a big difference in the finished result. Here are my best tips for creating fabric orbs you’ll be proud to display.
- Iron the fabric before cutting. Taking a few minutes to remove wrinkles will make the fabric easier to measure, cut, and wrap around the styrofoam balls.
- Use a low-temperature glue setting. High-temperature glue can melt styrofoam, making it difficult to achieve a smooth surface.
- Apply glue sparingly. A small dab of hot glue is all you need. Using too much glue can create lumps and may appear as dark spots on lighter-colored fabrics.
- Choose coordinating fabrics. Plaids, stripes, checks, florals, and solids can all work together beautifully when they share a similar color palette.
- Vary the sizes. Using styrofoam balls in different sizes creates a more natural, collected look when the fabric orbs are displayed together.
- Cover each orb with a single fabric. Rather than mixing fabrics on one orb, let the variety come from displaying several different patterns together.
- Think beyond fabric scraps. Worn clothing, thrifted textiles, bandanas, tea towels, and leftover sewing materials can all be transformed into beautiful DIY fabric orbs.
Ways to Decorate With DIY Fabric Orbs
One of my favorite things about DIY fabric orbs is how versatile they are. Whether displayed in a decorative container, arranged in a bowl, or styled as part of a seasonal vignette, they add color, pattern, and texture to your home decor.
Here are a few ways I used mine.
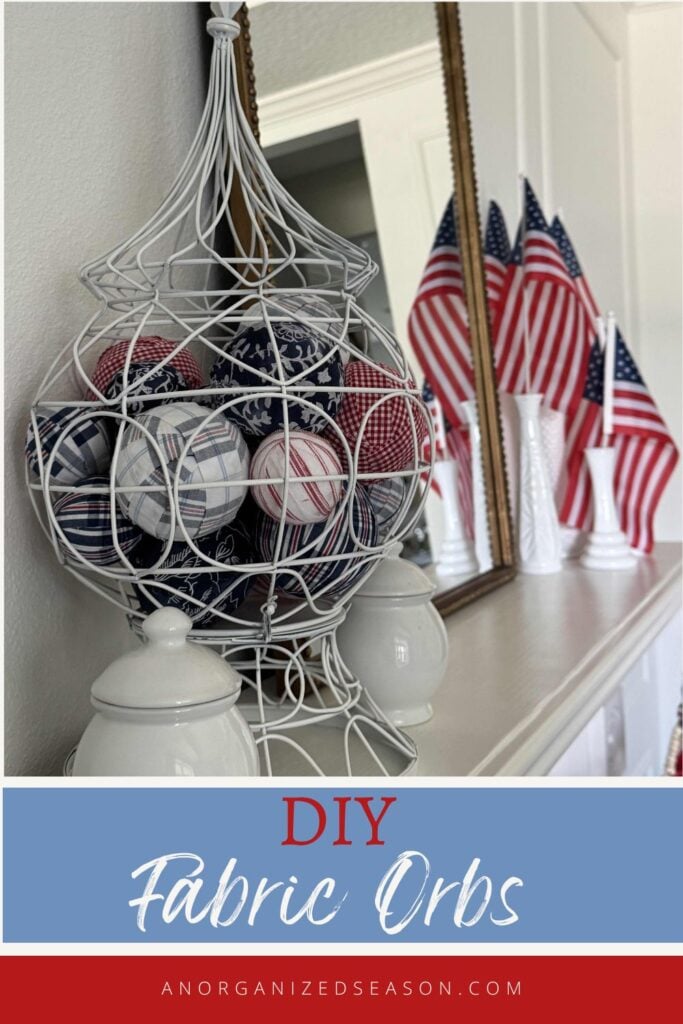
Display Them in a Decorative Wire Container
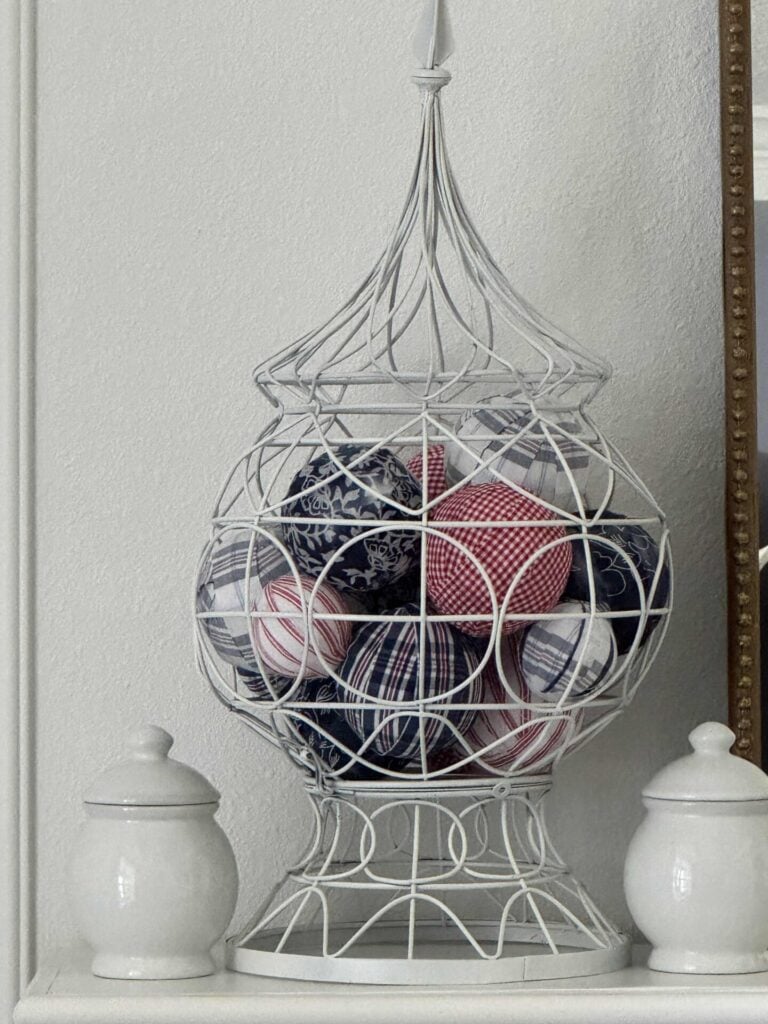
I love changing the contents of my thrifted wire container throughout the year.
For spring, it was filled with moss balls, but these fabric orbs gave it a completely different look for summer.
Fill a Decorative Bowl
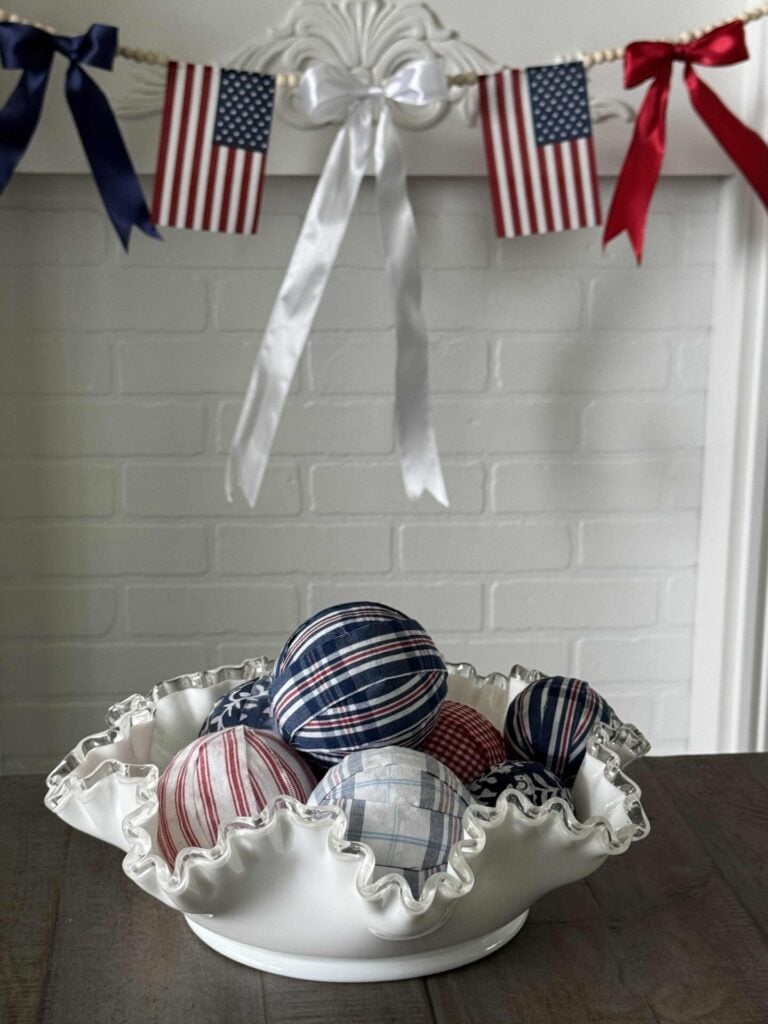
A bowl is one of the easiest ways to decorate with DIY fabric orbs.
Simply group several together and place them on a coffee table, side table, shelf, or dining table centerpiece.
I styled mine in a vintage milk glass bowl, and I love how it provided the perfect white backdrop for the colorful fabrics.
Style Them on a Tray or Mantel
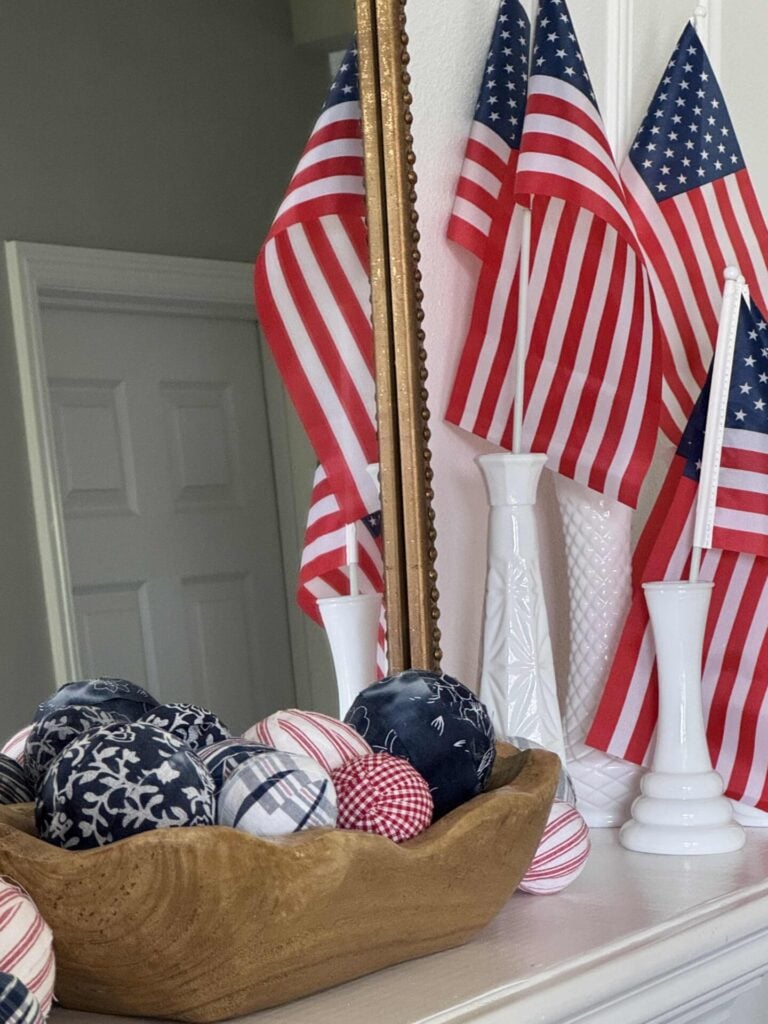
Fabric orbs also work beautifully as part of a larger decorative vignette.
I arranged some in a wooden bowl on my mantel, and scattered a few others beside it.
The possibilities are endless when it comes to decorating with DIY fabric orbs.
Try displaying them in baskets, dough bowls, cloches, lanterns, or other decorative containers throughout your home.
By simply changing the fabrics, you can create custom decor for every season.
See More Fabric Upcycling Ideas
If you enjoyed this DIY fabric orb project, you’ll want to visit my talented Handcrafted Society friends for even more fabric upcycling inspiration.
This month’s challenge focuses on giving old textiles new life, and each project offers a creative way to transform something worn into something beautiful.
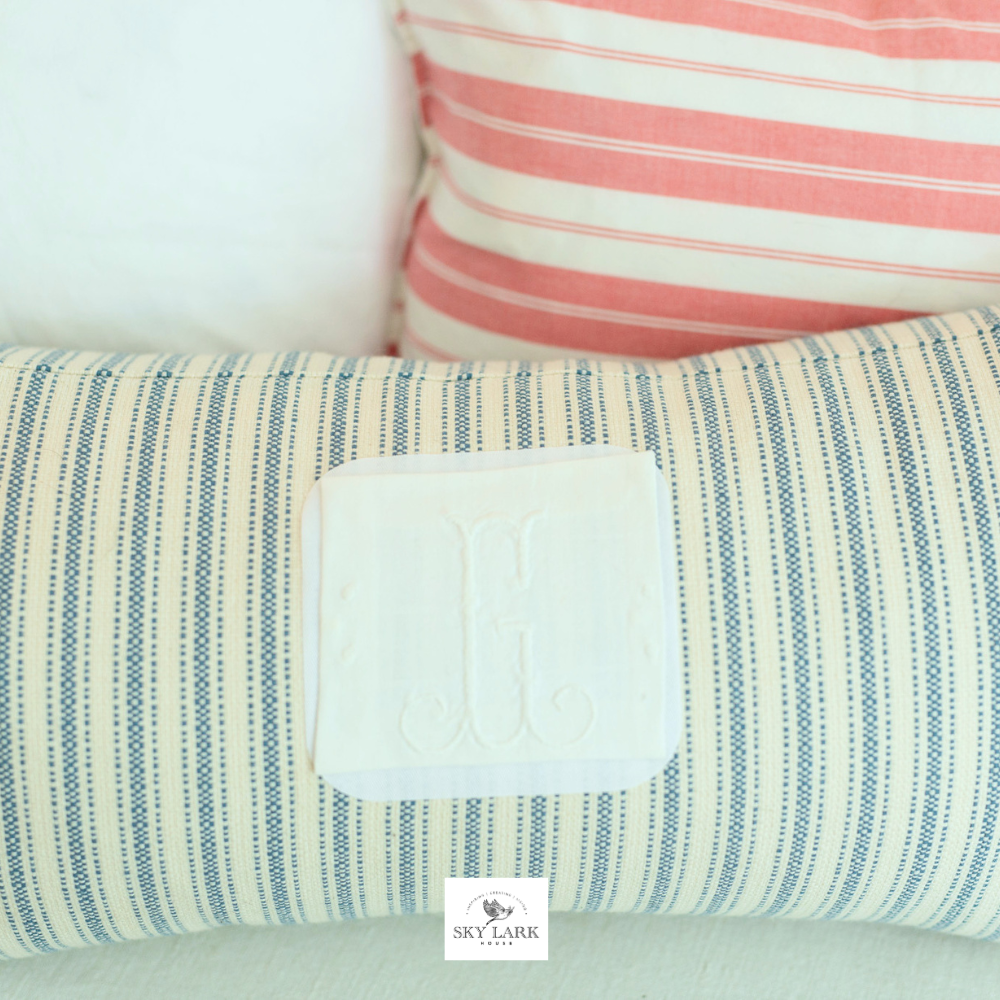
Anna upcycled a beautiful monogram from a vintage pillowcase into a one-of-a-kind decorative pillow.
It’s a wonderful way to preserve a special textile while creating meaningful home decor.
You can see Anna’s monogram pillow here!
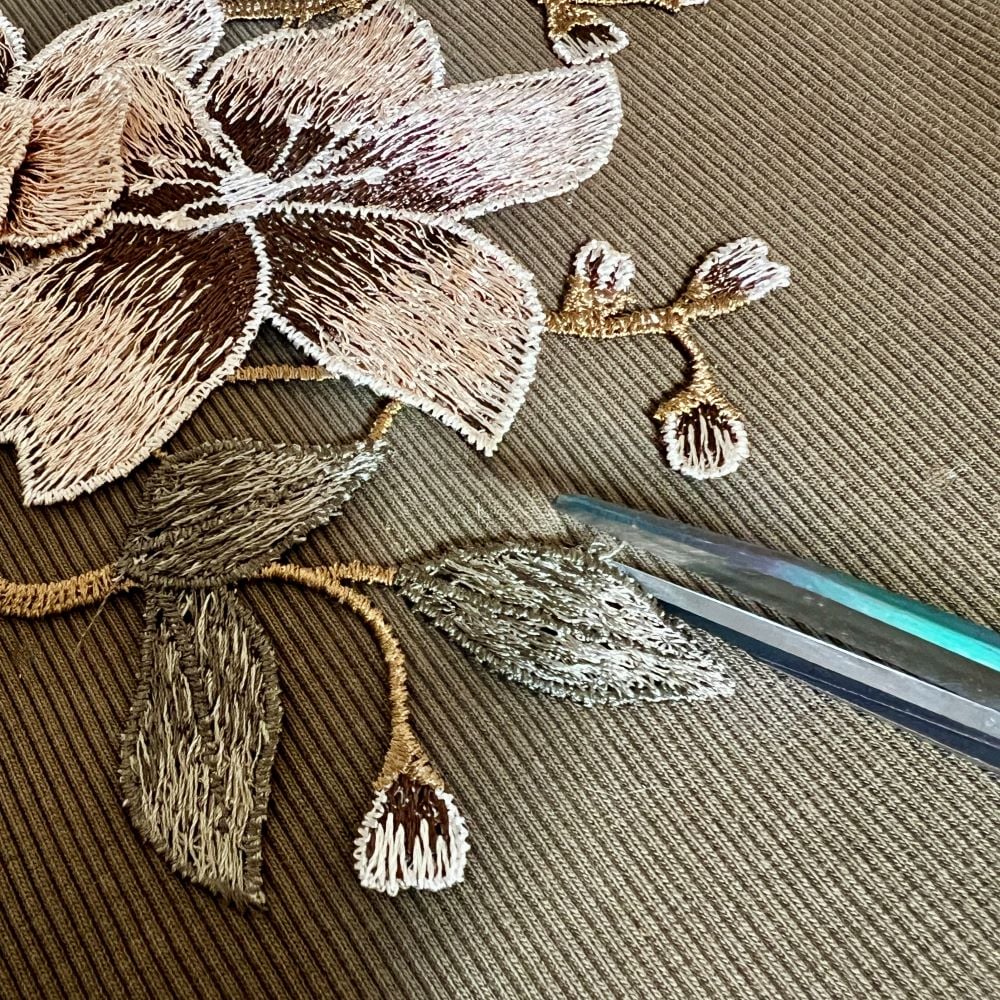
Diane gave her daughter’s favorite stretch-knit dress a second chance by adding a gorgeous floral appliqué to cover stains.
The result is fabulous and proves that a little creativity can go a long way.
You can see Diane’s daughter’s dress here!
Closing Thoughts
DIY fabric orbs are a simple and creative way to transform worn clothing and fabric squares into beautiful home decor.
Whether you display them in a decorative bowl, a wire container, or as part of a seasonal vignette, they add color, texture, and personality to your space.
I love that this project gave new life to a pair of shorts that would have otherwise been discarded.
It’s a great reminder that everyday items can often be repurposed into something both useful and beautiful.
If you enjoy the blog, please sign up for our email list so you won’t miss a post!
Blessings, Donna and Rich
More Upcycling Inspiration
If you enjoy finding creative ways to repurpose materials and make unique decor for your home, here are a few more DIY projects from our archives that you might enjoy.
Pin It For Later
Don’t forget to pin the image below to one of your Pinterest boards (hover over the picture and click the red Pin button in the top left corner).
Related Posts:


**Some of the links in this post are affiliate links. This means if you click on the link and purchase the item, we will receive an affiliate commission at no extra cost to you. We appreciate your support. (disclosure policy)
These are so cute and festive! I love the red, white and blue theme you selected for the fabrics. This is also a budget friendly project! Win-Win.
Thanks Anna! They were so fun and easy to make! You know how I love budget-friendly home decor!
For me, fabric orbs would become dust collectors and something more I would need to find a place to store.
But I am planning to learn how to weave rugs in the next year, and am collecting gently loved fabrics that are not ready for the bag of cleaning rags yet. Something like your husband’s shorts would be a lovely color combination to work into a rug with other similar colors and the fabric would probably be a good sturdy material for such a useful item. If they were my husband’s and he cherished them yet, I might consider a smaller version to use as a chair pad, or work the patterned material with solid colors to feature the fabric of the shorts in an area rug that could be used on his side of the bed or where he changes his shoes when he is headed out to work in the yard.
That’s so exciting! Good luck collecting your fabric and learning how to weave a rug! Sounds like a wonderful project!
OMG I LOVE these, Donna!! What a creative way to use old worn out things. The patterns of the fabric all look so pretty together! Super festive for the summer season.
Thank you! I’m so glad you like them! It was fun mixing the different patterns!