Today we’re focusing on the garage! Do you need to organize your garage but don’t know where to start? Then this post is for you!
We’ve made garage organization simple with six easy steps.
**Some of the links in this post are affiliate links. This means if you click on the link and purchase the item, we will receive an affiliate commission at no extra cost to you. We appreciate your support. (disclosure policy)
Please remember, just because the steps are simple doesn’t mean they will be fast.
We worked on our garage for approximately 20 hours to transform it into an organized and functional space.
I’m here to tell you that every minute was worth it!
Are you ready to see the before and after?
Here are the before and after videos of the amazing transformation.
Before
After
Before
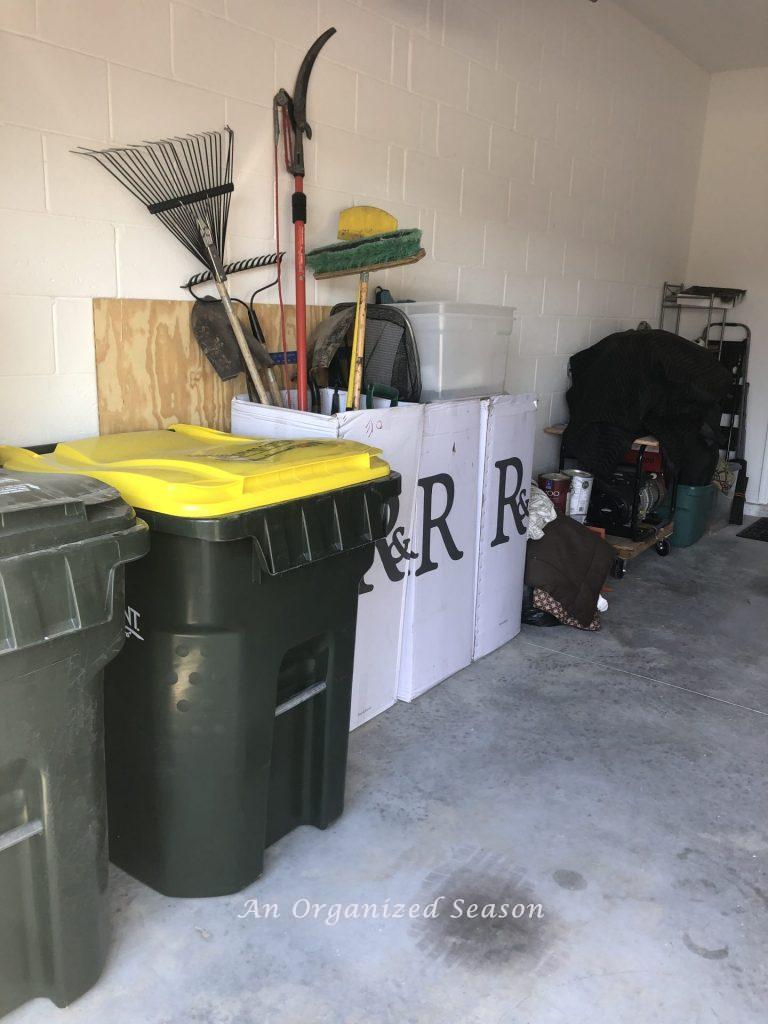
We were using boxes that our mattresses came in to store our lawn tools.
Then we lined the edges of the garage with stuff we didn’t have a place for.
After

Now we’re using the wall to store all of the lawn tools and ladders.
We even have extra storage space on the shelves for smaller items.
Garage organization in six steps
I developed six easy steps to organize any space in your home.
I call it the 6/P strategy (because each step starts with the letter “P”).
Follow each step to transform your garage into an organized and functional space.
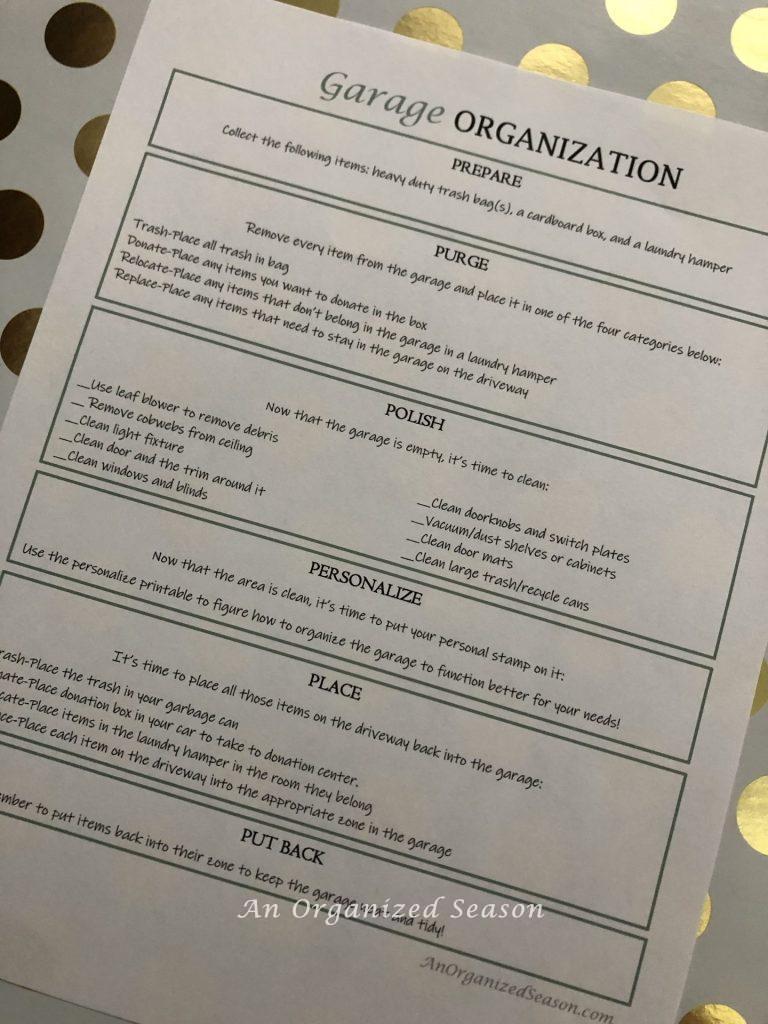
We have a great printable page to help you with this task.
Sign up for our weekly email by clicking here, and you’ll have access to the free garage organization printable showing the six steps you need to do.
1) Prepare
Get the garage ready to organize by grabbing the following items: heavy-duty trash bags, a cardboard box, a laundry hamper, a leaf blower, or a broom.
2) Purge
Remove everything from the garage and sort all items into one of these categories. If you have too much clutter to handle in one day, divide your garage into sections. We worked on our garage for four different weekends.
Trash-throw all unnecessary items in the trash bag
Donate-put items you would like to donate into the cardboard box
Relocate- any items that don’t belong in the garage should go into the laundry hamper
Replace- items that need to stay in the garage should be placed on the driveway until the garage is cleaned. Place all similar items together in piles so you can determine zones for replacing items.
Here are a few examples of zones you can incorporate in your garage:
- Household storage zone- items that won’t fit in the house, but you need easy access to. Examples: canned goods, pet food, paper towels, cleaning mops
- Yard/Equipment zone- rakes, shovels, garden stool, hoses, lawnmower, chemicals
- Long-term storage-Items you use the least or seasonally. Examples are: rooftop cargo carrier, camping gear, canopies, cooler, holiday decor, suitcases, kayaks
- Tool Zone-basic tools. Examples: nails, screws, paint, paint supplies, tarps, sandpaper
- Car supply zone-washer fluid, sponges, detail wipes
- Sports Equipment zone-bikes, balls, children’s toys, corn hole, skates
- Beach/pool zone-chairs, floats, wagon, beach towels
- Work/hobby zone-woodworking or gardening
- Trash/recycle zone – garbage and recycle cans
- Drop/transition zone- items you need when transitioning from outside to inside the house. Examples: umbrella, dog leashes, rain ponchos, grocery bags, jackets, shoes
3) Polish
The garage is empty, now let’s clean it up! Usually, I say start at the highest point and work your way down. But in the garage, I have found it best to use a leaf blower to remove all the debris from the floor first. Next, I dust the shelves (using a vacuum cleaner) and wipe down all of the storage tubs. This is a great time to clean your garbage cans!
4) Personalize
It’s time to personalize the garage space. Start by asking yourself the following questions:
- How many zones do I need in the garage to make this space function for my personal needs?
- What is causing clutter in this space?
- Have I removed all nonessential items from the garage?
- What items do I need to make or purchase to contain items in the garage?
- How can I beautify the space so I enjoy spending time there?
Use my printable to help you decide how this space can function best for your needs. The printable is free, and all you have to do to get it is sign up for our weekly email here.

5) PLACE
Trash- Put your trash bags in your garbage container!
Donate- If you have items to donate, don’t wait around, take them to the donation center soon, you don’t want that box cluttering up your clean organized garage.
Relocate-If you have items in the laundry hamper that belong somewhere else, deliver them now.
Replace -Now it’s time to decide where each zone will be located. Put the items you removed from the garage back in the zone you determined.
6) Put Back
You’ve worked hard to organize the garage, now you have to put things back where they belong to keep it looking great!
Well, there you go, now you know the six steps to make garage organization simple! Now I want to share how we personalized our garage!
How we personalized our garage
We go through each step of garage organization, as outlined above. Now
I’ll share how we brainstormed the problems we had in the garage during the personalization step.
BRAINSTORMED PROBLEMS
The garage in this house is smaller than the garage in our old Kentucky home.
That fact led to some major storage issues.
I was surprised by just how many problems we had until I wrote them down.
Brainstorming is an essential step in solving your clutter problems.
Here’s a list of all the problems we were having in our smaller garage.
Better tool storage

Rich had tools stored in three different toolboxes and several tubs.
This made it difficult to find what he needed without having to search.
Utilize a wall-mount hardware storage cabinet
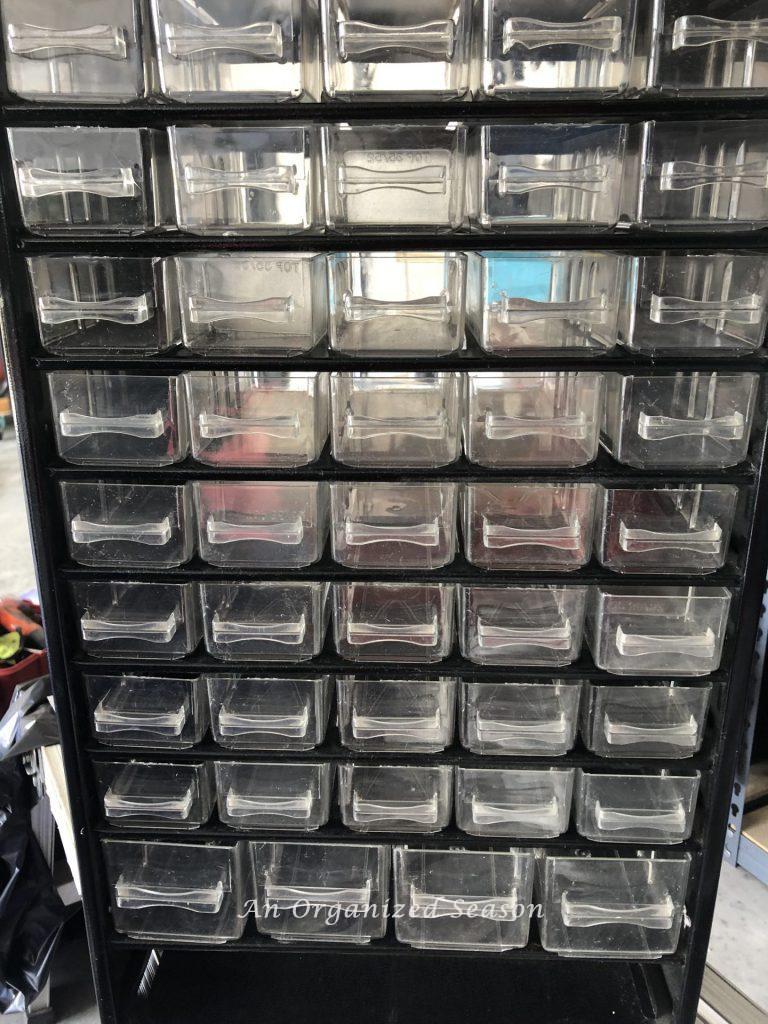
Rich had a storage cabinet for nails and screws that he had never used.
I told him it would be so much easier to find a particular size screw or nail if he would utilize this cabinet!
Relocate shelf
We brought five sets of metal shelves that we previously used in our basement to the garage.
We set them up along two walls of the garage. Unfortunately, we can’t get around our SUV to get access to the shelves.
So we need to move one set of shelves to a new location.
I wish I had taken a picture of how close we had to park to the shelf, so you could see what I mean!
Storage for lawn tools

We had our lawn tools stored in two mattress boxes.
When we removed the mattresses, I saved all of the plastic to use for tarps when I’m painting.
So the third box was full of plastic tarps, I needed to find a home for!
Battery storage

We relocated the shelf that was on this wall.
Now, we need to relocate the batteries that were sitting on the shelf.
Isn’t it amazing how one action leads to another!!
Oh well, when we find a new home for them, I’ll be sure to conceal all of those cords!!
Parking aid

Since the garage is small, the SUV has to be parked in a specific spot so you can open the driver’s side door.
This also allows you to walk entirely around the SUV for access to the rest of the garage.
In Kentucky, Rich had rigged a practice golf ball on a string and hung it from the ceiling to make sure I didn’t hit the built-in wooden shelves.
So, I wanted him to do the same thing here, to make sure the car is parked in the correct spot.
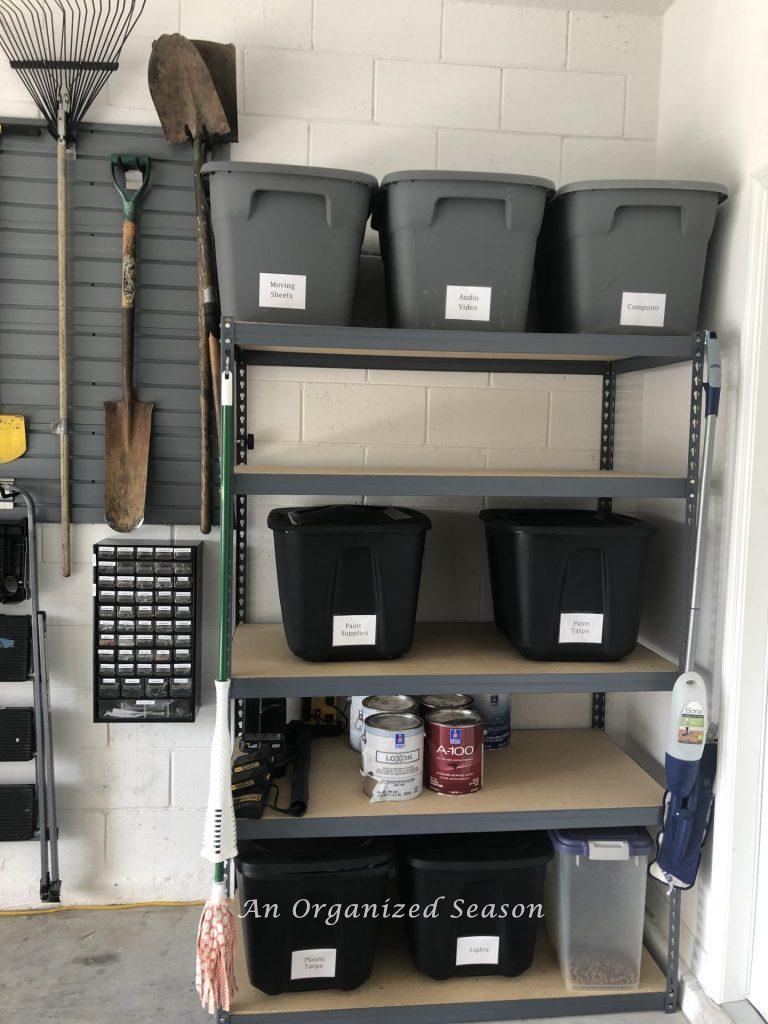
Better labels

In KY, I used my handy little label maker to make labels for each plastic tub.
Unfortunately, they faded, and some peeled off.
I need a label that will stick to the tub but can be changed if required.
Switch to matching tubs

You may laugh and not think this is a problem, but for me, it is, lol!!!
We were using several different color tubs.
You see, I like things to match and look nice.
So, I’m hoping to switch these out!
How we solved the problems
Purchased a workbench to hold tools
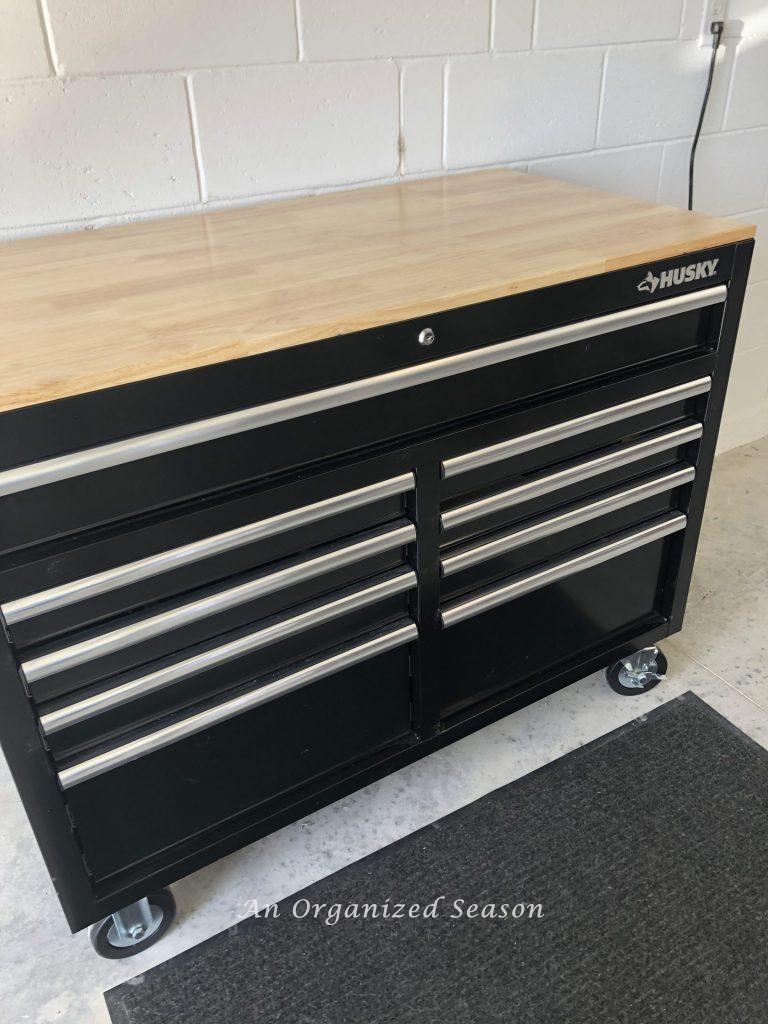
Rich purchased this mobile workbench with a deep tool chest to store the majority of his tools.
I have so many DIY projects that I want to do in this house that this workbench will be invaluable!
Filled the hardware storage cabinet

Oh my gosh!!
We worked approximately 4 hours organizing all of his nails, screws, and small items in this hardware cabinet!
I should have taken a picture of all the empty containers that he had been using compared to this organizational wonder!
This takes up one-quarter of the space!!
Bought a wall organization system to store yard tools
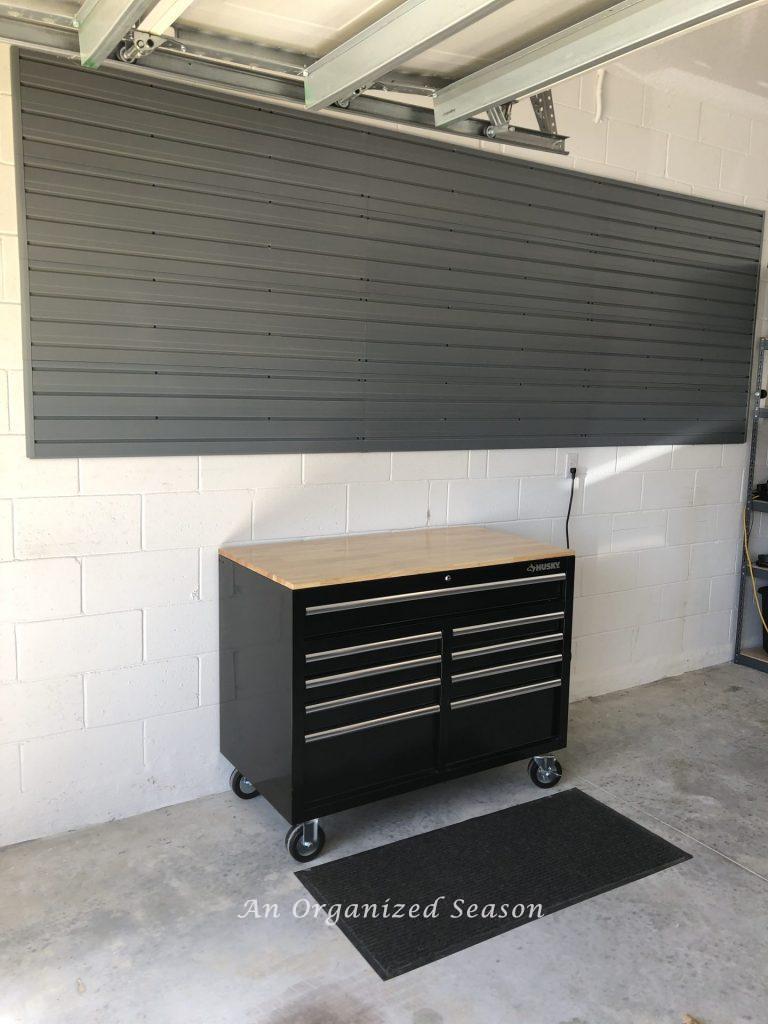
Rich purchased and installed Flow Wall storage panels to store our lawn tools.
It’s a modular garage wall panel storage set that came with a 15-piece accessory kit from Home Depot.
Click here to see a DIY post on how to install this yourself!
Relocated the batteries
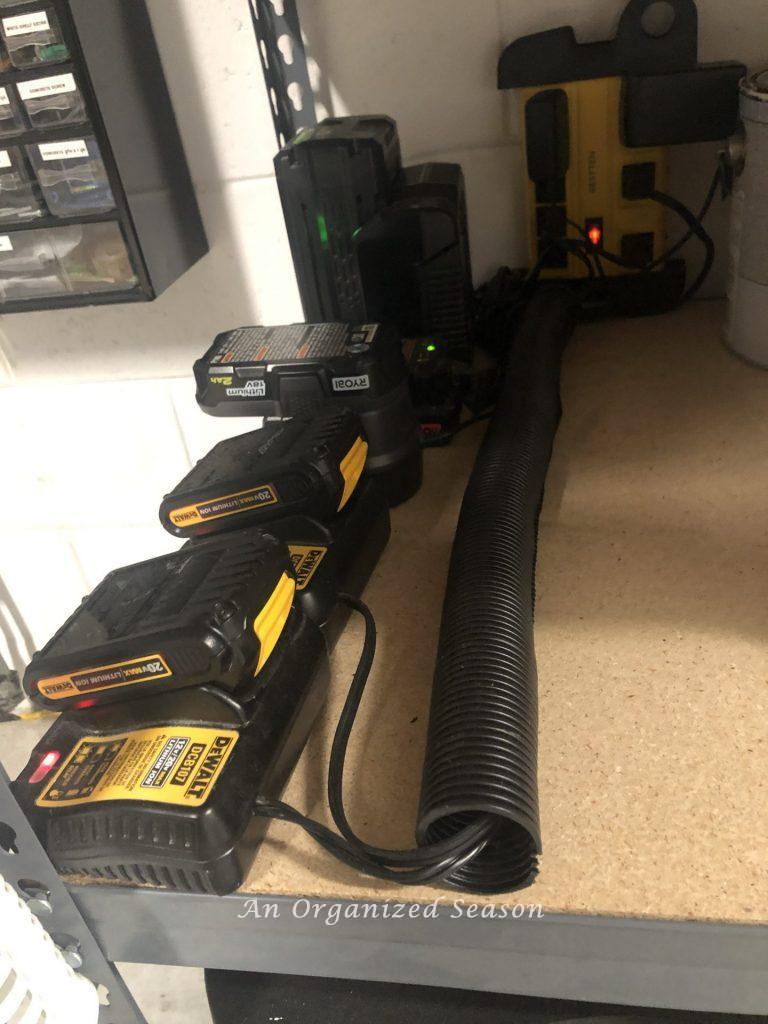
We relocated the batteries to this shelf and concealed all of the cords with this black tube.
Now they are easy to access and look so much better since the cords aren’t in a massive jumble!!
Purchased small tubs for wire shelves on the wall unit

These shelves provide extra space to organize smaller items.
I purchased the storage tubs from Walmart.
We actually have two empty shelves and four empty containers.
It’s always a good idea to leave some space empty for future storage!
Steps to garage organization
Here are the steps we used to organize items in the garage.
Now the cars and all of our stuff actually fit, and we know exactly where to find an item when we need it!
It is such a relief to have this job done!
Organized tools in The new Husky

Now, when Rich needs a screwdriver or a tape measure, he knows exactly where to find them!!
Hung hardware storage cabinet

I’m so excited because next time I need to hang a picture, Rich will easily find the right size nail or screw!!
Relocated Shelf
At first, I wasn’t happy about moving this shelf away from the others.
I didn’t think I was going to like how it looked, but I was pleasantly surprised.
It’s fine, and the garage functions so much better that now I’m glad we moved it!
Organized Lawn Tools on New Wall Unit
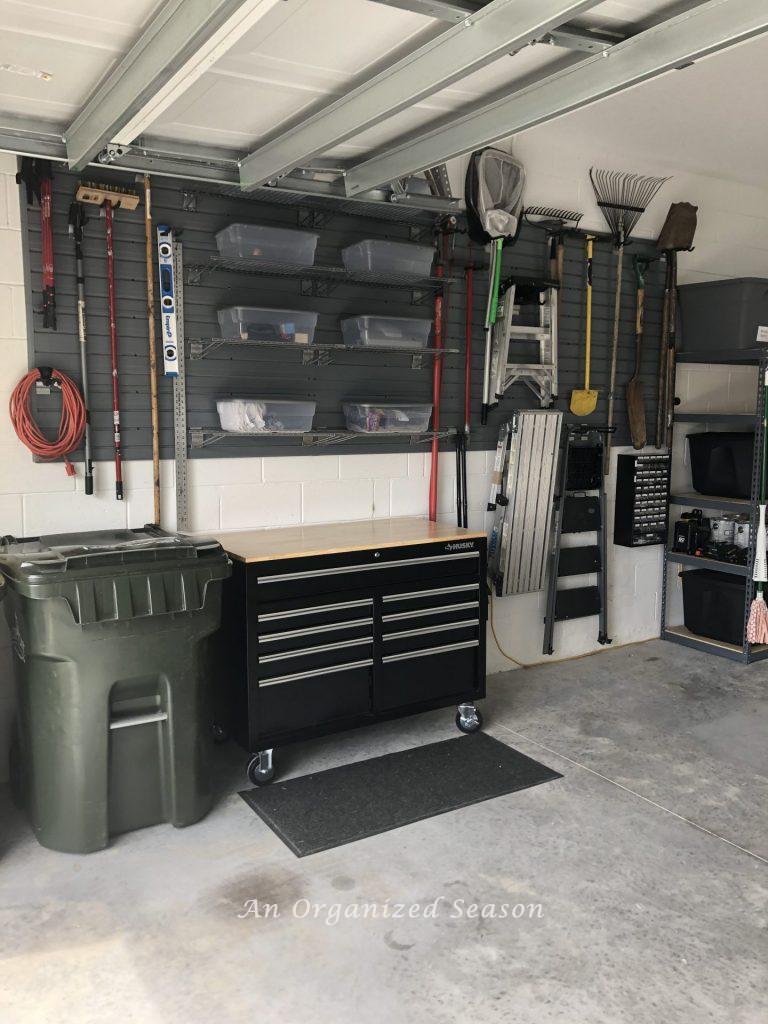
This is my favorite part of the garage transformation!
I love how it looks and functions.
The best part is that we can move the hooks and shelves around if our needs change.
Switched Tubs
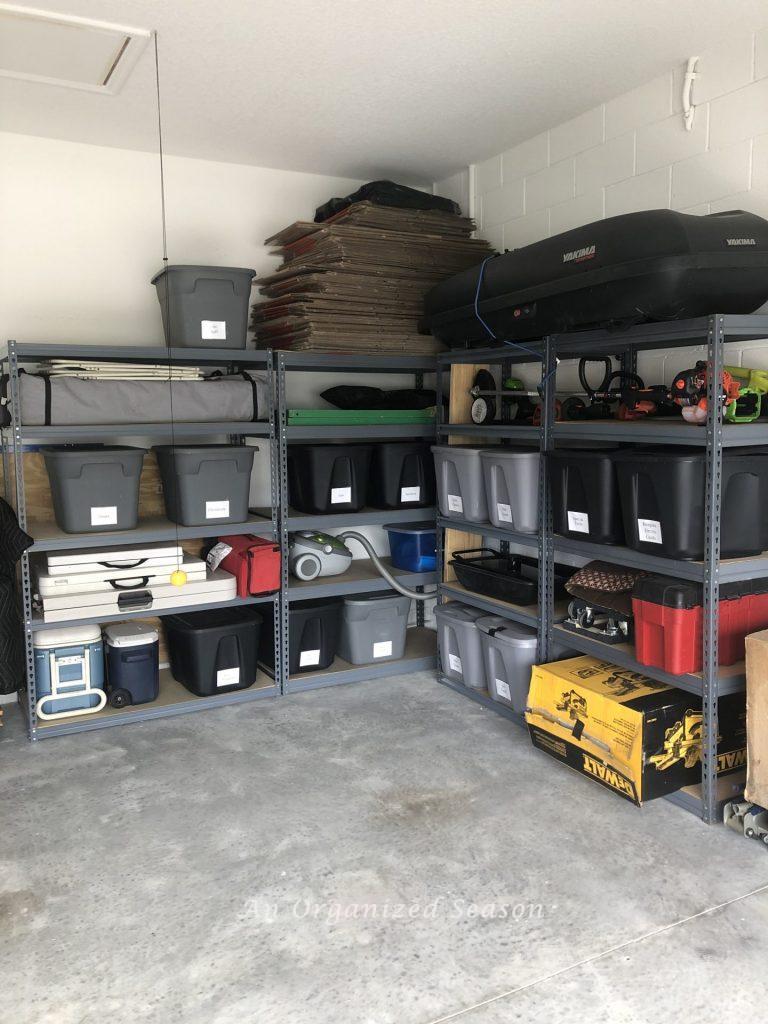
I asked Rich if we could switch and use black tubs instead of the blue and green ones.
He agreed, but we had so much stuff that we had to use gray tubs, as well.
I was totally okay with that since the new organization unit we purchased was black and the other gray!
Now, I have a color-coordinated garage that’s so much more pleasant to look at!
New Labels

We purchased these self-adhesive card pockets from Amazon.
I’m excited because they adhered well to the tubs.
The labels slide inside the pocket, so if we switch what’s in the tub, I can easily switch the label.
I’ll let you know next year how they held up!!
Added Parking Aid
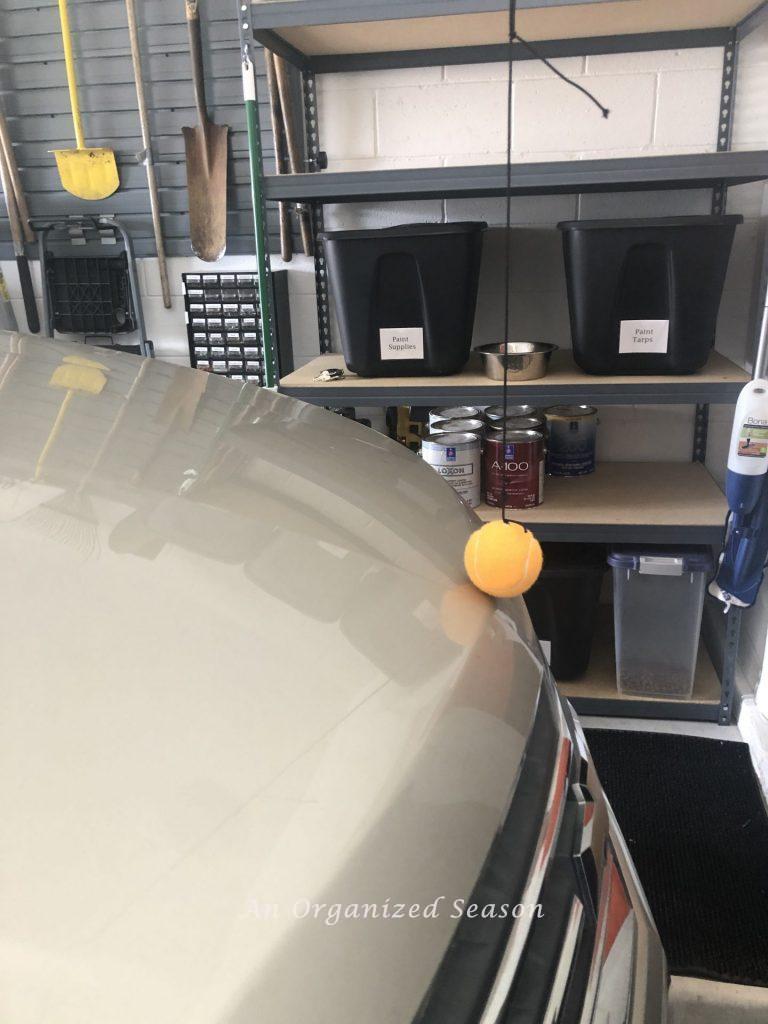
I love this so much because I don’t have to open my door to make sure I am parked in the exact right spot!
I just pull in, tap the ball, and put the car in park!!
Final Thoughts
Wow! I know that was a lot of information, but I hope it gives you inspiration to tackle your garage!
I feel like we’ve made garage organization simple by breaking it down into six easy steps.
So what are you waiting for?
Are you excited to get started? Let me know in the comments below!
If you enjoy the blog, please sign up for our email list so you won’t miss a post!
Until next time, follow us on Pinterest, Facebook, and Instagram!
Blessings, Donna and Rich
More Inspiration
Need more organizing inspiration? Check out these posts:
- How to Start Decluttering When You’re Overwhelmed
- Dining Room Organization Tips
- Practical Jewelry Organization Ideas
- How to Organize Dresser Drawers
- Best Bathroom Closet Organization Ideas
Pin It For Later
Don’t forget to pin the image below to one of your Pinterest boards (hover over the picture and click the red Pin button in the top left corner).

Related Posts:


**Some of the links in this post are affiliate links. This means if you click on the link and purchase the item, we will receive an affiliate commission at no extra cost to you. We appreciate your support. (disclosure policy)
What if you can’t afford panelled wall systems to hang tools, etc.?
Consider adding a piece of wood like a 1X4 to your garage wall and hang items from hooks or nails! If any stores in your area give wood pallets away, you can make garage storage out of those! Hope that helps!