Valentine’s Day is just around the corner, and there’s no better way to set the mood than with beautiful, budget-friendly decor! Whether preparing for a romantic evening or celebrating the season of love with family or friends, this DIY project using Dollar Tree wall tiles makes the perfect DIY Valentine’s Day decor!
I enjoy decorating for every holiday, but I don’t want to spend much on high-end decor!
**Some of the links in this post are affiliate links. This means if you click on the link and purchase the item, we will receive an affiliate commission at no extra cost to you. We appreciate your support. (disclosure policy)
So, instead, I challenge myself to make decor from inexpensive items!
Dollar Tree is one of my go-to places to buy items to makeover!
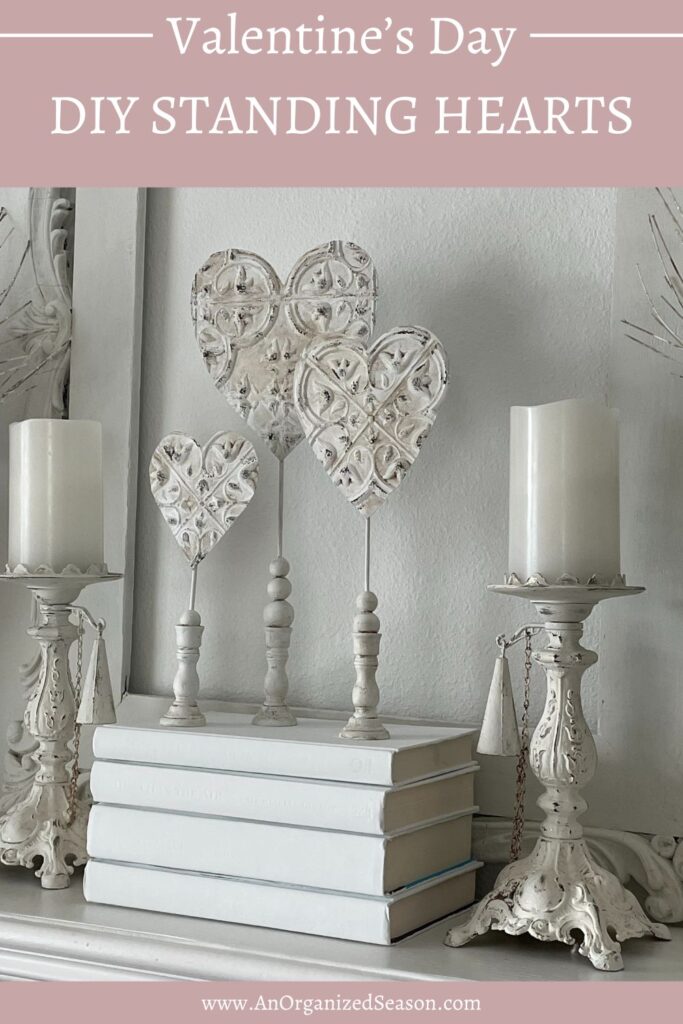
Today, we’ll use their vintage-inspired wall tiles to make a standing heart set!
And here they are!

I’m thrilled with how they turned out and excited to add them to my Valentine’s Day decor!
If you’re looking for ways to celebrate, you’re in luck!
Today, I’m joining the “Celebrate The Holiday Blog Hop”- Valentine’s edition, so you can be inspired by what my friends are doing for this special Day!
Thanks to my friend Carol from Bluesky at Home for hosting this inspiring blog hop!
If you’re coming from Master Pieces Of My Life, don’t you think Mary Jo’s Valentine’s decor is fabulous?
If this is your first time visiting An Organized Season, welcome! We are so happy to meet you! We are a husband-and-wife team sharing how we’re turning our builder-grade home into a place we love! Each season, we host a home organization challenge, decorate our house, and create budget-friendly DIY projects to make our dream a reality! We hope to inspire you to create a home you love, too!
Be sure to visit all the blogs at the end of this post for inspiring ways to celebrate Valentine’s Day!
Steps to Make Standing Heart DIY Valentine’s Decor
Gather

Gather or purchase the following items to complete this project:
- Self-adhesive wall tiles- Dollar Tree
- Card stock
- Wooden skewers
- Wood beads (3 sizes)
- Wood candlestick 1/2” hole
- Wood glue
- Miter shears
- Thin marker
- White Paint-Waverly White
- Paintbrush
- Clear wax– Annie Sloan
- Brown wax– Valspar Dark Satin Acrylic Antiquing Wax
- Wax brushes
- Lint-free paper towels
- Dark gray or black paint- Annie Sloan- Graphite
- Hot glue gun & glue sticks
- Silicone finger protectors
Prep
At Christmastime, Rich and I made unique Christmas trees from scrap wood trim pieces and used wooden candlesticks for the bases.
I had three candlesticks left over and thought they would work great for the bases of my heart stands.
So, I decided to make a template first to see if my idea would work!
Make templates

First, I made heart templates from cardstock.
I traced the inside of a Dollar Tree heart wreath for the largest heart and a cookie cutter for the smallest heart.
I had nothing to use for the medium heart, so I folded a piece of cardstock in half and drew a heart between the large and small sizes!
Next, I taped beads and a skewer to each candlestick and then taped the heart template to see if I liked the idea!
It appears that this will work, so let’s carry on with the project!
Glue beads and skewer to candlestick

Place a small amount of wood glue around the edge of the candlestick.
Press the bead into it, ensuring the hole is straight up and down.
Place the skewer inside the bead to correctly line it up.
Let dry.
Use two beads for the medium-sized stand and three for the large stand.
Prepare tiles
Put your heart template over the tile and draw around it with a thin black marker.
Cut out the hearts.
Note that the sticky white backing will fall away.
Paint

Paint the hearts and the candlesticks white.
Let dry.
Continue this step until you get the coverage you like.
I did three coats.
Distress

I sanded the heart so that the silver would show through.
Unfortunately, it’s too faint, so I will add more distressing with paint instead.
You can skip this step!
Antique with wax

Cover each heart with clear wax.
Then, put the brown wax over it and wipe it off with a lint-free paper towel.
Do the same thing to the wooden stands.
*Tip- don’t forget to use clear wax first; it makes it easy to remove the brown wax and keeps it from getting too dark!
Distress with paint

Since the first distressing technique did not work, I will distress with paint instead!
I’m using a brush that’s flat on the bottom.
Dip it into the paint and blot the excess onto a paper towel.
Dab the paintbrush onto the high points of the tile.
Now, the hearts look like they were made from antique tin tiles!
Assemble the heart stands
Cut the wooden skewers

Lay a ruler on your table and put the base over the ruler.
I placed the smallest heart one inch from the wood bead and used a pencil to mark the skewer at the top of the heart.
Then, I used miter shears to cut the wood skewer on the pencil mark.
I measured two inches up the skewer for the medium stand and three inches for the tallest stand.
Adhere the hearts

Use a hot glue gun to adhere the hearts to the skewer.
Be careful when using a glue gun because the glue is very hot and can burn you.
We recommend using silicone finger protectors.
Display Your DIY Valentine’s Day Decor

I’m showcasing the standing hearts on our mantel!

They look fabulous next to our white vintage-inspired candle holders.

If you need DIY Valentine’s Day decor, I hope you’ll try making these vintage-inspired heart stands!
Conclusion
And there you have it—gorgeous, budget-friendly Valentine’s Day decor made from something as simple as Dollar Tree wall tiles!
This project proves you don’t need to spend a fortune to create something unique and beautiful for your home.
Whether you use these pieces to decorate your mantel, create a festive centerpiece, or give them as gifts, they’re sure to bring a touch of love to your celebration.
Now, head to Sweet Valley Acres and see Crystal’s Valentine’s Day tree; it’s a trend you don’t want to miss!
If you enjoy the blog, please sign up for our email list so you won’t miss a post!
Blessings, Donna and Rich
More DIY Valentine’s Inspiration
If you loved this post, you’ll want to check out these other Valentine’s Day DIY projects we created:
- Simple Paper and Heart Ribbon Garland
- Dollar Tree DIY Heart Topiary
- Cute and Easy Valentine’s Hearts
- Craft a Valentine’s Heart Wreath From Yarn
- Create a Pretty Valentine’s Pillow
Pin It For Later
Don’t forget to pin the image below to one of your Pinterest boards (click the red Pin button in the top left corner).
Celebrate The Holiday Valentine’s Day Blog Hop

Click each link below to see what my creative blogging friends are doing for Valentine’s Day!


**Some of the links in this post are affiliate links. This means if you click on the link and purchase the item, we will receive an affiliate commission at no extra cost to you. We appreciate your support. (disclosure policy)
Donna, these are adorable! Pinned!
Thanks so much Cindy! I love how they turned out!! You’ll have to make some, they would look fabulous in your house!!
These are so pretty, Donna! I swear you find the most amazing things at your Dollar Store. I love that this budget friendly project can be left out year round and to help make Valentine’s Day extra special too. Hugs, CoCo
Thanks friend! It’s amazing how many great things you can craft with at the dollar stores! Such a great way to decorate for the holidays with out spending a lot!!
Such a brilliant idea! I saw these tiles at the dollar store and wondered what fun thing I could create with them and now I know! So cute!
Karin
Thanks Karin! You have to get some tiles and let me know what you make out of them! Thanks again, Donna
These are adorable Donna! What a great idea, and easy on the pocketbook!
I’m so glad you like them! I thought they turned out great! Nothing better than pretty decor that looks expensive but isn’t!! Thanks so much!
Morning Donna! These are so cute and simple but striking for the holiday! I’m forwarding this to my crafty daughter and her kids who are also for a Valentine project to make for their home. Pinned too.
Hi Linda! Thanks so much! I appreciate you sharing this with your family and thanks for pinning it too! Have a great day!
Omgosh I love how these turned out Donna. Would you be surprised if I told you I’m working on a very similar project? Lol. I’m not. So fun to share with you today friend. XO- MJ
That would not surprise me one bit, since we seem to like many of the same things! Can’t wait to see what you’re up to! Have a wonderful day!
What a great Valentine’s craft, Donna! I love their beauty, sweet nod to Valentine’s Day, and their simplicity! Now I’m scheming up ideas for those affordable tiles. Thanks for sharing!
Thank you Kristy! Those tiles can be used to make so many pretty and inexpensive items! I bet you can up with a fabulous way to use them! Thanks again!
Wow Donna you are amazing! I love this project and that the items were from the Dollar Store. No one would ever guess!!! I love how you decorate.
You just made my day Crystal! I love making pretty decor without spending big dollars! Thank you so much!
These are so cute Donna, and they match your home decor perfectly! You always come up with the best ways to use these tiles, you’ve inspired me to pull the ones I have in the basement out to see what I can make. Hope you have a Happy Valentine’s Day!
I can’t wait to see what you make with them! They really are fun to create with! Have a wonderful day!
Donna,
I love a good Dollar Tree craft; this one turned out so pretty!!
Thanks a bunch Libbie, they were so fun to make!
Hi Donna! As always, your projects are simple with a big impact. Love this! Great for any holiday. Pinned!
You’re so kind Sue! Thank you so much! You’re right, those tiles will work for any holiday!
What a great idea and easy DIY! These are adorable!
Thanks so much Annemarie! I hope you have a fabulous day!
I haven’t seen these tiles at my local Dollar Tree but I will be looking for them. Such a creative way to think outside of the box and end up with a beautiful new decoration. Thanks for sharing the tutorial. This post will be a feature this week. #HomeMattersParty
Hi Donna! At my Dollar Tree they do not put these in the craft section, they are near automotive stuff, which makes no sense to me! Anyway, thanks for sharing, it’s always a treat to be featured at your party! Thanks and I’ll see you there!