Want to paint your furniture, but fear is holding you back? See how I painted my kitchen table and chairs with chalk paint.
To say I was nervous about painting my table set is an understatement!
**Some of the links in this post are affiliate links. This means if you click on the link and purchase the item, we will receive an affiliate commission at no extra cost to you. We appreciate your support. (disclosure policy)
However, I decided to put my fears aside and try to transform this dining set.
I can’t wait to show you what they look like now!
Table and chairs before And After chalk paint
Here’s my brown, faded, kitchen table and chairs.

Can you believe what a mess they are??
This is what happens when you use a table meant for indoors on an outdoor covered deck for several years!!!
Now are you ready to see what my kitchen table and chairs look like after being painted with chalk paint?

Wow! Can you believe the transformation?
This project was so worth the time and effort I put into it!
Why Chalk Paint a kitchen table and chairs
I want to redo the table and chairs to make them look better, but I also want them to match the decor style I have chosen for the main living spaces in my new home.
Chalk paint can transform the style of your furniture
I am trying to achieve a French Country look rather than the rustic farmhouse vibe that they have now.
So, I painted them white and antiqued them with brown wax to make them look older.
It worked!
I think they look like something from a French cafe!!
Do you agree?
Chalk paint is easy to use
Chalk paint is so easy to use because you don’t have to sand your furniture before you begin.
One less step, especially one as messy as sanding, is a plus in my book!!
It will also cover metal!
Another difference between chalk paint and regular paint is that you have to give it a finish coat of wax to protect it.
If you want the piece to have an antiqued look you can use a dark or white wax instead of clear.
The waxing step is super easy, so don’t let that hold you back from trying this technique.
How to Choose Chalk Paint
Annie Sloan is the person who developed chalk paint and she patented the name.
Her brand is excellent, but also very expensive.
You can buy cheaper chalk-type paint at your local home improvement store.
No law says you can’t mix and match products.
Since I am new to chalk painting, I have decided to try different brands to figure out what I like best.
For this project, I am using Behr Chalk Paint in Farmhouse White.

Next, I’m using Annie Sloan Clear Wax and going over that with Valspar Antiquing Wax in Dark Satin.

supplies to chalk paint a kitchen table and chairs
Gather or purchase the following items:
- Product to clean furniture
- Tack cloth
- Drop cloth, plastic, or cardboard
- Chalk paint
- Paint key
- Stir sticks
- Paintbrush
- Clear wax
- Brush for clear wax
- Dark wax
- Brush for dark wax
- Lint-free rags or paper towels
STEPS TO CHALK PAINT A KITCHEN TABLE AND CHAIRS
PREP
- Clean the furniture- don’t leave this step out, you need to have a clean surface to start with. You can use soap and water or a product like Krud Cutter.
- Prep area- put down a tarp, plastic, or large piece of cardboard to protect the floor.

- Prep furniture- apply painter’s tape to any areas that you don’t want to get paint on.
- Remove dust- always use a tack cloth right before you paint to remove particles before you start to paint and in between coats.

PAINT
- Stir paint
- Apply by painting in different directions. You will get better coverage and texture if you apply going in different directions.
- Follow product instructions for how much time to allow between coats It will usually take more than one coat and possibly 3 to 4 coats if going over a dark color with a light color.
Here’s an example of how to apply the paint in different directions.

Here are the four chairs after the first coat of paint.
It always looks terrible and I have to remind myself that it will be okay after a couple of more coats!!

The table looks even worse after its first coat lol!!!

It took three coats of paint to get good coverage.
Here is a picture of two of the chairs showing the difference between the second and third coats.

Here are the table and chairs after three coats of paint!!
The finish finally looks even and there is no sign of brown peaking through.

WAX
I could have left the table white and just used a clear wax on it.
However, I want this table to have an antique finish, so I will be adding dark wax on top of the clear.
Here is the brush I used to apply the clear wax.

- Apply a thin coat of clear wax, in a small area, going in every direction.
- Wipe away excess with a clean white cloth or lint-free paper towel.
- Apply dark wax to the same area and wipe off excess.
- Continue this process until the entire piece is covered.
I applied the wax to the metal parts of the chairs, beginning with the clear and then dabbing the dark wax sporadically.

It leaves dark brown areas inside the crevices and darkens all of the white paint it touches.
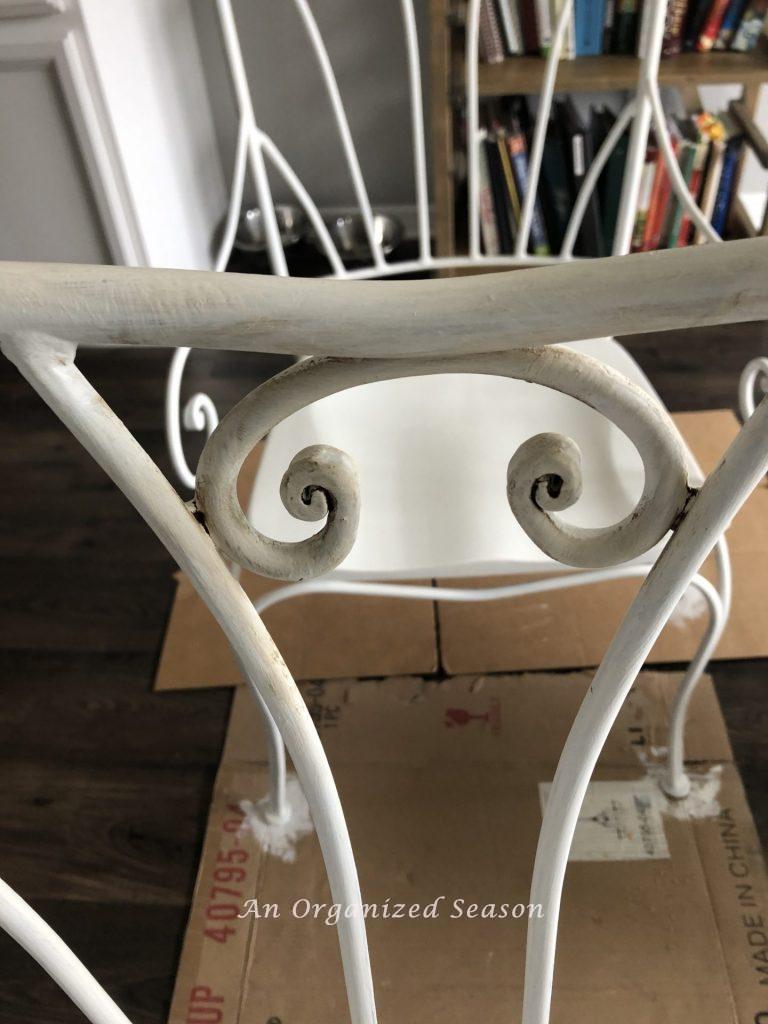
When all of the metal was waxed, I moved on to the wood.
This was the part that scared me the most.
It’s easy to use dark wax on furniture that has lots of indentions but I find it harder to apply to flat surfaces.
It’s just going to take more practice to become comfortable with this part.
Below is a picture of how I started to apply the wax.

At first, I only put the wax on the highest parts of the wood, as you just saw in the picture above, but then decided I wanted it darker and ended up putting it everywhere.
The next picture shows the difference between a chair with wax and one without.

When the chairs were finished I moved on to the table.
I was very nervous but I worked in small sections and I love how it turned out.
Sure looks like a hot mess when you first apply the dark wax.

Once you wipe it off, it looks so much better!
See what I mean, look at all that texture!!

In Conclusion
Here we have the finished project.

Not too bad for my first big furniture makeover.
I know I still have a lot to learn but this makes me very excited to try it again!
I have several large pieces of furniture I want to paint!!
Now look at the kitchen set after adding decorations to the room.

I hope you enjoyed seeing how I painted our kitchen table and chairs with chalk paint!
Do you think I achieved the French Country look I was going for??
If you enjoy the blog, please sign up for our email list so you won’t miss a post!
Until next time, follow us on Pinterest, Facebook, and Instagram!
Blessings, Donna and Rich
More DIY Inspiration
- How to Build a Shelf with Corbels
- Eat-in Kitchen makeover
- Beautiful Dining Room Makeover
- Amazing Table Set Makeover with Paint and a Stencil
- Four Beautiful Living Room Table Makeovers
Related Posts:


**Some of the links in this post are affiliate links. This means if you click on the link and purchase the item, we will receive an affiliate commission at no extra cost to you. We appreciate your support. (disclosure policy)
Beautiful. You have inspired me to possibly to try chalk painting.
Foaling season is about to begin with the first foal due in a couple of weeks, so I’ll be getting busier. Also Jeanette is about ready to open her B & B. I have volunteered to serve for her, if she cooks.
However, I really like what you have done and I want to try it.
I love your posts.
Bev
Thank you Bev! Sounds like you’re super busy but when things slow down you should definitely try chalk painting. It is easy to use and can completely transform a piece of furniture! You are so creative, I think you would really enjoy it!
Donna, this turned out so well! I’ve always wanted to try chalk paint and have a table that I can try it on and your post inspired me to try it. I will be a nervous wreck though! Lol
Hi Kristi! You should go for it! Just remember it always looks terrible after the first coat of paint lol! Good luck!
Great job!! Your instructions are wonderful along with the pictures. I have afraid to start a project to chalk paint an old style entertainment center that my tv sits on top of in my bedroom. I have had all the materials to start but like you said you were scared to start. You have pushed me in the direction of just do it!! You did a lovely job. Thanks. You
I’m glad you enjoyed the post and I hope you get started on your project soon! Don’t let fear stop you! Thanks again, Donna
Such an awesome blog! All the information provided by you is really very helpful for all. By using tack cloth you can keep your project dust-free and it is useful for cleaning fine dust off a surface and gives you a smooth finish. Keep Posting! Keep Sharing!
Thank you for your kind words! A dust cloth is a necessity when painting furniture!