
Hi friends! Guess what, it’s still Winter, which means I’m still organizing the working zone of my home. If you’re new to the blog and don’t know what that means click here. It explains how I organize my entire house each year by focusing on one zone per season!! This week I’ll be sharing how to organize your kitchen pantry. Whether you have a walk-in pantry or use a kitchen cabinet to store your food, size doesn’t matter. What does matter is that you can look into your pantry and know exactly where to find an item or easily see if it needs to be replaced.
Table of Contents
**Some of the links in this post are affiliate links. This means if you click on the link and purchase the item, we will receive an affiliate commission at no extra cost to you. We appreciate your support. (disclosure policy)
6/P Strategy to Organize Your Kitchen Pantry
The 6/P strategy makes organizing your pantry very simple. Just follow these six steps that start with the letter P and you’ll be organized in no time! The steps are: Prepare, Purge, Polish, Personalize, Place and Put back. If you’d like more details on the 6/P Strategy click here.
Prepare
Bring a trash bag, a cardboard box, and a laundry hamper into your pantry. Clear everything off of your kitchen table.
Purge
Remove everything from the pantry and sort all items into one of the following categories:

- Trash-place all expired or unwanted food in the trash
- Donate-place any non-perishable food you want to donate into the cardboard box
- Relocate-put any items that don’t belong in the pantry into the laundry hamper
- Replace-place any items that need to stay in the pantry on the dining table and group like items together
Here are some examples of how you might want to group your food items: canned goods, baking supplies, bottled beverages, breakfast items, snack foods, bread, potatoes, onions, pasta and sauces, you get the idea! It’s important to always save room on a shelf or have an empty container for back stock.
Polish
The pantry is empty, so let’s get it clean by starting at the top and working your way down to the bottom!!
Personalize
Everyone’s pantry will be different based on the number of people in your family and your food preferences. Ask yourself the following questions to help you determine the best way to personalize your pantry:
- How does the space need to function for my personal needs? Will I only store food or do I need to store appliances here as well?
- What is causing clutter in this space?
- What are the necessary items I need to put back into the space? How many categories of food do I have?
- What items do I need to make or purchase to contain the items in my categories? Do I have any boxes, bins, plastic containers, or food storage containers that I can use?
- How can I beautify the space?
If you would like to use the handy printable in the pic below to help you work through this step, just sign up to receive our weekly email. When you join the email list you can gain access to our free printable library.

PLACE
You’ve determined how you’re going to personalize your pantry and now it’s time to place items back inside in an organized manor.
- Discard the trash bag you filled up!
- If you have food to donate, don’t wait around, take it to the food pantry nearest you!
- If you have items that belong in another room, deliver them now.
- Replace the items on your dining table into the pantry in an organized manor. Be sure to label any bins, boxes or containers you use so everyone knows what belongs inside!!
Put Back
If you put in the effort to organize your kitchen pantry, then you must train yourself, and all of your family, to put items back where they belong. After grocery shopping, immediately put all of your purchases in the location you designated they should go.
HOW I ORGANIZED MY kitchen pantry
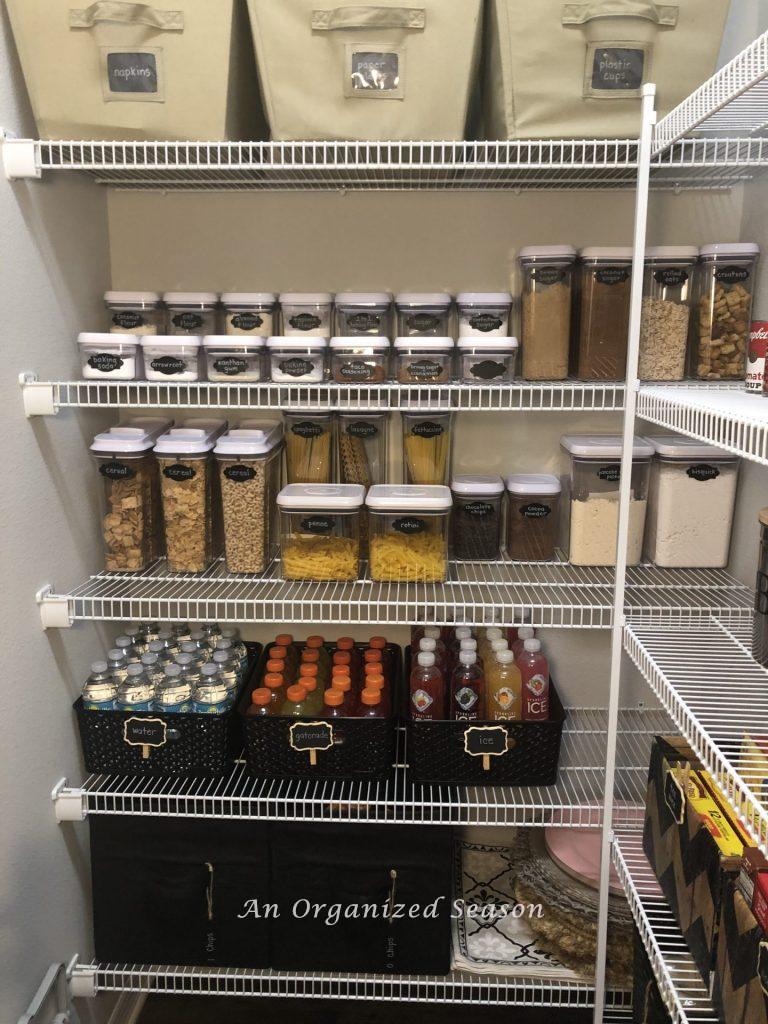
On the right side of the pantry I have one shelf dedicated to canned goods. On the shelf below that I have cute containers with dog treats, black plastic bins holding snacks and oatmeal and two wrapped boxes holding popcorn and several types of breakfast bars.

The two bottom shelves on the right side hold wrapped boxes filled with pasta sauce, crackers, rice, noodles and items for “Tex Mex Tuesday” meals and plastic bins containing potatoes, onions, bread and back stock.

On the far wall I have two shelves that hold OXO containers filled with baking supplies, pasta, and various cereals. I love these containers and collected them for several years. Definitely worth the money!!

I am currently using two types of fabric containers to hold various items. The olive colored bins, on the top shelf, contain paper plates, cups, and napkins. On the bottom shelf, one black container holds unopened bags of chips and the other holds the bags that have been opened.

HOW I PERSONALIZED MY kitchen pantry
Fix shelves
When we moved into the house, I immediately noticed that the shelves in our pantry were uneven. It drove me crazy because I am very “OCD” about things like that!! Fortunately, it was an easy fix that Rich could take care of! Notice in the picture below how the shelves are uneven.

Rich to the rescue!! He had to unscrew each shelf and then drill a new hole to even them up. Here’s the after picture! Nice and even now!

wrap boxes in paper
Here’s a great tip if you don’t have room in the budget to buy plastic containers to store food. Just get a box and wrap it in paper that matches your decor. I found this paper at Hobby Lobby many years ago and I’m still using these boxes today. Very easy and cheap DIY project!

new labels
Labeling is such an important step in this space, because all of the family has access to this area. If you don’t have your containers labeled, no one will know where to put things back. You might not even remember yourself! Don’t make the same mistake I did and use whatever labels you have on hand, even if they don’t fit. So, I’m re-doing mine now. You can see in the pick below how the labels are peeling off because they are too big for the container I put them on.

To solve the problem, I bought smaller labels. It was time consuming to switch them all out but I think they look much better. Notice the difference between the larger and smaller labels on the back row!

new black bins for beverages
Bottles do not like to stand up straight on these type shelves. To solve the problem, I purchased three black plastic bins to hold them.

I hope this gives you some great ideas to organize your kitchen pantry. If you’re wondering why you should take the time to do a project like this, click here to check out a post that discusses the perks of organizing your kitchen pantry. You can also see the difference between the pantry in my old Kentucky home (that had pull out shelves) and the one I have now (that is a walk-in)!
Also follow us on Pinterest, Facebook, and Instagram!
Blessings, Donna and Rich
Recommended PRODUCTS


**Some of the links in this post are affiliate links. This means if you click on the link and purchase the item, we will receive an affiliate commission at no extra cost to you. We appreciate your support. (disclosure policy)
Leave a Reply